
One Bar Oakensoul Builds for all Classes in ESO
ESO’s One Bar Oakensoul Builds are easy and fun to play, yet provide a surprising amount of damage. With easy rotation, no bar swaps, and no light attack weaving.
This One Bar Oakensoul Build leaves you free to pay attention to everything else going around and enjoy the game. And with all the buffs Oakensoul Ring has, both the damage and your survivability will be high.
Table of Contents:
Gear Setup 1
Gear Setup 2 Beginner
Champion Points
Resource Management
Rotation
Classes Skills
Arcanist
Dragonknight
Necromancer
Nightblade
Sorcerer
Templar
Warden
Buff Food
Mundus Stone
Race
Potions
Passives
Attributes
Tips for playing solo
Update Log
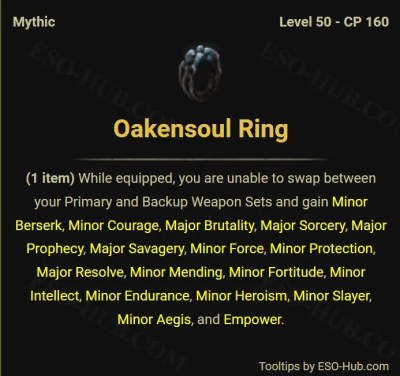
Oakensoul Ring Mythic Explained
Here is a quick explanation of the Oakensoul Ring and why it is so strong. The Oakensoul Ring provides multiple major and minor buffs to your character that you would otherwise need to get from other sets, skills, potions or from your group. The downside is it restricts you to one bar only, but that is not an issue with one bar builds.
With Major Brutality, Savagery, Prophecy, and Sorcery, you don’t need weapon and spell power potions. That’s why tristat potions or even just health potions will be enough. This makes the build a lot less expensive to maintain. Permanent Empower boosts your heavy attacks and Minor Heroism gives you ultimate even if you are not attacking. Just to name a few buffs.
The sheer number of offensive and defensive buffs you get from Oakensoul makes this the optimal mythic for one bar heavy attack builds.
Gear – One Bar Oakensoul Build for ESO
Here is a quick example of what the stats look like on a One Bar Oakensoul Build in ESO. The stats below are taken from a Sorcerer One Bar Oakensoul Build. The numbers will be similar on the other classes.
Gear Setup 1
For a one bar heavy attack build Sergeant’s Mail is the go-to set. This provides a lot of damage, especially if you can keep the stacks up. Keep heavy attacking, and the stacks boost your damage. The second powerful set is Storm Master. This also increases your damage when heavy attacking.
However, there are some alternatives to Storm Master. Another strong set instead of Storm Master is Deadly Strike, which drops in Cyrodiil. You might have to do PVP to get it or buy it from guild stores. Deadly Strike provides a huge buff to your damage over time and channeled skills. Due to hybridization medium armor is preferred but if you are willing to use light armor Noble Duelist’s Silks is a good third option instead of Storm Master.
With a one bar setup with a mythic and two sets, there is one slot left. Slimecraw monster set gives you the most crit chance with one piece. If you are playing solo you might need more penetration. You can use Valkyn Skoria instead of Slimecraw, or use Sharpened trait on your lightning staff. Head and shoulder pieces are interchangeable. This means you can slot Slimecraw shoulders and Storm Master helmet or the other way around.
Gear
Set
Weight
Trait
Enchantment
Chest
Sergeant’s Mail
Heavy
Divines
Magicka
Belt
Storm Master
Medium
Divines
Magicka
Shoes
Storm Master
Medium
Divines
Magicka
Pants
Storm Master
Medium
Divines
Magicka
Hands
Storm Master
Medium
Divines
Magicka
Head
Slimecraw
Light/Medium
Divines
Magicka
Shoulder
Storm Master
Medium
Divines
Magicka
Necklace
Sergeant’s Mail
Jewelry
Bloodthirsty
Increase Physical Harm
Ring
Oakensoul Ring
Jewelry
Bloodthirsty
Increase Physical Harm
Ring
Sergeant’s Mail
Jewelry
Bloodthirsty
Increase Physical Harm
Weapon 1
Sergeant’s Mail
Lightning
Precise
Poison/Flame
Where can I get the gear?
Slimecraw: veteran Wayrest Sewers I, Undaunted Enclave
Valkyn Skoria: veteran City of Ash II, Undaunted Enclave
Sergeant’s Mail: Wayrest Sewers I & II
Storm Master: Tempest Island
Deadly Strike: Cyrodiil, guild stores
Noble Duelist’s Silks: Blessed Crucible
Gear Setup 2 Beginner
If you do not have Slimecraw yet you can use one piece of Druid’s Braid or Armor of the Trainee until you get one.
Gear
Set
Weight
Trait
Enchantment
Chest
Tharriker’s Strike
Medium
Divines
Magicka
Belt
Order’s Wrath
Medium
Divines
Magicka
Shoes
Order’s Wrath
Medium
Divines
Magicka
Pants
Order’s Wrath
Medium
Divines
Magicka
Hands
Order’s Wrath
Medium
Divines
Magicka
Head
Slimecraw
Medium
Divines
Magicka
Shoulder
Order’s Wrath
Medium
Divines
Magicka
Necklace
Tharriker’s Strike
Jewelry
Bloodthirsty
Increase Physical Harm
Ring
Oakensoul Ring
Jewelry
Bloodthirsty
Increase Physical Harm
Ring
Tharriker’s Strike
Jewelry
Bloodthirsty
Increase Physical Harm
Weapon 1
Tharriker’s Strike
Lightning
Precise
Flame
Champion Points
Below you can find the Champion Points setup for this build. Work your way from top to bottom in your allocation. For more information on Champion Points, please visit the Champion Points Overview Page on ESO-Hub.com.
Hovering over each perk will give you insights into what it does. Presets are also provided for each of the allocations below.
Click the tab below to open the allocation.
Resource Management
With heavy attack builds resource sustain is not an issue. As long as you keep heavy attacking, you will not run out of magicka. The stamina skills have been selected to be long duration and only a few so you will have enough stamina for break free and roll dodge. The jewelry enchantments further improve stamina recovery, but it is fine to use Increase Magickal Harm glyphs.
Rotation
First cast any buffs and any pets you may have. When starting combat hold your heavy attack down and heavy attack cast skills one by one. Heavy attack casting is when you hold the attack button down and press a skill. The skill will be cast after the heavy attack channel finishes. Cast only one skill between heavy attacks to keep Sergeant’s stacks up. Reapply different skills when timers run out. Start casting an execute skill instead of heavy attack at 25%, if the build has an execute.
Class Skills for Oakensoul Build in ESO
Here are class specific skills and explanations what they do for our best ESO Oakensoul Build. In the explanation there are also alternatives, should you want to play solo content. The alternative skills sacrifice some damage for survivability.
Arcanist Oakensoul Build
Destruction Staff Mainbar
Slot 1: Elemental Blockade
Slot 2: Inspired Scholarship
Slot 3: Cephaliarch’s Flail
Slot 4: Pragmatic Fatecarver
Slot 5: Fulminating Rune
Ultimate: The Languid Eye
Skill explanation:
Elemental Blockade: This skill has longer duration than the Unstable morph. Used to proc Off Balance for the Exploiter CP.
Inspired Scholarship: Nice damage over time, boosts class skills, can generate a crux.
Cephaliarch’s Flail: Spammable, main crux creation. Also heals you.
Pragmatic Fatecarver: Use whenever you have three cruxes. Either morph works. The beam does very high damage. If maintaining full Sergeant’s stacks is difficult with long beam time, you can replace Sergeant’s Mail with any other aforementioned set instead.
Fulminating Rune: A long DOT.
The Languid Eye: Very strong class ultimate.
Dragonknight Oakensoul Build
Destruction Staff Mainbar
Slot 1: Elemental Blockade
Slot 2: Venomous Claw
Slot 3: Engulfing Flames
Slot 4: Eruption
Slot 5: Barbed Trap
Ultimate: Standard of Might
Skill explanation:
Elemental Blockade: This skill has longer duration than the Unstable morph. Used to proc Off Balance for the Exploiter CP.
Venomous Claw: A strong DOT. Switch to Burning Embers for the heal if playing solo.
Engulfing Flames: Applies a decent DOT and makes the enemy take more fire damage. Switch to Noxious Breath if more penetration is needed while playing solo.
Eruption: An AOE that does fire damage. This skill gets buffed by Engulfing Flames.
Barbed Trap: A hard hitting, long AOE that also gives boost to all damage through a Fighters Guild passive. Swap for Coagulating Blood if playing solo.
Standard of Might: This ultimate does fire damage and also buffs your damage and reduces damage taken.
Necromancer Oakensoul Build
Destruction Staff Mainbar
Slot 1: Elemental Blockade
Slot 2: Blighted Blastbones
Slot 3: Detonating Siphon
Slot 4: Unnerving Boneyard
Slot 5: Barbed Trap
Ultimate: Pestilent Colossus
Skill explanation:
Elemental Blockade: This skill has longer duration than the Unstable morph. Used to proc Off Balance for the Exploiter CP.
Blighted Blastbones: Huge AOE damage and creates a corpse.
Detonating Siphon: Long duration AOE. Swap for Mortal Coil for HOT and sustain when playing solo.
Unnerving Boneyard: Applies Major Breach and Minor Vulnerability to all enemies in the skill area, debuffing their resistances and damage taken. Also provides a Synergy.
Barbed Trap: A hard hitting, long AOE that also gives boost to all damage through a Fighters Guild passive. Swap for Hungry Scythe when playing solo.
Pestilent Colossus: Does increasing AOE damage and applies Major Vulnerability to enemies.
Nightblade Oakensoul Build
Destruction Staff Mainbar
Slot 1: Elemental Blockade
Slot 2: Twisting Path
Slot 3: Impale
Slot 4: Merciless Resolve
Slot 5: Barbed Trap
Ultimate: Ice Comet
Skill explanation:
Elemental Blockade: This skill has longer duration than the Unstable morph. Used to proc Off Balance for the Exploiter CP.
Twisting Path: An AOE that also gives you Major Expedition.
Impale: A strong execute skill at 25%. Also increases your Spell Critical through a passive. Swap for Healthy Offering when playing solo.
Merciless Resolve: Stacks increase your weapon and spell damage. At 5 stacks you can launch a spectral arrow for strong burst damage. Also increases your Spell Critical through a passive.
Barbed Trap: A hard hitting, long AOE that also gives boost to all damage through a Fighters Guild passive. Swap for Elemental Susceptibility for more penetration when playing solo.
Ice Comet: a powerful ultimate. Can use the other morph for more ultimate generation. Elemental Rage will work just as well.
Sorcerer Oakensoul Build
Destruction Staff Mainbar
Slot 1: Elemental Blockade
Slot 2: Summon Volatile Familiar
Slot 3: Summon Twilight Matriarch
Slot 4: Daedric Prey
Slot 5: Crystal Fragments
Ultimate: Summon Charged Atronach
Skill explanation:
Elemental Blockade: This skill has longer duration than the Unstable morph. Used to proc Off Balance for the Exploiter CP.
Summon Volatile Familiar: Single target damage and a large AOE that stuns the enemies.
Summon Twilight Matriarch: Does single target damage and has a strong burst heal.
Daedric Prey: Keep this up always, as it increases the damage of your Familiar, Matriarch and Atronach against enemies by 45%.
Crystal Fragments: Hard hitting single target damage. Cast on proc for instant cast and increased damage. Swap to Critical Surge when playing solo.
Summon Charged Atronach: An AOE ultimate. Gets damage increase from Daedric Prey. Sets enemies Concussed and Blockade of Storms sets Concussed enemies Off Balance for Exploiter CP.
Templar Oakensoul Build
Destruction Staff Mainbar
Slot 1: Elemental Blockade
Slot 2: Ritual of Retribution
Slot 3: Blazing Spear
Slot 4: Radiant Oppression
Slot 5: Barbed Trap
Ultimate: Ice Comet
Skill explanation:
Elemental Blockade: This skill has longer duration than the Unstable morph. Used to proc Off Balance for the Exploiter CP.
Ritual of Retribution: Large AOE that does decent damage. Do not cast early as the last ticks are stronger.
Blazing Spear: Another good AOE. Can be swapped for Living Dark if playing solo for more survivability.
Radiant Oppression: Very strong execute skill. Can use the other morph if playing solo.
Barbed Trap: A hard hitting, long AOE that also gives boost to all damage through a Fighters Guild passive. Can be swapped for Razor Caltrops (Major Breach) or Power of the Light (Minor Breach) if more penetration is needed in solo.
Ice Comet: a powerful ultimate. Can use the other morph for more ultimate generation. Elemental Rage will work just as well.
Warden Oakensoul Build
Destruction Staff Mainbar
Slot 1: Elemental Blockade
Slot 2: Arctic Blast
Slot 3: Deep Fissure
Slot 4: Barbed Trap
Slot 5: Screaming Cliff Racer
Ultimate: Wild Guardian
Skill explanation:
Elemental Blockade: This skill has longer duration than the Unstable morph. Used to proc Off Balance for the Exploiter CP.
Arctic Blast: Heals you and places an AOE around you. Also increases max health through a passive.
Deep Fissure: Strong burst damage in an area that also afflicts the enemies with Minor and Major Breach.
Barbed Trap: A hard hitting, long AOE that also gives boost to all damage through a Fighters Guild passive.
Screaming Cliff Racer: Off Balance on demand and deals increased damage to off balance enemies. Swap to Leeching Vines when playing solo.
Wild Guardian: A strong ultimate that not only deals a lot of bleed damage, but also has a high chance of applying Hemorrhaging status.
Important Information for our Oakensoul Build in ESO
Buff Food
You have four options, Bewitched Sugar Skulls will give you the best all around stats, but the buff food also costs quite a lot. You can also use Longfin Pasty With Melon Sauce, which is only a tiny bit less powerful than the other one but only costs a fraction of the price. Mistral Banana-Bunny Hash gives you plenty of health and magicka for survivability and damage. Firsthold Fruit and Cheese Plate and Tomato Garlic Chutney gives you highest damage but no extra health.
Bewitched Sugar Skulls
(Max Health, Max Magicka, Max Stamina, Health Recovery)
Longfin Pasty with Melon Sauce
(Max Health, Max Magicka, Max Stamina)
Mistral Banana-Bunny Hash
(Max Health, Max Magicka)
Firsthold Fruit and Cheese Plate
Tomato Garlic Chutney
(Max Magicka)
Mundus Stone
The Thief Mundus Stone provides the best overall damage increase with increased critical chance. If you want to learn more you can check out the Mundus Stone Page.
The Thief Mundus Stone (Increased Critical Chance)
Race
Magica-based damage races would be optimal, but any race will work with this setup. More about each race can be found on the racial overview page.
Potions
You can either use the Essence of Health or the Crown Store potions that provide you with all 3 stats. With heavy attacks it is unlikely to run out of magicka and with the Oakensoul Ring you get the crit and damage buffs that potions usually bring. This leaves only health or health and stamina for potions.
Essence of Health
(Max Health, Max Stamina, Max Magicka)
(Columbine, Mountain flower, Bugloss)
Passives
Race passives: All
Class passives: All
Light Armor: All (if wearing light pieces)
Medium Armor: All
Heavy Armor: All (if wearing Sergeant’s Mail)
Destruction Staff: All
Mages Guild: All (if slotting Inner Light or Mages Guild ultimate)
Fighters Guild: All (if slotting Barbed Trap)
Undaunted: All
Assault: Continuous Attack 1 (Only one point needed.)
Alchemy: Medicinal Use 3
Provisioning: Gourmand 3
Attributes
All into Magicka.
64 Magicka, 0 Health, 0 Stamina
Tips for playing Solo with Oakensoul Build
When playing solo you have no one else to rely on. You need to be a tank, a healer and a damage dealer all in one.
One bar builds use Oakensoul Ring as mythic, but a strong mythic for solo play is the Ring of the Pale Order mythic.
It is important to have some self-heal when playing solo. Under each class’ skills there is a section Skill Explanation. This explains what each skill does and also recommends alternatives you can use if you play solo.
Always prioritise heals, buffs and shields when playing solo. Do not let the timers run out. Staying alive is more important than doing damage. Remember: your DPS is 0 when you are dead.
Learn the mechanics. Learn when to move away from an area of effect, when to roll dodge a heavy attack and what you can tank. Dying resets the combat encounter so it is important to know the mechanics you cannot survive.
For buff food it is better to use something that gives also max health with the max magicka.
Tips for Arcanist class. Arcanist usually relies on Fatecarver and heavy attack may not be the optimal way to play.
Stamina Arcanist works better. Set all attributes to Stamina, use stamina glyphs on armor and use stamina buff food.
Buff foods like Bewitched Sugar Skulls, Artaeum Takeaway Broth, or Dubious Camoran Throne give both max health and max stamina. When playing solo, it is good to use food that also gives max health.
Consider using medium armor that boosts your Fatecarver. For example Deadly Strike is a great set. The other set can be for example Order’s Wrath, (Perfected) Ansuul’s Torment, or (Perfected) Coral Riptide.
Daggers are a better weapon choice. Main hand can be Nirnhoned or Charged, off hand Charged. Flame and Poison glyphs.
When using Daggers, swap Elemental Blockade to Quick Cloak.
CP: swap Weapons Expert for Thaumaturge. You can also swap Exploiter for Deadly Aim.
For more in-depth instructions on how to play solo: ESO Solo Tips & Tricks – How to Solo Play in ESO
Update Log for the One Bar Oakensoul Build ESO
07.08.2024 Added the One Bar Oakensoul Build for ESO
The post One Bar Oakensoul Builds for all Classes in ESO appeared first on AlcastHQ.


