
Powerful SOLO Stamina Werewolf Build for PvE ESO Elder Scrolls Online
Type: Solo vet Maelstrom & Dungeons, Overland
Buildname: Solo Werewolf
Class: Any Class
Race: Any Race
NOTE: This build is specifically made to allow for mistakes, therefore we favor tankyness and extensive healing over raw damage output. Don’t worry, the damage output is still very high thanks to the Werewolf form.
Table of Contents
Gear
Skills Werewolf
Skills Human
Champion Points
Important Info (Food, Mundus, Race, Potions, Passives, Attributes)
Resource Management
Rotation
Gameplay
Welcome to the Solo Werewolf Build for ESO (Elder Scrolls Online), the build is optimized for solo play. Make sure to bookmark the link as I will keep updating the build for each new Update of ESO. This build is designed for Solo Overland, Dungeons, and the Maelstrom Arena.
If you want a group-focused max DPS Werewolf build please check out the “Claws” Werewolf Build! You can also find all Class setups in the Claws build, whereas here we just focus on the Werewolf part of things! If you are looking for an introduction to Werewolf, I recommend checking out the very detailed Werewolf, everything you need to know guide!
The focus of this build is to give you easily accessible gear choices that are very effective in Werewolf form, which will make it fairly difficult to kill you because you have constant healing going on. We can achieve really high health recovery with this setup, which will always give you constant healing even if you forget to activate your healing ability.
Solo Werewolf Build
One Bar Build
Any Class, Any Race
Optimized for Maelstrom Arena
Advanced & Easy to get Gear (Non-DLC, Orsinium)
Good DPS
Good Survivability
Built-in Healing
IMPORTANT
This build works well because we have higher health recovery and higher health than other setups. Therefore the chance to get one shot is way smaller and even if you forget to heal yourself, the health recovery will carry you for a while! So make sure to get as close to my health recovery values and health as my character. Most important are the Artaeum Food, Alessian Set and the Potions that we use.
Solo Setup Werewolf Build for ESO
Now let us take a look at the actual SolO Werewolf Build setup.
5x Alessian Order, 5x Briarheart, 1x Swarm Mother, 1x Pale Order with the Artaeum Takeaway Broth buff food.
Unbuffed: Buff food active
Buffed: Buff food, tri stat potion, and carnage buff active
Gear Setups
If you are on a budget:
Alessian & Briarheart: You can actually buy both Alessian and Briarheart from the store for a fairly cheap price as long as you don’t pick the perfect trait.
Blue Quality Jewelry: Blue Briarheart jewelry is very cheap. You really only need to make sure to gold out your weapons for the extra damage on this setup.
Why Heavy Armor?
It provides higher resistance and therefore increases our health recovery because of the Alessian set.
It provides increased healing, which is very helpful for our setup.
It also restores small amounts of resources when we get hit.
Setup 1 with Mythic Item
Ring of the Pale Order is the most powerful healing item set in the game, if you have access to it, I recommend always using it in solo content.
Gear
Set
Weight
Trait
Enchantment
Chest
Alessian Order
Heavy
Divine
Stamina
Belt
Alessian Order
Heavy
Divine
Stamina
Shoes
Alessian Order
Heavy
Divine
Stamina
Pants
Alessian Order
Heavy
Divine
Stamina
Hands
Alessian Order
Heavy
Divine
Stamina
Head
Swarm Mother
Medium
Divine
Stamina
Shoulder
Briarheart
Medium
Divine
Stamina
Necklace
Briarheart
Jewelry
Robust
Weapon Damage
Ring
Briarheart
Jewelry
Robust
Weapon Damage
Ring
Ring of the Pale Order
Jewelry
Bloodthirsty
Weapon Damage
Weapon 1 DW
Briarheart
Dagger
Nirnhoned
Poison Damage Enchant
Weapon 1 DW
Briarheart
Dagger
Charged
Flame Damage Enchant
Weapon 2
Briarheart
Bow
Infused
Weapon Damage Enchantment
Setup 1 without Mythic Item
This setup uses Troll King instead of a Mythic item. Troll King will boost our Health Recovery even further to increase healing.
Gear
Set
Weight
Trait
Enchantment
Chest
Alessian Order
Heavy
Divine
Stamina
Belt
Alessian Order
Heavy
Divine
Stamina
Shoes
Alessian Order
Heavy
Divine
Stamina
Pants
Alessian Order
Heavy
Divine
Stamina
Hands
Alessian Order
Heavy
Divine
Stamina
Head
Troll King
Medium
Divine
Stamina
Shoulder
Troll King
Medium
Divine
Stamina
Necklace
Briarheart
Jewelry
Robust
Weapon Damage
Ring
Briarheart
Jewelry
Robust
Weapon Damage
Ring
Briarheart
Jewelry
Robust
Weapon Damage
Weapon 1 DW
Briarheart
Dagger
Nirnhoned
Damage Health Poisons
Weapon 1 DW
Briarheart
Dagger
Precise
Damage Health Poisons
Weapon 2
Briarheart
Bow
Infused
Weapon Damage Enchantment
Where can I get the gear?
Troll King: vet Blessed Crucible
Swarm Mother: Spindleclutch 1
Ring of the Pale Order: Antiquities System
Briarheart: Wrothgar or Guildstores
Alessian Order: Cyrodiil, Vlastarus Elite Gear Vendor or Guildstore
There is an unique Dagger for Briarheart that you can acquire from a quest in Wrothgar. Next to the Icy Shore Wayshrine talk to a guy called Eshir and follow his questline. If you do this on two characters, you will get two daggers. You will have to re-trait them though with the transmute station.
Solo Werewolf Skills
If you want human form skill setups please check out the “Claws” Werewolf Build. All the different class setups can be found there. Here I just want to focus on the Werewolf aspect.
Werewolf
Slot 1: Brutal Pounce
Slot 2: Hircine’s Rage
Slot 3: Howl of Agony
Slot 4: Deafening Roar
Slot 5: Claws of Life
Ultimate: Werewolf Berserker
Skill Explanation
Light Attacks: Light Attacks are your main damage tool as a Werewolf, they do immense damage and also apply bleeding on the target.
Heavy Attacks: If you drop low on Stamina, use Heavy Attacks to restore huge amounts of Stamina. This is possible thanks to the Pursuit passive.
Brutal Pounce: Gap closer and applies Brutal Carnage, increasing your Weapon Damage.
Hircine’s Rage: This is your primary heal that you can activate when needed. If you are at max Health and you use this, you regain Stamina and get a damage boost.
Howl of Agony: Your main spammable.
Deafening Roar: This ability fears up to 6 targets and also applies Major Fracture to the enemy.
Claws of Life: This is your main active healing tool. Make sure it stays on all the enemies to keep the healing effect up.
Berserker: The bleed does a lot of damage in addition to the light attack damage.
IMPORTANT
Always keep Claws of Life on the enemy. That is your most reliable heal over time.
Human Form Skills
In theory, the Solo Werewolf Build for ESO can complete the Maelstrom Arena (normal and veteran mode) without leaving the werewolf form. However, in reality this can be difficult, especially if you are a new player or if you play the build for the first time. Therefore I included human form skills as well for each class. You can follow the skill setup for each class below but of course you can also use your own skill setup in human form if you prefer that.
The class skill setups below are all with Dual Wield/ Bow.
Champion Points
Below you can find the Champion Points setup for this build. Work your way from top to bottom in your allocation. For more information on Champion Points, please visit the Champion Points Overview Page on ESO-Hub.com.
Hovering over each perk will give you insights on what it does. Presets are also provided for each of the allocations below.
Click the tab below to open the allocation.
Important Info for Solo Stamina Werewolf Build PvE
Buff-food
For this build to truly work in more difficult content such as the veteran Maelstrom, you have to run a fairly expensive buff food called Artaeum Takeaway Broth, you need this one because it gives you A LOT of health recovery that you really need. You can buy it in the guildstores.
For less difficult content you can also use Dubious Camoran Throne.
For more information on all buff food and drinks I recommend visiting the Buff Food and Drink Overview Page.
Mundus Stone
The Lover Mundus Stone provides us with extra penetration, which increases our damage. For more information on Mundus Stones please visit the Mundus Stone Overview Page.
The Lover Mundus Stone (Increased Penetration)
Race
All stamina based races work with this setup. More about each race can be found on the racial overview page.
Dark Elf
Khajiit
Orc
Redguard
Imperial
Wood Elf
Nord
Argonian
High Elf
Potions
You can either use the Essence of Health or the Crown Store potions that provide you with all 3 stats. We are using tri-stat potions because we need the stamina, magicka and health. The stamina is used for our damage abilities, block and dodge roll. Magicka is used for support abilities such as Hircine’s Rage.
Essence of Health
(Max Health, Max Stamina, Max Magicka)
(Columbine, Mountain flower, Bugloss)
Poisons
Damage Health Poison
(Damage Poison, Damage Poison)
(Fleshfly Larva, Nightshade, Nirnroot)
Passives
Class Skill Lines for your Class
Dual Wield: Slaughter, Dual Wield Expert, Controlled Fury, Ruffian, Twin Blade and Blunt
Bow: Long Shots, Accuracy, Ranger, Hawk Eye, Hasty Retreat
Heavy Armor: Resolve, Constitution, Juggernaut, Revitalize, Rapid Mending
Medium Armor: Dexterity, Wind Walker, Athletics, Agility, Improved Sneak
Fighters Guild: Intimidating Presence, Slayer, Banish the Wicked, Skilled Tracker
Werewolf: Pursuit, Blood Rage, Savage Strength
Undaunted: Undaunted Command, Undaunted Mettle
Racial: All
Alchemy: Medicinal Use
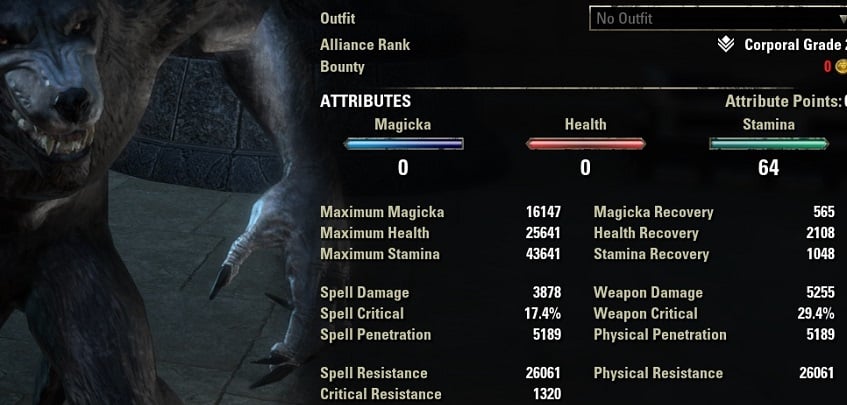
Attributes
0 Health, 64 Stamina, 0 Magicka
Resource Management
Heavy Attack is our main resources tool, each heavy attack restores around 4500 stamina, 3000 is base and we also get an extra 50% from the Pursuit passive. Heavy Attacks also deal crazy damage, therefore you won’t even lose damage.
Potions also make a huge difference, if you use the recommended tri-stat potions and activate them, you regain 9122 Health, 7582 Stamina, and 7582 Magicka.. Please make sure to have the Medicinal Use passive, that way the recovery buff will last for the full duration of the potion.
Hircine’s Rage can be used at full health to also restore another 3000 Stamina.
Rotation of the Solo Werewolf Build
Your main damage source is light attacks. Most enemies die within a few light attack hits. You can also charge a heavy attack if you are swapping a target. Other than that you could use Deafening Roar to FEAR enemies, so they get stunned for a short duration.
Gameplay of the Solo Werewolf Build for ESO
Here you can find a full run with the build in the veteran Maelstrom Arena. If you want to learn more about the Maelstrom Arena you can check out the Maelstrom Guide or the Maelstrom overview page.
Related Content:
Werewolf DPS Build
Werewolf Guide – Everything You Need To Know
Werewolf PVP Build for Stamina Sorcerer
The post Powerful SOLO Stamina Werewolf Build for PvE ESO Elder Scrolls Online appeared first on AlcastHQ.


