
Best Staff Wand/Tome Mage Build for Throne and Liberty
Welcome to our Throne & Liberty Staff and Wand & Tome build. This is a DPS build that excels at farming, thanks to its high AoE damage and self-healing. It is one of the best builds in the game for playing solo, and it’s also very useful in groups thanks to its high AoE damage. You can also slightly adjust the setup to be more suited to single-target damage (for fighting bosses). This build can be converted to a healer build by swapping out some of your skills – it won’t be as good as a dedicated healer build, but it’s good enough for the majority of situations and gives you a lot of flexibility.
For a full overview of all builds please visit the Throne and Liberty Builds Database.
Since creating and fully optimising a Throne & Liberty build is a long and complex process, this guide will not only explain how to create the build and how it works, but also has early and midgame setups and suggestions about which aspects of the build to prioritize farming, crafting or upgrading.
Mainhand: Staff
Offhand: Wand & Tome
Table of Contents:
- How to build your Character [Important]
- Leveling Character
- Leveling Skills and Gear
- Staff and Wand/Tome Basics
- Skill Setups
- Attribute Stat Priority
- Gear Progression
- Guardians
- Buff Food & Potions
How to Build your Staff & Wand/Tome DPS Character in Throne and Liberty
Playing Throne and Liberty can be overwhelming at first. In this section, I want to explain quickly how your character build progression works in this game. Leveling up to max level is easy and won’t take long, just follow the main story purple quests and you will hit max level at the end of the story. During this period the game teaches you how to craft gear, this will allow you to get full green gear fairly fast while also working on some basic blue items.
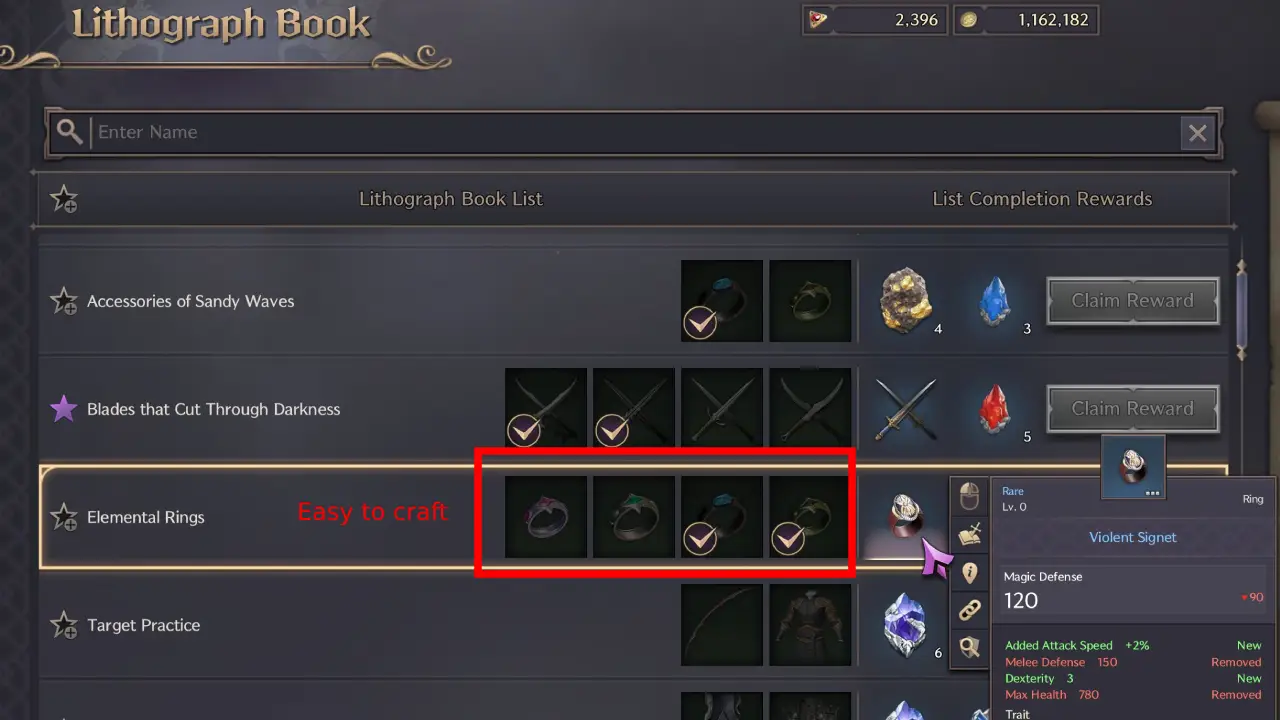
Now you are at max level, you can get some easy wins with the Lithograph Book (Check Menu in-game). This allows you to sacrifice certain items and in return you get better items. So you can get slightly better blue gear.
Important: Now, this is where most players make a big mistake. They want to start going from blue to purple gear. But this is too early! The main strength of gear comes from attribute stats (buffs to Strength, Dexterity, etc) and traits. Fully traiting a purple item is impossible as a new player unless you swipe your credit card. Therefore, you want to first get good blue gear with good attribute stats and good traits before you even consider going after purple gear.
It is best to either bank purple items you drop or sell them at the Auction House if they are worth a lot. You don’t sell items in this game, you sell the extract of it with the trait. Traits are the most important aspect of this game and is where most of your time commitment will be.

You always want to level up your blue gear too. You won’t lose any materials on this, because you can transfer the level and trait power of a blue item into a Purple item. So a level 9 blue item transferred into a purple will result in a level 6 purple item. The blue traits will disappear but the purple item gets “trait blessing”. This makes it cheaper to get your purple item traited.
Once you have good blue gear, then you can think about starting to equip purple items! Finding a purple item isn’t necessarily difficult, but fully traiting and maxing it out definitely is!
- Leveling up is easy, follow purple main story quest to hit max level.
- While leveling, you get green items and a few blue items.
- After max level, focus on getting good blue gear.
- Don’t focus on purple items yet! (Rookie Mistake)
- Focus on getting good blue items to max level and fully traiting them
- After that, you can think about starting to equip purple items.
- Max level blue gear with full traits is better than non-maxed purple gear with no traits.
- Do your dailies, co-op dungeons, and public dungeons to get pouches and other loot.
This is more or less it about progressing your character. Even getting blue gear fully trained will already be a challenge. Getting purple items to max level is even more difficult and time consuming.
Once Again: A max-level blue weapon with full traits will do more damage than a max-level purple weapon without full traits in Throne and Liberty!
Leveling your Staff and Wand/Tome Build in Throne and Liberty
The leveling progression in Throne and Liberty is easy. Follow the main story quest (Purple Markers) and you will hit max level at the end of the story. If your level is too low at any point, complete the Exploration quests (blue markers) in the areas you just completed. During this phase, the game will also teach you how to craft gear to get all green gear with some blues at the end of the story.
During this process, you also want to get used to your skills. Make sure to read all the skills so you know what they do! Also, test the skills out on monsters or the target dummies you can find, for example, in Vienta Village.
Once you are max level you should focus on getting good blues before you go for purple gear. I explained this above in the How to build your Character section. Maxed out blue gear with full traits is stronger than max level purple gear without maxed out traits. Blue gear is also a lot easier to get, see the Gear Progressions section of our Throne and Liberty Staff and Wand/Tome DPS Build.
Leveling Skills and Gear in Throne and Liberty

While leveling up, you will get plenty of upgrade materials, but eventually, you will have a shortage of these. So here are a few important tricks to keep progressing as fast as possible with your character build in Throne and Liberty.
Skills Progression:
- Upgrade all skills from green to blue first
- Upgrade all skills from blue to purple next
- Dissolve purple growth materials to get 10x the amount of the lower quality. That means 1 purple growth material will get you 10 blue growth materials.
- Doing Exploration quests will give you plenty of upgrade materials.
- Purchasing the Leveling Pass and Battle Pass will also give you plenty of growth materials. You can sell items in the Auction House to get Lucent without spending real money.
- Inside the store there is a section with Ornate coins where you can also purchase growth materials. Purchase the purple materials and dissolve them instead of buying blue materials directly (which is a lot more expensive).
- Ornate Coins are often received for maintenance downtime and other things like events.
Gear Progression:
- Green to Blue: A max level 6 green item infused into a blue item will become a level 3 blue.
- Blue to Purple: A max level 9 blue item infused into a purple item will become a level 6 purple.
- Fully gear yourself with blue items and trait them before you consider going purple. (Takes weeks or months).
- Look out for good blue items that give attribute stat points that you need for your build.
- A max-level blue weapon with full traits will do more damage than a max-level purple weapon without full traits.
- Dissolve purple growth materials to get 10x the amount of the lower quality. That means 1 purple growth material will get you 10 blue growth materials.
- Doing Exploration quests will give you plenty of upgrade materials.
- Purchasing the Leveling Pass and Battle Pass will also give you plenty of growth materials. You can sell items in Auction House to get Lucent without spending real money.
- Inside the store there is a section with Ornate coins where you can also purchase growth materials. Purchase and dissolve the purple materials instead of buying blue materials directly (which is a lot more expensive).
- Ornate Coins are often received for maintenance downtime and other things like events.
Staff & Wand/Tome Build Basics in Throne and Liberty
This TL Staff and Wand & Tome build excels at AoE damage, and can also be used to deal decent single-target damage to tougher mobs and bosses. To get the most out of the build, you need to understand how the skills work and ensure that you use them in the correct order.
You should aim to debuff your primary target (the toughest enemy or an enemy in the middle of an enemy group) with Curse effects, such as Time for Punishment, Touch of Despair and Decaying Touch. At three Curse Stacks, use the Curse Explosion Skill. There are a lot of debuffs from the Wand & Tome weapon skills – ensure you use them all to make enemies more vulnerable to damage before unleashing your powerful damage spells from the Staff.
We also recommend using the High Focus skill before you use a long combo of other skills. This will reduce your cooldowns, enabling you to repeat the combo much sooner and significantly increasing your DPS potential.
Some useful skill combos are listed below.
Easy AoE Combo:
- High Focus – Increases your Cooldown Speed
- Time for Punishment – Decrease the target’s Skill Damage Resistance and 90% chance to Curse them
- Touch of Despair – Curse the target, stacking up to 3 times. Deals a small amount of damage over time and makes the target 10% weaker to basic attack damage.
- Serial Fire Bombs – Throw fire bombs at the target that deals damage in a small AoE and burns them. Use the skill three times in a row.
- Inferno Wave – Create a fire explosion at the target that deals AoE damage and burns enemies in range.
- Decaying Touch – Curses the target, dealing damage over time.
- Touch of Despair – Second cast in the rotation. The primary target should now have three stacks of Curse.
- Curse Explosion – Creates an explosion at the target. Try to use this on enemies with three Curse stacks whenever possible.
Easy Single-Target Combo:
- High Focus – Increases your Cooldown Speed
- Time for Punishment – Decrease the target’s Skill Damage Resistance and 90% chance to Curse them
- Serial Fire Bombs – Throw fire bombs at the target that deals damage in a small AoE and burns them. Use the skill three times in a row.
- Inferno Wave – Create a fire explosion at the target that deals AoE damage and burns enemies in range.
- Chain Lightning – Damage all enemies in a 3 metre area around the target. Damage is increased against monsers.
- Judgement Lightning – Calls down a lightning strike that deals heavy damage to the target. Damage is increased against monsters. If the target has Wet or Frost, a portion of the damage is transferred to a nearby enemy. If the skill lands as a Heavy Attack, you can use it again immediately. If the recast also lands as a Heavy Attack, the Cooldown is decreased.
Skill Setups for our Staff and Wand & Tome Build in Throne and Liberty
Now, let’s look at the skill setups for our Throne and Liberty Staff and Wand/Tome Build. We have three setups in this build:
- DPS Setup – This is the preferred setup for group content, allowing you deal the highest possible single-target and AoE damage without worrying about self-healing or support.
- Farming Setup – Quite similar to the DPS Setup, but it includes some self-healing and a slightly higher focus on AoE skills. This is ideal for farming mobs while solo, dabbling in PvP or playing in an inexperienced group where you’re likely to take more damage than usual and won’t get much healing and support from other players.
- Healer Setup – While this build isn’t primarily intended for healing, thanks to our weapon composition we can swap to a healer setup in a pinch for added flexibility. But it won’t be as good as a full healer build. Place the lowest priority on this setup when upgrading your Skills and Equipment.
DPS Setup
The DPS Setup is designed to deal the maximum possible Single-target and AoE damage. It does not have any provision for healing or self-support, so it is well-suited to playing with an organised group. Be careful when playing solo, or use the Farming Setup detailed later in the guide.
| Icon | Skill Name | Skill Spec |
|---|---|---|
 |
Touch of Despair | Effect Duration |
 |
Serial Fire Bombs | Focused Fire Bombs, Mobility |
 |
Chain Lightning | Chain Lightning |
 |
Fireball Barrage | Fireball Frenzy, Cooldown |
 |
Inferno Wave | Cooldown, Consecutive Use |
 |
Curse Explosion | Dark Explosion, Damage Increased, Focus Target |
 |
Swift Healing | Consecutive Use |
 |
Corrupted Magic Circle | Decaying Touch, Additional Damage |
 |
Time for Punishment | Effect Duration |
 |
Judgment Lightning | Consecutive Use |
 |
High Focus | Base Damage Boost |
 |
Inner Peace | Immune to CC |
Important DPS Skills
- Touch of Despair – Use it at the start of the fight. Your aim is to stack Curse three times on your primary target, then use Curse Explosion.
- Decaying Touch (Specialization of Corrupted Magic Circle) – Use this before your third Touch of Despair. It will improve the Curse Explosion damage.
- Curse Explosion – We have selected the Dark Explosion spec, which prevents the skill from consuming the DoTs, allowing you to use it more often, and to stack max stacks of Burning on the target.
- Chain Lightning, Inferno Wave and Fireball Barrage – Once you’ve built up plenty of Burning stacks on the target, use these on Cooldown for maximum damage.
- Judgment Lightning – A very powerful single strike that can jump to nearby enemies in some situations, and has a small chance to be reusable if you land a Heavy Attack. Use this on Cooldown and make sure it hits the highest-priority target (usually the boss or the most dangerous mob).
Utility Skills
- High Focus – Always use this skill at the start of a combo to reduce the Cooldowns of your Skills. This will allow you to use your Skills more often, significantly improving your DPS potential.
- Time for Punishment – It’s also advisable to use this at the beginning of a combo, as it will increase the damage of all skills in the combo.
Standard Setup Passives
| Icon | Name |
|---|---|
 |
Devotion and Emptiness |
 |
Noble Revival |
 |
Vampiric Contract |
 |
Wraith’s Beckon |
 |
Forbidden Sanctuary |
 |
Flame Condensation |
 |
Manaball Eruption |
 |
Asceticism |
Farming Setup
This setup is very similar to the DPS setup above, but is optimised for solo farming rather than group play. This setup is also good for Taedal’s Tower.
| Icon | Skill Name | Skill Spec |
|---|---|---|
|
Touch of Despair | Radius Increased, Effect Duration, Curse |
|
Serial Fire Bombs | Mobility, Radius, Instant Casting |
|
Chain Lightning | Damage Transfer, Damage Transfer |
 |
Karmic Haze | Radius Increased, Additional Damage |
|
Inferno Wave | Cooldown, Consecutive Use |
|
Curse Explosion | Damage Increased |
|
Swift Healing | Consecutive Use |
|
Corrupted Magic Circle | Decaying Touch, Additional Damage |
|
Time for Punishment | None |
|
Judgment Lightning | Consecutive Use, Damage Transfer, Damage Transfer |
|
High Focus | Base Damage Boost |
|
Inner Peace | None |
Farming Setup Passives
| Icon | Name |
|---|---|
|
Devotion and Emptiness |
|
Vampiric Contract |
|
Wraith’s Beckon |
|
Forbidden Sanctuary |
 |
Full of Corruption |
|
Flame Condensation |
|
Manaball Eruption |
|
Asceticism |
Healing Setup (Optional)
You can swap to the Healing Setup when needed. It is good enough to heal most content in the game, but it’s not as finely tuned as a dedicated healer build. You can completely ignore this part if you don’t want the option of switching to Healer.
You can still deal a lot of damage with the Healer setup. This is because healing is a very reactive role in Throne & Liberty, and there aren’t enough good healing, support and debuff skills to keep you busy. If you focus 100% of your setup on these kinds of skills, you’ll find that you have lengthy downtimes where there is nothing to do other than spam basic attacks. This situation is very wasteful and should be avoided. This is especially likely to happen in highly skilled groups, where most DPS players won’t take much damage and don’t need healing often.
Therefore, this setup is designed so that you can spend a lot of your time doing DPS, while looking out for your team and healing and supporting them when needed.
| Icon | Skill Name | Skill Spec |
|---|---|---|
|
Touch of Despair | Effect Duration |
|
Serial Fire Bombs | Focused Fire Bombs, Mobility, Projectile Speed Increased |
|
Time for Punishment | Effect Duration |
 |
Fountain of Life | Mana Recovery, Radius Increased, Effect Duration |
|
Curse Explosion | Dark Explosion, Damage Increased, Focus Target |
|
Swift Healing | Consecutive Use |
|
Corrupted Magic Circle | Decaying Touch, Additional Damage |
 |
Clay’s Salvation | None |
|
Judgment Lightning | Consecutive Use |
 |
Infernal Meteor | Hellfire Rain, Cooldown |
|
High Focus | Base Damage Boost |
|
Inner Peace | Immune to CC |
Notable Healing Skills:
- Fountain of Life – a powerful healing skill that heals all allied players who stand in the area, and also regenerates some of their Mana. It is usually placed either on the tank if they are having a hard time, or in the middle of the group so that DPS players can stack in the area.
- Swift Healing – A single-target burst heal with a fairly short cooldown. It can be used on yourself or an ally. It can be recast up to two more times at an increased Mana cost. Good for helping one player who is in trouble.
- Clay’s Salvation – An AoE burst heal. Quite an expensive skill to use, but does a lot of healing to your entire party. Use it when multiple players are damaged.
Healer Setup Passives
For the Healer Setup of our Staff and Wand & Tome Build in Throne & Liberty, we are using exactly the same passive setup as the main DPS Setup earlier in the guide.
Skill Upgrade Priority
Progressing your skills in Throne and Liberty takes time. Therefore, it is important to first get all your used skills from green quality to blue quality. Green to blue is achieved fairly easily. After that, start going from blue to purple.
Tip: At the beginning, it makes sense to dissolve purple upgrade materials. Because 1 purple material will give you 10 blue materials. This way you can progress the blue quality faster. You could dissolve this even further, so technically, 1 purple upgrade material results in 100 green upgrade materials. Of course you can also craft some books, but dissolving is far more efficient than anything else.
Dissolve Upgrade Mats: 1 Purple > 10 Blue > 100 Green
IMPORTANT: Don’t dissolve OMNIPOTENT books (Purple growth books, says in the text on the book). These are special and can only be used for your special level 50 skills.
So that leaves us with a priority list for our Throne and Liberty Staff & Wand Build:
- Priority 1: Get all used skills from green to blue (if necessary, dissolve purple growth materials into blue and then into green like explained above.
- Priority 2: Get all skills from blue level 1 to purple level 1. This takes a bit more time. (Once again, dissolve purple growth materials into blue to get plenty of blue books.
- Priority 3: Purple skill progression to level 5
The reason we want to push as many skills to purple as possible, is because they often gain a new effect when going to a higher quality. Therefore, we want to achieve this quickly with as many skills. Afterward, from purple level 1 to max purple, there are only small differences.
Time estimate: Going from green to blue can be achieved after the end of the story + a few exploration quests. Going from blue to purple is a lot more tricky and might take 1-2 months. Going from purple level 1 to max purple will take months but isn’t that important since you only gain small extra stat boosts.
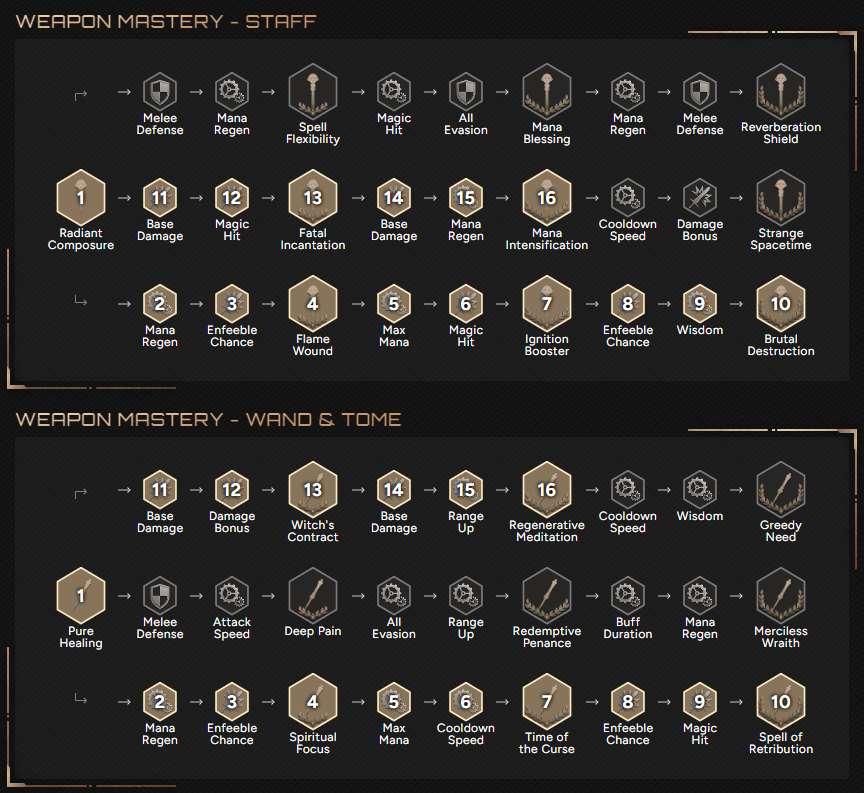
Weapon Mastery
For the Wand & Tome Weapon Mastery, focus on completing the Spell of Retribution line first, which makes many aspects of the build a little stronger. Spend the remaining points on the Greedy Need line, which gives some handy damage boosts.
For Staff Weapon Mastery, fully unlock the Brutal Destruction line first, which gives the best overall DPS boost. Then spend your remaining points on the Strange Spacetime line, which gives a mixture of damage and sustain buffs.
Leveling up the Weapon Mastery to max 16 points takes a long time. You should be able to get to 8/9/10 fairly fast, but afterward, it starts dragging.
Attribute Stat Priority for our Staff & Wand/Tome Build
When adding stat bonuses to your Staff and Wand & Tome build in Throne & Liberty, try to aim for the milestones at 30/40/50/60 or 70 points, because you gain special bonuses for hitting these numbers. When allocating stat points, don’t put more than 20 points in a single stat unless you’re pushing a couple of extra points to hit a milestone. This is because after investing 20 stat points in a stat, you need 2 points per increase, which is very wasteful.
At the beginning, you won’t have many stats, but once you get decent blue gear you will notice that stats can go very high and this will increase your combat power tremendously.
We are primarily focusing on increasing Dexterity and Wisdom which will increase your Critical Hit chance, Attack Speed and Maximum Weapon Damage.
It’s also useful to improve Strength and Perception. Your final stats aren’t set in stone and depend on what gear you get. The most important thing is to hit as many of the milestones mentioned above as possible.
Primary Stat Points:
- Dexterity
- Wisdom
Secondary Stat Points:
- Strength
- Perception
Gear Progression for our Throne and Liberty Staff & Wand/Tome Build
The most difficult part of any build is the gear progression. This is where you will spend most of your time. With this Throne and Liberty Staff & Wand Build we will have three different setups, Early Game, Mid Game and Endgame. It is important to understand that any gear is placeholder gear until the endgame setup, which means it’s okay to deviate somewhat from the early-game and mid-game setups. However, getting the End Game setup is no easy task because the items all drop in different parts of the game.
Important: Fully leveled blue gear with max traits is stronger than fully leveled purple gear with no traits. I mentioned this above in the Leveling Skills and Gear section.
That means it is best to focus on getting good blue items that give you extra stats (mid-game). After you have all that, you want to start farming for the end-game gear. Getting purple items is often not even the problem, but traiting them is insanely expensive, especially for meta gear.
You will find three different setups below:
- Early Game Setup: Easy to get gear from your Lithograph Book
- Mid Game Setup: Co-Op Dungeon and Public Dungeon Gear
- End Game Setup: Co-Op Dungeon and World Boss Gear
Early Game Setup
The Early Game setup for the Throne and Liberty Staff & Wand/Tome DPS Build can be obtained very fast after you start doing your dailies. Please don’t spend too much time on farming or crafting the exact items mentioned in this section, especially not the green ones. If you find a decent item that’s not listed here, then so be it, this is just a guideline for a transitional phase of building your character. The aim is to get to max level, then start switching to blue gear asap.
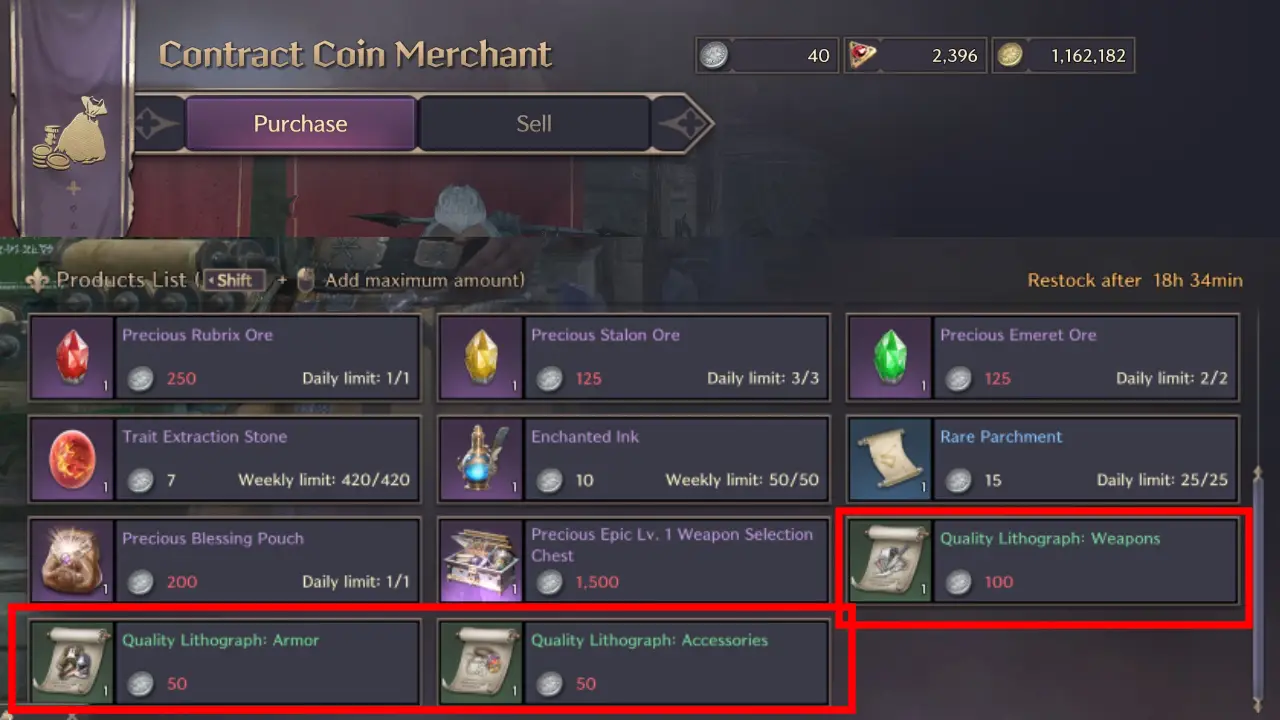
IMPORTANT: By doing your dailies you get Contract Coins (Always do them in high level areas for max gains). With the Contract Coins, you can buy Quality Lithographs: Weapons, Accessories, and Armor. These can be used to craft green items you put into your Lithograph Book to get blue items. This is how you get your first blue items easily!
LB = Lithograph Book
Every time you have enough materials to craft an item, immediately go for it.
| Icon | Type | Item | Drop Location |
|---|---|---|---|
 |
Main Hand | Staff of the Resistance | LB Archwizard’s Lost Staves |
 |
Off Hand | Scepter of the Resistance | LB Mystical Wands |
 |
Head | Layered Iron Helm | Craftable |
 |
Cloak | Deadeye’s Cloak | LB Beginner’s Cloaks of Victory |
 |
Chest | Intricate Leather Tunic | Craftable |
 |
Gloves | Ironclad Plate Gauntlets | Craftable |
 |
Pants | Blackened Plate Greaves | Craftable |
 |
Boots | Blackened Plate Sabatons | Craftable |
 |
Necklace | Necklace of Foresight | Craftable, Lv.6 Uncommon Accessories Selection Chest, Growth Support Chest: Lv.10 |
 |
Bracelet | Bracelet of Conquest | Craftable |
 |
Ring | Violent Signet | LB Elemental Rings |
 |
Ring | Ring of Robustness | Craftable, Lv.6 Uncommon Accessories Selection Chest, Growth Support Chest: Lv.10 |
 |
Belt | Belt of Vigor | Craftable |
Mid Game Setup
The Mid Game setup for our Throne and Liberty Staff and Wand DPS Build is where you will spend most of your time because it is incredibly hard to get End Game equipment.
Don’t grind just one dungeon for loot! This is the number one mistake of getting gear from Co-Op Dungeons. There is a mathematically faster way to get gear from dungeons.
- In Stonegard there are purple item crafters (Map).
- Check all of them and read carefully what you need to craft items (Also check the Treasure Chests!)
- To craft purple dungeon weapons you need 2 Dimensional Essence: Salvation
- For each Dungeon completion, you get 4 Dimensional Soul Shards when you open a chest at the end.
- That means, if you run each dungeon 5 times you can craft the weapon of your choice.
- Purple Jewelry can be obtained via Chests from the Accessories Crafter in Stonegard too (Map).
RANDOM QUEUE: If you use the random queue system, you also have a small chance to get a Dimensional Essence: Salvation.
It is mathematically faster to rotate dungeons and then simply craft the purple item of your choice rather than getting a lucky drop at 2-5% drop chance.
Auction House: Check the Auction house for blue item lithographs. Sometimes, they can be cheap, so you can buy them and craft the item directly.
That means getting the items below is mostly farming Co-Op Dungeons and doing Public Dungeons to get enough currency to craft the purple items. Blue item drop chances are mostly fine in dungeons so you should be able to get them eventually. But focus on the purple items!
| Icon | Type | Item | Drop Location |
|---|---|---|---|
 |
Main Hand | Toublek’s Shattering Quarterstaff | Co-Op Tyrant’s Isle, Craftable |
 |
Off Hand | Lequirus’s Coveted Tome | Co-Op Cave of Destruction, Craftable |
 |
Head | Elusive Hexweaver Hat | Co-Op Valley of Slaughter, Excavator-9 World Boss |
 |
Cloak | Supreme Devotion | Co-Op Cave of Destruction |
 |
Chest | Phantom Wolf Tunic | Co-Op Tyrant’s Isle & Island of Terror |
 |
Gloves | Ascended Guardian Gloves | Co-Op Voidwastes & Butcher’s Canyon |
 |
Pants | Duskblood Trousers | Kowazan World Boss, Precious Blessing Pouch: Shadow |
 |
Boots | Alacritous Invoker Shoes | Grand Aelon World Boss |
 |
Necklace | Ecliptic Pendant | Co-Op Butcher’s Canyon, Lv.6 Rare Accessories Selection Chest, Lv.6 Rare Necklace Selection Chest |
 |
Bracelet | Bracers of the Primal King | Co-Op Cave of Destruction, Lequirius’s Equipment Selection Chest |
|
Ring | Violent Signet | LB Elemental Rings |
 |
Ring | Sapphire Dimensional Band | Precious Epic Accessory Selection Chest |
|
Belt | Belt of Vigor | Craftable |
Best in slot traits:
- Staff – Hit Chance, Critical Hit Chance, Heavy Attack Chance
- Wand & Tome – Hit Chance, Critical Hit Chance, Heavy Attack Chance
Most of your traits aren’t too important for now, since many of your items will eventually be replaced for endgame. You may want to put max Health on your blue gear for the time being.
End Game Setup
The End Game Setup for the Throne and Liberty Staff & Wand/Tome Build is the best in slot setup that you want to aim for. This will take a long time to achieve. You might be able to get the items needed in a decent time, but traiting them is incredibly time consuming.
Getting World Boss loot is very difficult unless you have a good guild that splits up the loot. If you aren’t in a guild it is very unlikely that you will manage to get any endgame gear unless you buy most of it via the Auction House.


Best in slot traits:
- Staff – Hit Chance, Critical Hit Chance, Heavy Attack Chance
- Wand & Tome – Hit Chance, Critical Hit Chance, Heavy Attack Chance
- Helmet – Ranged Evason, Cooldown Speed, Mana Regen
- Cloak – Mana Regen, Skill Damage Resistance, Debuff Duration
- Chest – Max Mana, Mana Regen, Melee Evasion
- Gloves – Max Mana, Mana Regen, Ranged Evasion
- Legs – Max Health, Melee Evasion, Debuff Duration
- Boots – Max Health, Movement Speed, Melee Evasion
- Necklace – Skill Damage Boost, Buff Duration, Max Health
- Bracelet – Max Health, Skill Damage Resistance, Debuff Duration
- Ring 1 – Max Health, Skill Damage Boost, Buff Duration
- Ring 2 – Max Mana, Skill Damage Boost, Buff Duration
- Belt – Max Mana, Skill Damage Resistance, Debuff Duration
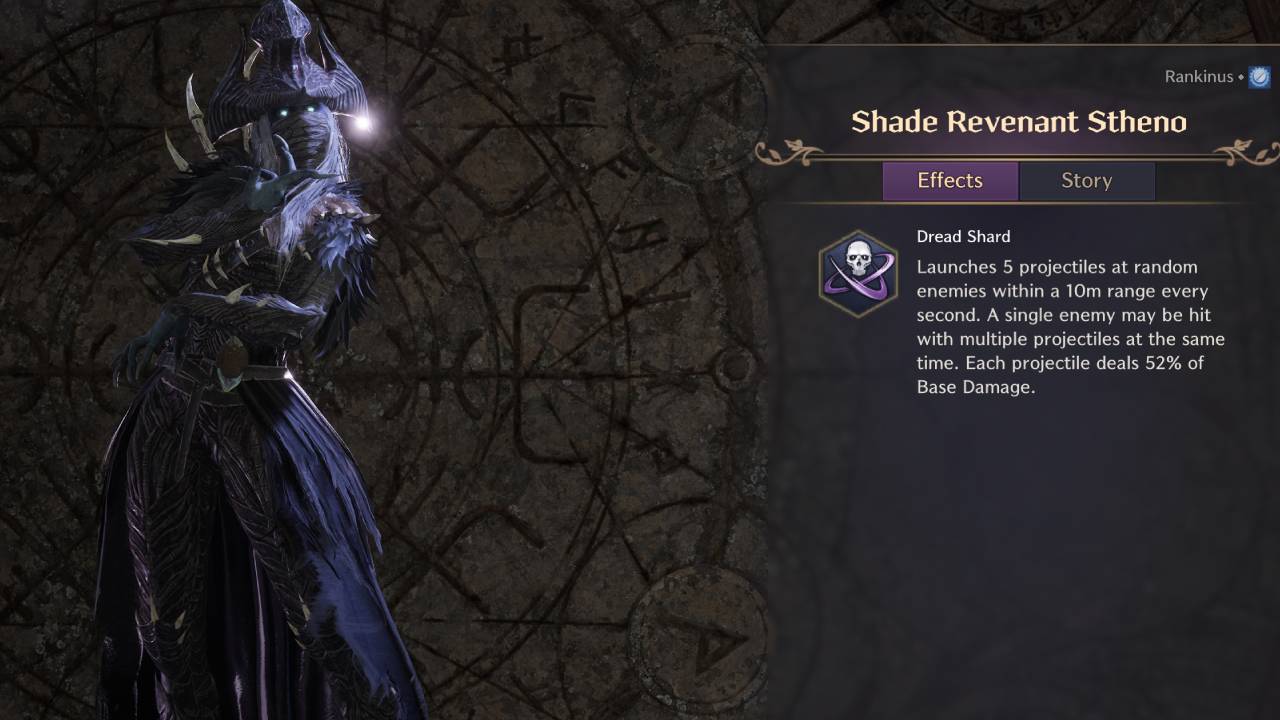
Guardians for your Staff and Wand & Tome DPS Build in Throne and Liberty
Guardians are special transformations that have a 10 minute cooldown. They have various effects; for our Staff and Wand Build, we’re using the Shade Revenant Stheno Guardian. This Guardian shoots projectiles in all directions, and deals more damage than the other Guardians in most situations.
Buff Food & Potions
Buff Food and Potions are an important part of any Throne and Liberty Build. It is recommended to level up cooking because some of the later buff foods are very strong. However, for most content right now Vegetable Stir-fry will do. It increases your Max Health and Health Regen for 15-30 minutes.
Fried Egg is also a good option if you want to deal some extra damage on bosses.

The post Best Staff Wand/Tome Mage Build for Throne and Liberty appeared first on AlcastHQ.


