
The First Descendant: Serena Build & Best Loadout

Welcome to The First Descendant: Serena Build & Best Loadout. In this guide, we will explain how to create a powerful build for the Serena Descendant. We’ll cover how the skills work and which weapons, stats and modules you need to create the most powerful build for Serena. Visit The First Descendant Builds page for more Builds.
WORK IN PROGRESS
Table of Contents:
- How to play Serena
- How to unlock Serena
- Skills Explanation
- Modules – Important!
- Serena Build Setups
- Best Weapons
- Reactor
- External Components
- Smooth Grapple Hook
- Serena’s Story
SERENA PROS
SERENA CONS
How to Play Serena in the First Descendant
How to Unlock Serena in The First Descendant
Let’s take a quick look at how to unlock X in the First Descendant. To unlock Serena you have to purchase him from the store, or research him. You need the following items to research Enzo:
- 1x Serena Enhanced Cells
- 1x Serena Stabilizer
- 1x Serena Spiral Catalyst
- 1x Serena Code
- 400k Credits
When you visit Magisters Anais at the Research Institute you can hover over each item. Then click on Acquisition Info and it will tell you where this specific item drops. You can view an in-depth guide here on How to get X in The First Descendant.
Serena Skills Explained
In this section, we are going to explain the skills available to our Serena Build in the First Descendant, how each skill works and the best ways for you to use them.
S1
S2
S3
S4
X (Passive)
How Modules Work in The First Descendant
Modules in The First Descendant are the bread and butter of all Descendant Builds. There are a few important things to remember about modules. This is for both Descendant and Weapon Modules.
While most builds require you to increase Module Capacity with an Energy Activator (you get two for free), they won’t require you to reduce the Module cost with Crystallization Catalyst. However, if you want to truly min-max a build, you will need plenty.
- How to increase your Module Capacity
- Module Levels and Cost
- Reduce the cost of Modules
- How to farm Modules
How to Increase Module Capacity
You get a base of 45 Modules for every Descendant character. And you can increase this up to 85 currently. First off, always slot a Sub Attack Module (Slot 7). When you increase this to the max level you will get an additional 10 Module Capacity. if you use a Crystallization Catalyst on the Sub Attack Module, you even get 15 extra slots. You will see this in the setup below.
Additionally, you can use an Energy Activator to increase your Module Capacity by another 20. However, these are fairly hard to farm, only use them on your best Descendants.
Lastly, increasing your Mastery Rank will also increase Module Capacity. Rank 1 gives you 25 Module Capacity, Rank 20 gives you 50 Module Capacity. That is how we reach the 80 Module Capacity that you see on most builds.
- Slot a Sub Attack Module (and max it out to get +10 capacity, crystallize it for +15)
- Use an Energy Activator (2o extra capacity)
- Increase Mastery Rank (25 base capacity, max 50)
Weapons: Basically the same, but because you don’t have Subattack Modules, the Energy Activator gives you 30 instead of just 20 extra capacity.
You can also read my in-depth guide on how to increase Module Capacity in The First Descendant if you need more information. Or my Best Energy Activator Farm Spots and our Best Crystallization Catalyst Farm Spots. I tested all of the grind spots by myself and have already farmed plenty of these items with this method.
Module Levels and Cost
Modules can be enhanced (leveled up) with Kuiper Shards in The First Descendant. Enhancing Modules increases their power. At higher levels, the power will increase way more than at lower levels. Therefore it is always recommended to max out the most important Module first.
Here is an example of a must-have Module called Increased HP for our Descendant. You will notice that we start at 22%, but at the max level, we get a whopping 218.5% increase in health!
| Level | Capacity Cost | Power |
|---|---|---|
| 0 – Base | 6 | 22% |
| 1 | 7 | 31.2% |
| 2 | 8 | 41.4% |
| 3 | 9 | 54.4% |
| 4 | 10 | 69.8% |
| 5 | 11 | 87.2% |
| 6 | 12 | 108.2% |
| 7 | 13 | 130.2% |
| 8 | 14 | 155.2% |
| 9 | 15 | 184.5% |
| 10 | 16 | 218.5% |
Transcendent Modules are the exception; they decrease Capacity Cost with higher levels!
For an in-depth overview, please visit our How to Level Up Modules in The First Descendant guide.
How to Farm Kuiper Shards
Kuiper Shards are used to level up Modules. We have a guide on the Top 3 Kuiper Shard Farming Locations in the First Descendant. We explain how to most efficiently farm Kuiper Shards (300-500k/hour) and show the amount you need to level up mods. As a summary, to max out a Module you need:
- Normal Modules: 103’100 Kuiper Shards
- Rare Modules: 206’200 Kuiper Shards
- Ultimate Modules: 309’300 Kuiper Shards
- Transcendent Modules: 515’500 Kuiper Shards
Always max out the most important Modules first, we will showcase the order below.
How to Reduce the Cost of Modules
To reduce the cost of Modules you need Crystallization Catalysts in The First Descendant. These require a lot of time investment, most builds won’t require you to get many if any at all (Budget Setup). But if you want to completely min-max you need to get plenty of them as technically, every slot can have a specific socket type to half the cost.
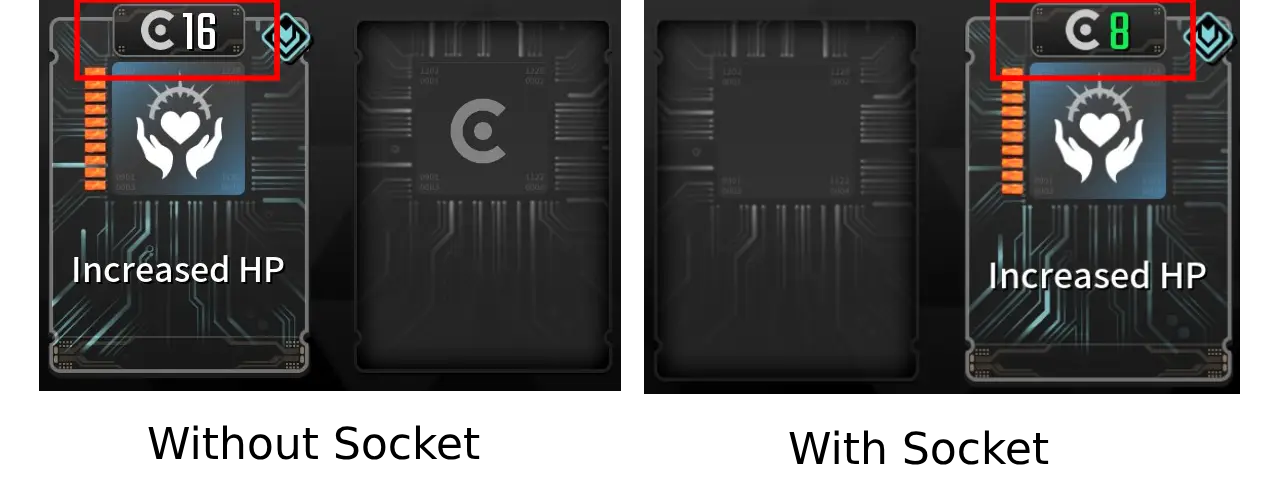
Modules have Socket Types. Our Increased HP Module has the Cerulean Socket Type.
- Module: Increased HP
- Socket Type: Cerulean
This is important because if we place our Increased HP Module in the fitting Socket Type, it will half the cost of the Module!
How to farm Modules
Most Modules can be acquired fairly easily, but the higher-quality ones (Ultimate, Transcendent) are more tedious to obtain. Here is the easiest process to farm Modules quickly.
Open Map > Swap to Access Info > Select Modules
Here, you can find all Modules and their drop locations. If a module drops from several locations, it is recommended to select drop locations with higher drop chances.
There isn’t really much more to this. Simply check the location and go farm. Normal and Rare quality Modules have 30-50% drop chances in most cases. Ultimate ones range around the 5% mark and Transcendent ones can be a tough cookie with around 2% drop chance.
We will list the best farming location of modules in the next step of the guide.
Best Serena Build Setups for The First Descendant
In this section, we are going to look at the different best Serena Build Setups for The First Descendant. I will show you an optimized Boss DPS and AoE Farming setup and a Budget setup. The optimized setups require a lot of Crystallizations. The Budget setup requires none.
All setups require you to have used your Energy Activator to increase the Module Capacity. Here are the Top 3 Kuiper Shard farm spots, you will need plenty to upgrade all Modules!
- X Boss Build: Weapon-based damage
- X Farming Build: Skill and Weapon-based damage
- X Budget Build: Starter setup
- Note: All Builds are compatible with each other
How to get Modules: Read the Module Farming section.
85 Module Capacity How? Read the basics Module section.
Best Weapons for the Serena Build in The First Descendant
Our The First Descendant Serena Build uses the following weapons:
- Enduring Legacy (Boss)
- Afterglow Sword (Boss)
- Thunder Cage (Farming)
- Restored Relic (Farming)
Enduring Legacy Build Setup
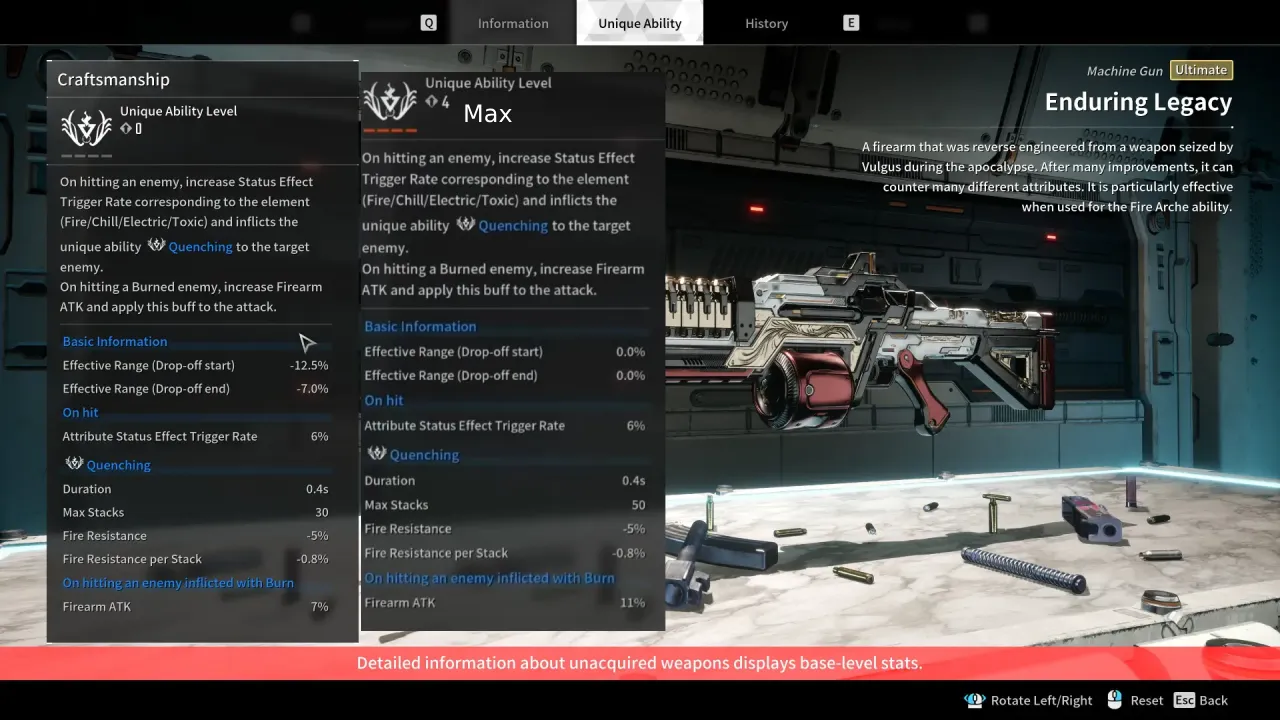
Enduring Legacy is one of the most powerful weapons in The First Descendant. It is best built with a high crit rate and crit damage as well as a focus on Fire ATK due to its unique ability that lowers the enemy’s Fire Resistance. It is recommended to get the unique ability to max stacks. That means you will have to farm 5 copies of this weapon (1x + 4x to absorb).
How to get Enduring Legacy in The First Descendant.
You can also use Mental Focus instead of Sharp Precision Shot if you prefer that. However, in my experience, Mental Focus is only better if you can always unload the full magazine without interruption. And because that almost never happens, I prefer Sharp Precision Shot because you can build max stacks back faster.
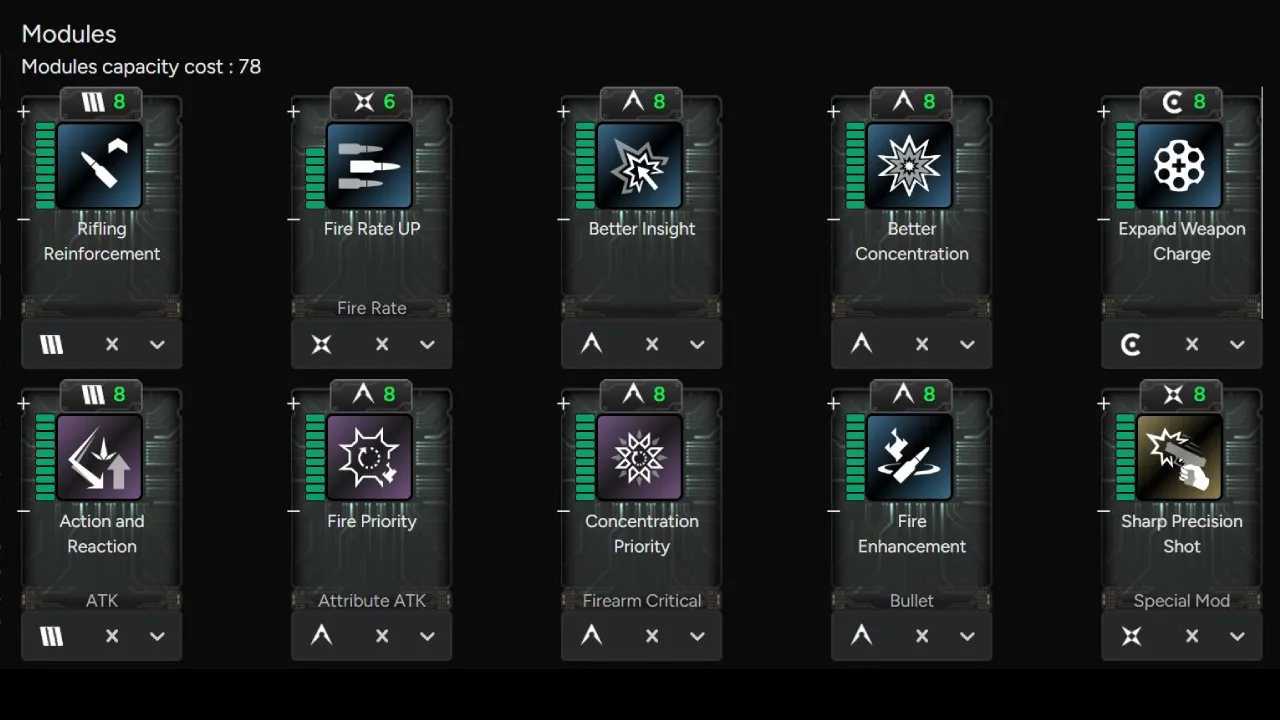
Enduring Legacy Modules Explanation:
- Rifling Reinforcement: + Firearm ATK
- Fire Rate UP: + Fire Rate
- Better Insight: + Firearm Critical Hit Rate
- Better Concentration: + Firearm Critical Hit Damage
- Expand Weapon Charge: + Rounds per Magazine
- Action and Reaction: + Firearm ATK, + Recoil
- Fire Priority: + Fire ATK, – Reload Time Modifier
- Concentration Priority: + Firearm Critical Hit Damage, – Reload Time Modifier
- Fire Enhancement: Adds Fire ATK equal to 30% of Firearm ATK
- Sharp Precision Shot: – Fire Rate. While pulling the trigger, + Fire Rare, – Recoil and Firearm ATK +6% every 0.5s, max 10 stacks.
| Slot | Module | Mod Level | Socket Type | Crystallized |
|---|---|---|---|---|
| 1 | Rifling Reinforcement | Max | Yes | |
| 2 | Fire Rate UP | Max | Yes | |
| 3 | Better Insight | Max | Yes | |
| 4 | Better Concentration | Max | Yes | |
| 5 | Expand Weapon Charge | Max | Yes | |
| 6 | Action and Reaction | Max | Yes | |
| 7 | Fire Priority | Max | Yes | |
| 8 | Concentration Priority | Max | Yes | |
| 9 | Fire Enhancement | Max | Yes | |
| 10 | Sharp Precision Shot | Max | Yes |
The best stats you can pick for Enduring Legacy are the following below, anything from blue to gold quality will do just fine.
- Firearm ATK
- Fire ATK
- Firearm Critical Hit Damage
- Cirearm Critical Hit Rate

Afterglow Build Setup
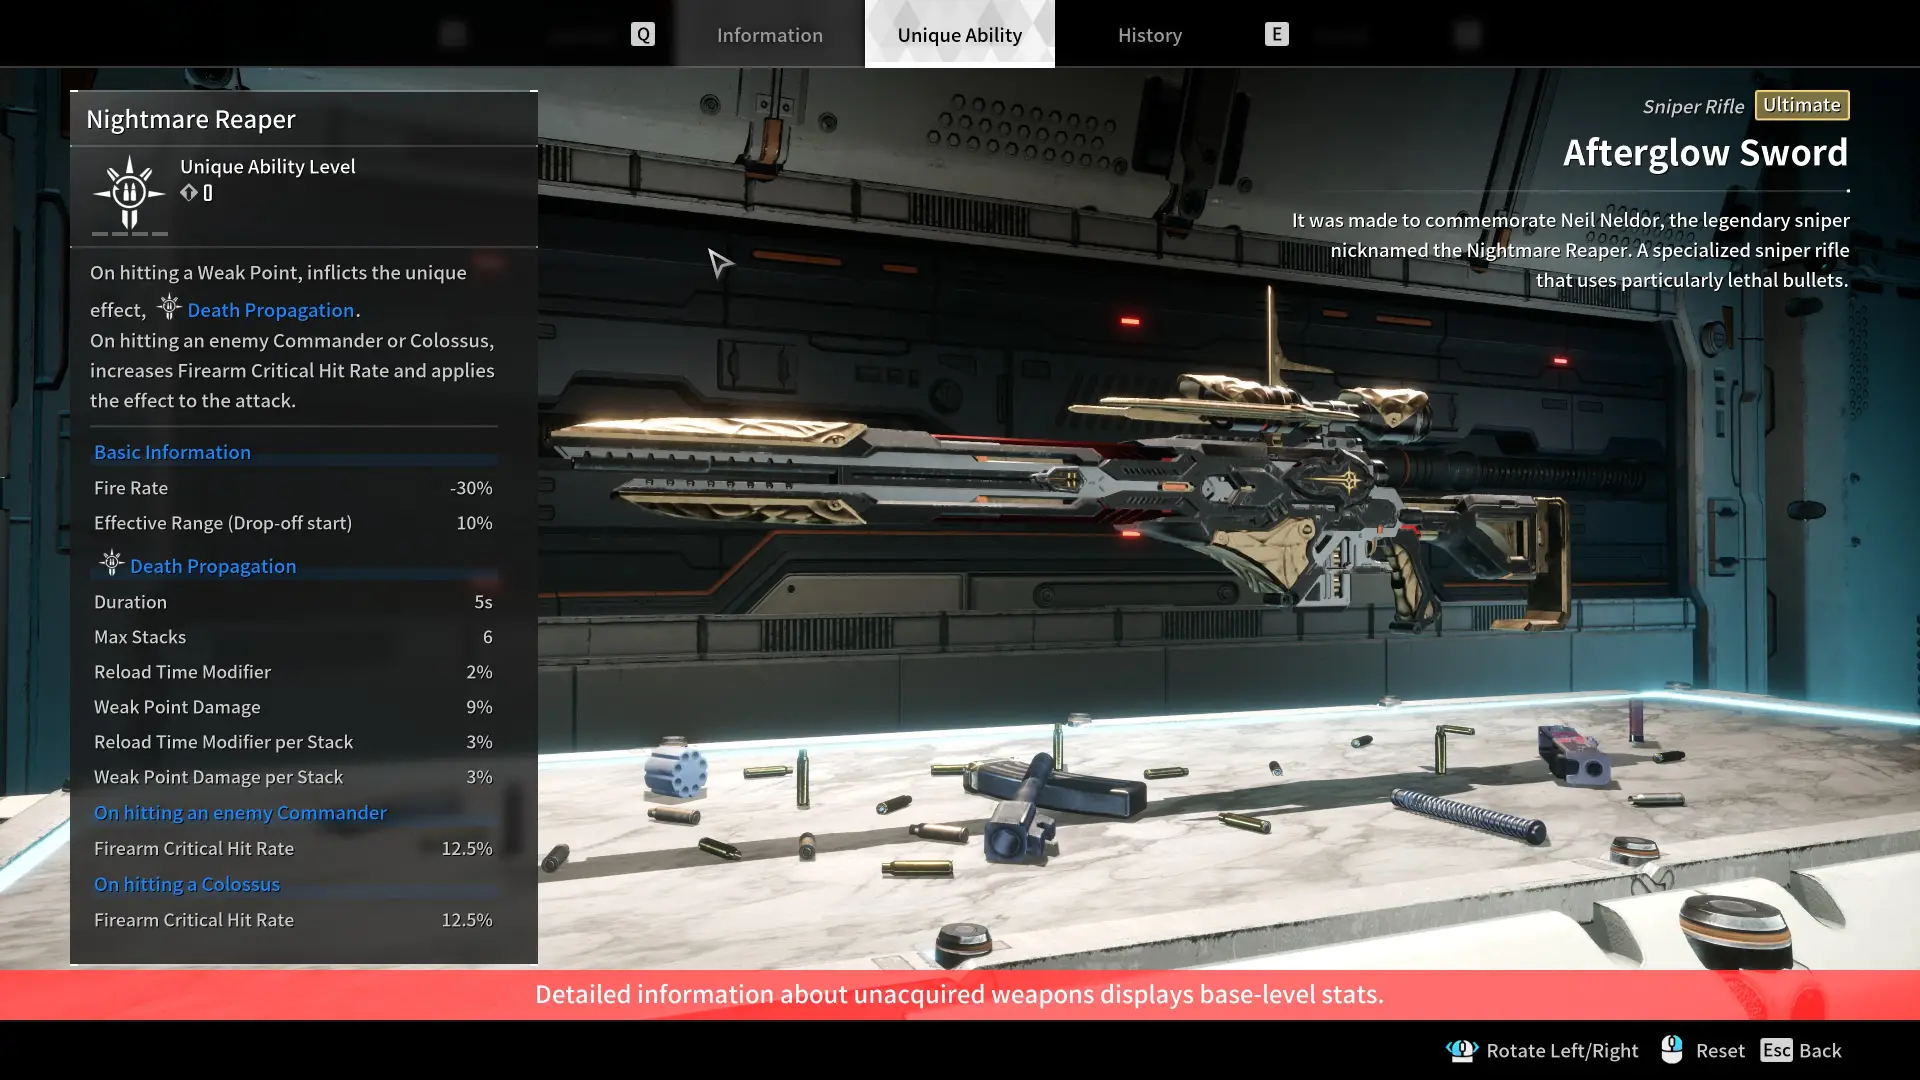
The Afterglow Sword is the best sniper rifle in The First Descendant. It deals insane damage to weak points and has a high critical rate. However, you need to make sure to build it correctly. Afterglow Sword is best built with a focus on Crit and Weak Point Damage. With this weapon, you can destroy parts of Colossus super fast.
How to get the Afterglow Sword in The First Descendant
Instead of the Weak Point Expansion Module, you can also use the Strengthen First Shot Module. However, Weak Point Expansion is more consistent in my opinion.
Afterglow Sword Modules Explanation:
- Rifling Reinforcement: + Firearm ATK
- Better Insight: + Firearm Critical Hit Rate
- Better Concentration: + Firearm Critical Hit Damage
- Weak Point Sight: + Weak Point Damage
- Weak Point Expansion: + Weak Point Damage
- Action and Reaction: + Firearm ATK, + Recoil
- Concentration Priority: + Firearm Critical Hit Damage, – Reload Time Modifier
- Edging Shot: + Firearm Critical Hit Rate, – Firearm ATK
- Focus Fire: + Weak Point Damage, + Firearm Critical Hit Damage
- Toxic Enhancement: Adds Toxic ATK equal to 30% of Firearm ATK
| Slot | Module | Mod Level | Socket Type | Crystallized |
|---|---|---|---|---|
| 1 | Rifling Reinforcement | Max | Yes | |
| 2 | Better Insight | Max | Yes | |
| 3 | Better Concentration | Max | Yes | |
| 4 | Weak Point Sight | Max | Yes | |
| 5 | Weak Point Expansion | Max | Yes | |
| 6 | Action and Reaction | Max | Yes | |
| 7 | Concentration Priority | Max | Yes | |
| 8 | Edging Shot | Max | Yes | |
| 9 | Focus Fire | Max | Yes | |
| 10 | Toxic Enhancement | Max | Yes |

Stats you want for Afterglow Sword:
- Weak Point Damage
- Firearm Critical Hit Damage
- Bonus Firearm ATK (vs Colossus)
- Firearm ATK

Best Thunder Cage Build Setup
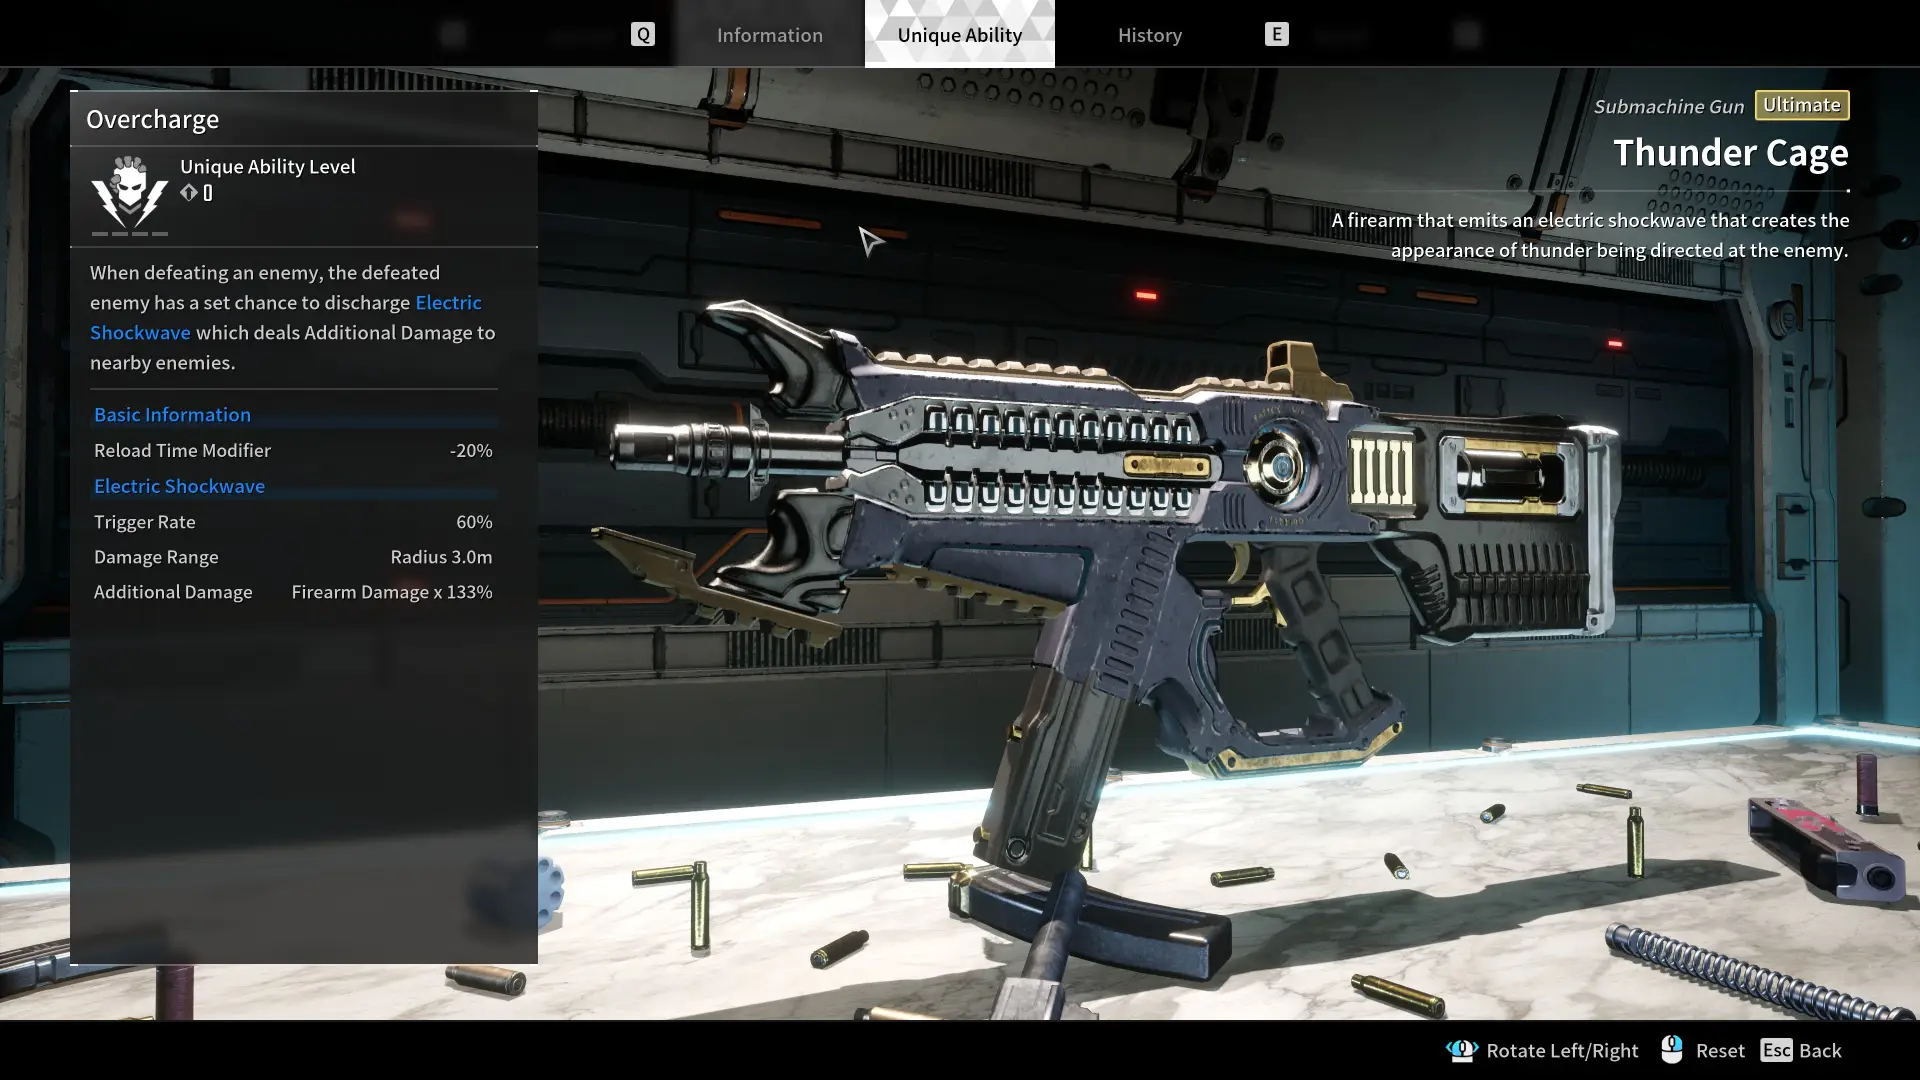
This is a high crit rate setup for the Thunder Cage. Thunder Cage has a unique ability that deals massive AoE damage. You can use this both for farming and bossing if you don’t have any other weapons yet. Thunder Cage is already powerful without maxing out its unique ability.
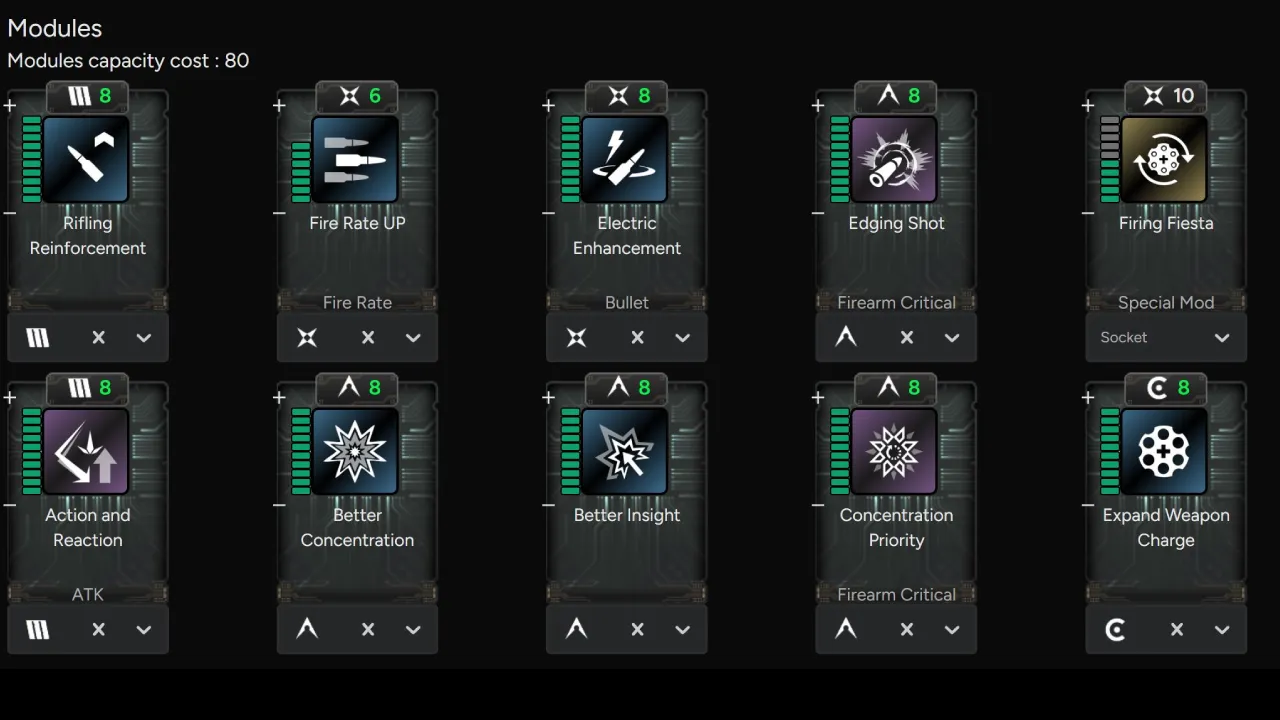
Thunder Cage Modules Explanation:
- Rifling Reinforcement: + Firearm ATK
- Fire Rate UP: + Fire Rate
- Electric/Chill/Fire/Toxic Enhancement: Adds Elemental Damage Equal to 30% of Firearm ATK
- Edging Shot: + Firearm Critical Hit Rate, – Firearm ATK
- Firing Fiesta: When reloading, rounds are not consumed for a short duration
- Action and Reaction: + Firearm ATK, + Recoil
- Better Concentration: + Firearm Critical Hit Damage
- Better Insight: + Firearm Critical Hit Rate
- Concentration Priority: + Firearm Critical Hit Damage, – Reload Time Modifier
- Expand Weapon Charge: + Rounds per Magazine
| Slot | Module | Mod Level | Socket Type | Crystallized |
|---|---|---|---|---|
| 1 | Rifling Reinforcement | Max | Yes | |
| 2 | Fire Rate UP | Max | Yes | |
| 3 | Electric Enhancement | Max | Yes | |
| 4 | Edging Shot | Max | Yes | |
| 5 | Firing Fiesta | 5/10 | No | |
| 6 | Action and Reaction | Max | Yes | |
| 7 | Better Concentration | Max | Yes | |
| 8 | Better Insight | Max | Yes | |
| 9 | Concentration Priority | Max | Yes | |
| 10 | Expand Weapon Charge | Max | Yes |
Budget Thunder Cage
This here is the Thunder Cage Budget setup that won’t require any Crystallization Catalysts. However, it requires an Energy Activator to reach the 80 Module Capacity.
Thunder Cage Budget Modules Explanation:
- Rifling Reinforcement: + Firearm ATK
- Fire Rate UP: + Fire Rate
- Firing Fiesta: When reloading, rounds are not consumed for a short duration
- Action and Reaction: + Firearm ATK, + Recoil
- Concentration Priority: + Firearm Critical Hit Damage, – Reload Time Modifier
- Expand Weapon Charge: + Rounds per Magazine
| Slot | Module | Mod Level | Socket Type | Crystallized |
|---|---|---|---|---|
| 1 | Rifling Reinforcement | Max | No | |
| 2 | Fire Rate UP | Max | No | |
| 3 | Empty | |||
| 4 | Empty | |||
| 5 | Firing Fiesta | Max | No | |
| 6 | Action and Reaction | Max | No | |
| 7 | Empty | |||
| 8 | Empty | |||
| 9 | Concentration Priority | Max | No | |
| 10 | Expanded Weapon Charge | Max | No |

Best Restored Relic Build

The Restored Relic launcher is a fun weapon to use in The First Descendant because it has homing missiles. Fully built out, it will deal massive damage against all enemies in its explosion radius.
Restores Relic Modules Explanation:
- Rifling Reinforcement: + Firearm ATK
- Fire Rate UP: + Fire Rate
- Expand Weapon Charge: + Rounds per Magazine
- Recycling Genius: + Reload Time Modifier
- Lethal Finish: Ammo gets + Crit Hit Rate
- Action and Reaction: + Firearm ATK, + Recoil
- Chill Enhancement: Adds Chill elemental damage
- Reload Focus: + Reload Time Modifier, + Firearm Critical Hit Damage
- Better Concentration: + Firearm Critical Hit Damage
- Better Insight: + Firearm Critical Hit Rate
| Slot | Module | Mod Level | Socket Type | Crystallized |
|---|---|---|---|---|
| 1 | Rifling Reinforcement | Max | Yes | |
| 2 | Fire Rate UP | Max | Yes | |
| 3 | Expand Weapon Charge | Max | Yes | |
| 4 | Recycling Genius | Max | Yes | |
| 5 | Lethal Finish | Max | Yes | |
| 6 | Action and Reaction | Max | Yes | |
| 7 | Chill Enhancement | Max | Yes | |
| 8 | Reload Focus | Max | Yes | |
| 9 | Better Concentration | Max | Yes | |
| 10 | Better Insight | Max | Yes |

Best Reactor for Serena in The First Descendant
Your Reactor is a very important item that determines your skill damage and can also include extra modifiers that buff certain aspects of your Serena build. The better your Reactor is, the more damage your skills will deal to enemies.
The name of a reactor can be determined by the following. For example a reactor with the name Materialized in it means it is good for anything that deals Non-Attribute damage.
| Name | Type |
|---|---|
| Tingling | Electric |
| Burning | Fire |
| Toxic | Toxic |
| Frozen | Chill |
| Materialized | Non-Attribute |
| Mechanics | Tech |
| Singularity | Singular |
| Mixture | Fusion |
| Phase | Dimension |
The First Descendant Enzo’s attribute is Non-Attribute and her skills use the following types:
- Singular (Start Supply, Perfect Support)
- Dimension (Explosive Drone, Enhance Combat Suit)
That means you want to get a Materialized Phase Reactor. This is important for the farming build because our drone that explodes will deal the most damage. For the boss build it doesn’t matter what reactor you use because we deal all our damage with our weapons.
Optimal stats to get for the Maaterialized Phase Reactor:
- Skill Cooldown
- Skill Duration
- Skill Effect Range
How to find the Location of Reactors
Reactor drop locations change every day. Not many players know this. Now there is a reactor search function in-game. Go to the map and press on Difficulty Level Rewards. Here, you can see where all the reactors have dropped.
Note: It is possible that no such reactors drop currently. Come back here every day and check if one drops.
If our specified reactor drops in an area, you go there and farm missions and monsters. There will be plenty of reactors dropping from monsters all over the place, any monster works.
In our example, we can actually farm them in the Muskeg Swamp area today. This changes every week, therefore always check this.

External Components for the Serena Build
X
Smooth Grapple Hook for your Serena Build
Using the standard Grapple Hook in The First Descendant can be a pain, and it feels kinda frustrating at times. Don’t worry, there is a way better alternative that will make it a joy to use the grappling hook!
It is called the Mid-Air Maneuvering Sub Module. I use this on all my The First Descendant Builds because it improves grappling by so much.
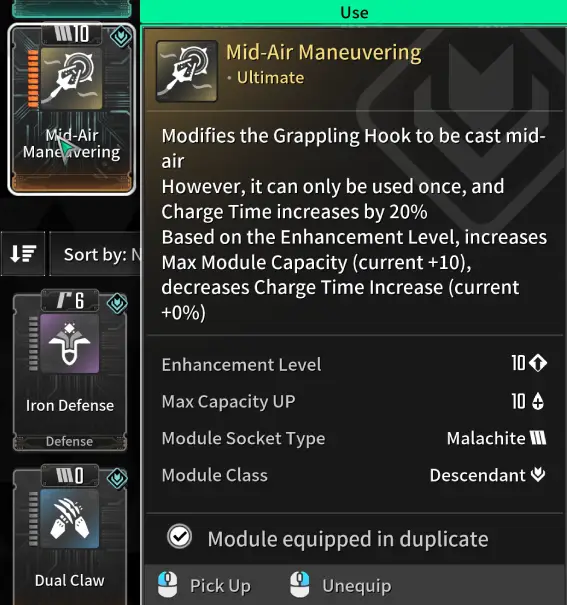
With this Module, you can attach your Grapple Hook to anything, even air! That means you can simply aim towards the sky and Hook up your grapple hook there for guaranteed fast movement!
Here is a guide on how to get the Mid-Air Maneuvering Sub Module in The First Descendant. It won’t take a lot of effort, but it will definitely improve your build and overall gameplay in The First Descendant.
Serena’s Story in The First Descendant
X
Related Content:
- The First Descendant Builds Database
- The First Descendant Character Tier List
- The First Descendant Best Characters – Top 3
The post The First Descendant: Serena Build & Best Loadout appeared first on AlcastHQ.


