
Unique Solo Sword and Shield Dragonknight Build for ESO
Type: Overland, Dungeons, Maelstrom & Vateshran Arena
Buildname: Solo Slam DK
Table of Contents
Gear
Skills
Champion Points
Important Info (Food, Mundus, Race, Potions, Passives, Attributes)
Resource Management
Rotation
Gameplay
Welcome to the Solo Sword and Shield Dragonknight Build for ESO, the build is optimized for solo play. This unique build is designed to be a bit more tanky than normal stamina damage dealer builds but still manages to push very good damage like you can see in this example here where Vateshran Hollows is cleared on veteran mode without a single death. To achieve the power of the build we are utilizing Sword & Shield/Bow weapon mix with Medium Armor.
This is one of the best builds for a Dragonknight that wants to be both tanky and deal damage. Dragonknights have a huge advantage due to a key ability like Noxious Breath which can be used as a spammable (Not a lot of players are aware of this), it also applies a damage over time effect and debuffs the enemies with Major Fracture, decreasing their resistance by a lot. And all that is area of effect (AoE) damage.
In addition, passives such as Helping Hands and Battle Roar supply us with extra stamina and Mountain’s Blessing boosts our weapon damage even higher.
Overland, Dungeon
Maelstrom & Vateshran Hollows Arena
Medium Armor
One Hand and Shield & Bow
Great Damage
Great Defensive
Good Healing
Solo Setup Sword and Shield Dragonknight for ESO
Now let’s take at the gear setup of the Solo Sword and Shield Dragonknight Build. You will find several setups. The tier 1 setup being the most optimal one, but the gear can be hard to get. That is why we also have a tier 2 and a beginner setup.
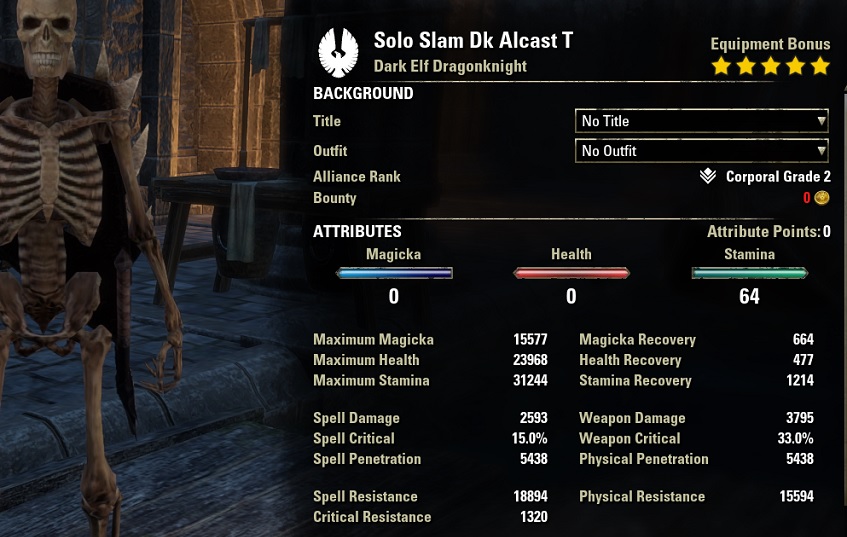
5x Vicious Serpent, 5x Briarheart, 1x Ring of the Pale Order, 1x Maelstrom Bow, 1x Stonekeeper on a Dark Elf with Dubious Camoran Drink buff food.
Unbuffed: Out of combat, buff food active
Buffed. In combat, buff food active, weapon damage enchantment, Briarheart, Weapon Power Potion active.
Gear
I have chosen to go 6 medium and 1 heavy piece, that way we get extra resistance and benefit from the Undaunted Mettle passive. I also use one health enchantment on the chest to increase our health a bit further.
Gear Setup with Mythic Item
Vicious Serpent helps a lot with sustain, you can also use it on the body and use Briarheart on the front bar, which is also a good choice.
You can arrange the placement of the sets however you want.
Gear
Set
Weight
Trait
Enchantment
Chest
Briarheart
Medium
Divine
Health
Belt
Briarheart
Medium
Divine
Stamina
Shoes
Briarheart
Medium
Divine
Stamina
Pants
Vicious Serpent
Medium
Divine
Stamina
Hands
Vicious Serpent
Medium
Divine
Stamina
Head
Vicious Serpent
Medium
Divine
Stamina
Shoulder
Stonekeeper or any other Monster Set
Heavy
Divine
Stamina
Necklace
Vicious Serpent
Jewelry
Bloodthirsty
Weapon Damage
Ring
Vicious Serpent
Jewelry
Bloodthirsty
Weapon Damage
Ring
Ring of the Pale Order
Jewelry
Bloodthirsty
Weapon Damage
Weapon 1 S&B
Briarheart
1H Weap
Nirnhoned
Damage Health Poisons IX
Weapon 1 S&B
Briarheart
Shield
Divine
Stamina
Weapon 2
Perfected Thunderous Volley
Bow
Infused
Weapon Damage Enchant
Gear Setup without Mythic item
Here we basically have the same setup as the first one, but without the Mythic item.
Gear
Set
Weight
Trait
Enchantment
Chest
Briarheart
Medium
Divine
Health
Belt
Briarheart
Medium
Divine
Stamina
Shoes
Briarheart
Medium
Divine
Stamina
Pants
Vicious Serpent
Medium
Divine
Stamina
Hands
Vicious Serpent
Medium
Divine
Stamina
Head
Bloodspawn
Medium
Divine
Stamina
Shoulder
Bloodspawn
Heavy
Divine
Stamina
Necklace
Vicious Serpent
Jewelry
Robust
Weapon Damage
Ring
Vicious Serpent
Jewelry
Robust
Weapon Damage
Ring
Vicious Serpent
Jewelry
Robust
Weapon Damage
Weapon 1 S&B
Briarheart
1H Weap
Nirnhoned
Damage Health Poisons IX
Weapon 1 S&B
Briarheart
Shield
Divine
Stamina
Weapon 2
Thunderous Volley
Bow
Infused
Weapon Damage Enchant
Beginner Setup
This is your secondary option, Vengeance Leech is a good set and also returns a lot of resources every time you kill something.
Gear
Set
Weight
Trait
Enchantment
Chest
Hunding’s Rage
Heavy
Divine
Health
Belt
Spriggan’s Thorn
Medium
Any Trait
Stamina
Shoes
Hunding’s Rage
Medium
Divine
Stamina
Pants
Hunding’s Rage
Medium
Divine
Stamina
Hands
Spriggan’s Thorn
Medium
Any Trait
Stamina
Head
Spriggan’s Thorn
Medium
Any Trait
Stamina
Shoulder
Spriggan’s Thorn
Medium
Divine
Stamina
Necklace
Vengeance Leech
Jewelry
Robust
Weapon Damage
Ring
Vengeance Leech
Jewelry
Robust
Weapon Damage
Ring
Vengeance Leech
Jewelry
Robust
Weapon Damage
Weapon 1 S&B
Hunding’s Rage
1H Weap
Nirnhoned
Damage Health Poisons IX
Weapon 1 S&B
Hunding’s Rage
Shield
Divine
Stamina
Weapon 2
Hunding’s Rage
Bow
Infused
Weapon Damage Enchant
Where can I get the gear?
Hunding’s Rage: Craftable
Perfected Thunderous Volley: vet Maelstrom Arena
Thunderous Volley: Maelstrom Arena
Vicious Serpent: Aetherian Archive, Sanctum Ophidia, Hel Ra Citadel
Bloodspawn: vet Spindleclutch 2
Vengeance Leech: Cyrodiil, Guildstores
Spriggan’s Thorn: Bangkorai Overland
Stonekeeper: vet Frostvault
Skills for the Sword and Shield DK Build
You might think that Noxious Breath is a weird choice for a spammable. However, it applies both a lot of direct damage and damage over time plus it debuffs the enemies with Major Fracture, decreasing their resistance by a lot. And all that is area of effect (AoE) damage.
S&B Mainbar
Bow-second bar
Slot 1: Defensive Stance
Slot 1: Endless Hail
Slot 2: Venomous Claw
Slot 2: Barbed Trap
Slot 3: Noxious Breath
Slot 3: Shuffle
Slot 4: Fragmented Shield
Slot 4: Cauterize
Slot 5: Echoing Vigor
Slot 5: Consuming Trap
Ultimate: Spell Wall
Ultimate: Standard of Might
Skill explanation:
Defensive Stance: Lets us block more and mitigate additional damage.
Venomous Claw: Powerful damage over time effect
Noxious Breath: Applies Major Breach, reducing enemy resistance, deals direct damage and damage over time. This is also our main spammable.
Fragmented Shield: Applies Minor Brutality through the passive Mountain’s Blessing. Also increases our healing by 16% for a short duration and gives Stamina back through the Helping Hands passive.
Echoing Vigor: Strong heal over time that lasts for a long time. We prefer this morph because the heal is already strong enough and the longer duration is better, more time to deal damage! Compared to the other morph which only lasts for a very short duration. If you drop low on health make sure to activate this and also use Brawler to gain a shield to bolster your health.
Spell Wall: Any ultimate can go here, Spell Wall is nice because you perma block for a while and reflect all attacks back to the caster.
Endless Hail: Your AoE damage over time effect, drop it on the ground, can it several enemies.
Consuming Trap: Apply this on the enemy, deals a lot of damage and gives 7000 stamina back when you kill the enemy while affected by this skill.
Shuffle: Reduces AoE damage by 20%.
Barbed Trap: Deals insane damage and gives Minor Force to us, increasing Critical Damage by 10%.
Cauterize: Powerful extra heal. (You can also use the other morph Flames of Oblivion if you want more damage instead of extra heal).
Standard of Might: Your main ultimate, increase all of your damage.
Champion Points
Below you can find the Champion Points setup for this build. Work your way from top to bottom in your allocation. For more information on Champion Points, please visit the Champion Points Overview Page on ESO-Hub.com.
Hovering over each perk will give you insights on what it does. Presets are also provided for each of the allocations below.
Click the tab below to open the allocation.
Important Info
Buff-food
Artaeum Takeaway Broth is the expensive buff-food version, if you want to save money you can use Dubious Camoran Throne, which can be bought at guild stores for a cheap price.
Artaeum Takeaway Broth
(Max Health, Max Stamina, Stamina Recovery, Health Recovery)
Dubious Camoran Throne
(Max Health, Max Stamina, Stamina Recovery)
Mundus Stone
The Lover Mundus Stone provides us with extra penetration, which increases our damage. For more information on Mundus Stones please visit the Mundus Stone Overview Page.
The Lover Mundus Stone (Increased Penetration)
Race
All stamina based races work with this setup. More about each race can be found on the racial overview page.
Dark Elf
Khajiit
Orc
Redguard
Imperial
Wood Elf
Nord
Argonian
High Elf
Potions
Always make sure to active potions on cooldown, to really get the 100% uptime on the buffs and extra stamina.
Weapon Crit Potions
(Weap dmg, Weap Crit, Stamina)
(Blessed Thistle, Dragonthorn, Wormwood)
Poisons
I recommend front baring these poisons, they deal a good amount of damage.
Damage Health Poison
(Damage Poison, Damage Poison)
(Fleshfly Larva, Nightshade, Nirnroot)
Passives
Ardent Flame: Combustion, Searing Heat, World in Ruin
Draconic Power: Iron Skin, Burning Heart, Scaled Armor
Earthen Heart: Eternal Mountain, Battle Roar, Mountain’s Blessing, Helping Hands
One Hand and Shield: Fortress, Sword and Board, Deadly Bash, Deflect Bolts, Battlefield Mobility
Bow: Long Shots, Accuracy, Ranger, Hawk Eye, Hasty Retreat
Medium Armor: Dexterity, Wind Walker, Improved Sneak, Agility, Athletics
Heavy Armor: Resolve, Constitution, Juggernaut, Revitalize, Rapid Mending
Fighters Guild: Intimidating Presence, Slayer, Banish the Wicked, Skilled Tracker
Undaunted: Undaunted Command, Undaunted Mettle
Racial: All
Alchemy: Medicinal Use
Attributes
64 Stamina, 0 Health, 0 Magicka
Resource Management
Heavy Attacks work well on S&B, they are faster and return a lot of resources. Use your potions on cooldown to regain a lot of stamina at once. Your main resource tool is Consuming Trap, if you kill an enemy while that skill is on the enemy, you regain 7000 stamina, yes that is a lot.
Rotation
There is not a real rotation with this setup, you always have to prioritize survival, aka healing and defense. Once that is taken care of, apply damage over time effects and use your spammable on the enemy till your damage over time effects fall off, reapply them and repeat the whole process.
In case you don’t know what what weaving light attacks is, make sure to check out the “Weaving Beginner Guide” which explains how to weave light attacks between abilities, aka animation canceling.
Gameplay
Maelstrom Arena Run
Full veteran Maelstrom Arena run. If you want to learn more about the Maelstrom Arena, you can check out the Maelstrom Arena overview page.
Vateshran Hollows Arena Run
Full veteran Vateshran Hollows Arena run. If you want to learn more about the Vateshran Hollows Arena, you can check out the Vateshran Hollows overview page.
Related Guides
ESO Best Dragonknight Build META DPS
Group Two Hander/ Bow Dragonknight DPS Build
Group Bow/ Bow Dragonknight DPS Build
Solo Dragonknight DPS Build
The post Unique Solo Sword and Shield Dragonknight Build for ESO appeared first on AlcastHQ.


