
BG3 Patch 8 Best Subclass Tier List | Baldur’s Gate 3
Welcome to the BG3 Patch 8 Subclass Tier List. On this page, we will rank the new Patch 8 subclasses introduced to Baldur’s Gate 3 in 2025.
In BG3 Patch 8, each of the 12 classes got one new subclass option that you can choose. While all of them have their uses, today we will aim to find out which ones are strongest. We’ll be ranking them based on their damage output, survivability, support potential (healing, buffs, debuffs) and their range/mobility.
Table of Contents:
If you want a general overview of all classes, please visit the BG3 Classes Overview article.
How the BG3 Class Tier List Works
We’ve broken down the BG3 Patch 8 subclasses into four tiers for this ranking:
- S-Tier: Supremely powerful, a major asset for your party and capable of turning the tide of battle or controlling the battlefield in a variety of situations.
- A-Tier: Extremely strong and versatile class, adaptable to anything the game can throw at you
- B-Tier: Very strong and can handle the majority of situations with ease, but some minor weaknesses of note
- C-Tier: Decent, but with several weaknesses that require consistent effort to mitigate.
We’ll be ranking them based on four important criteria:
- Damage – How quickly can the subclass dish out damage to enemies in normal circumstances?
- Support – How good is the subclass at healing and buffing allies and debuffing and crowd-controlling enemies?
- Survivability – How good is the subclass at staying alive? More tanky subclasses are easier to play and can stay in the fight for longer.
- Range and Mobility – Your character’s high damage potential might not be immediately useful if they are slow to move around and cannot fight at long range. To score well here, a subclass must be either highly mobile or come with good long-range fighting options.
Please note that there are not really any “bad” classes and subclasses in Baldur’s Gate 3 – If you go with a subclass that’s ranked C-Tier on the list, you will still be able to play through the game on any difficulty.
However, the highest-ranked subclasses will typically make your playthrough a little easier and are more suited to beginners or people trying Tactician/Honour mode for the first time.
Without further delay, let’s get into the rankings!
BG3 Patch 8 Subclass Tier List
| Tier | Class |
|---|---|
| S-Tier |
|
| A-Tier |
|
| B-Tier |
|
| C-Tier |
|
S-Tier Subclasses in BG3 Patch 8
The BG3 subclasses in the S-Tier are supremely powerful and give players ample options in combat.
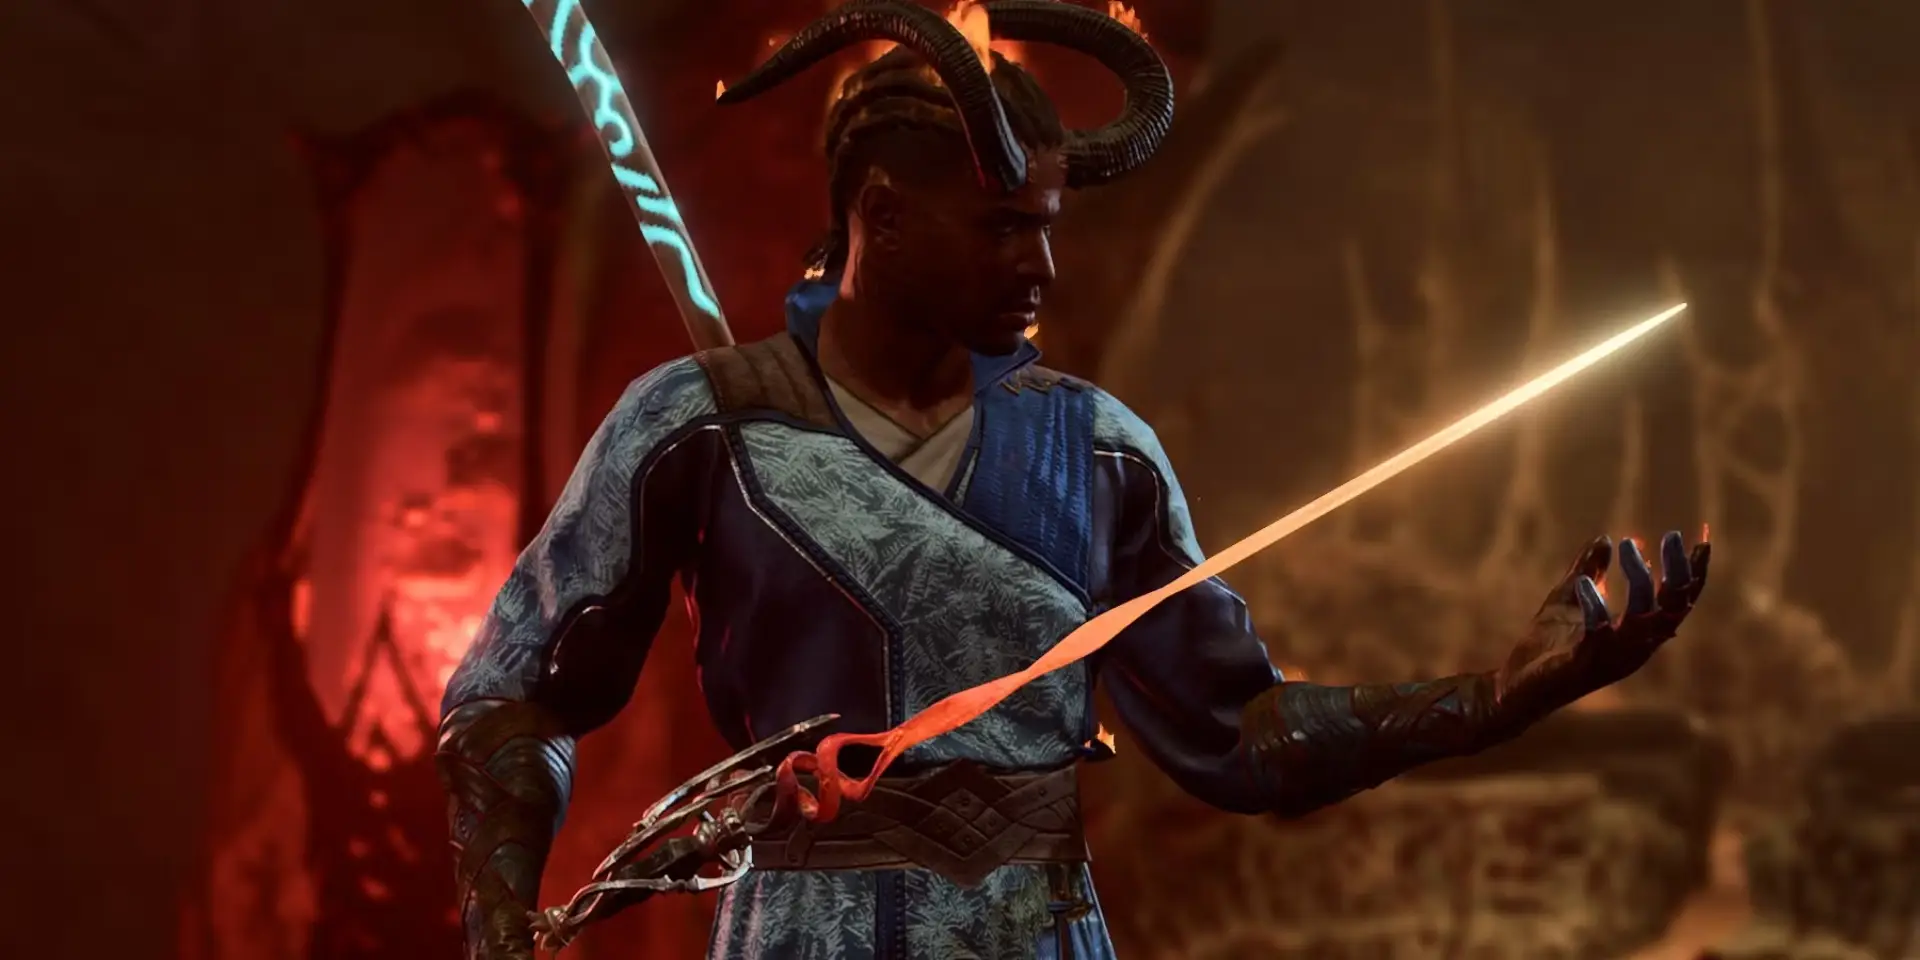
BG3 Hexblade Warlock
The Hexblade is arguably the strongest subclass in BG3, at the time of writing. This also makes it the most likely candidate to be nerfed.
Hexblade Warlocks get Proficiency with all melee weapons and with medium armour, which is already a pretty neat addition to their wide range of spellcasting options.
But the bread and butter of the Warlock subclass revolves around the Hexblade Curse that you can apply to enemies. You can manually inflict the curse by spending a Bonus Action, but you also have a chance to inflict it with each successful melee attack. You are more likely to land a Critical Hit against a cursed enemy, and you will also heal yourself when the Cursed enemy dies (even if an ally kills them, rather than your Hexblade Warlock). The Half-Orc race works very well with the Hexblade Warlock, because they roll extra damage when they Crit.
When your Hexblade reaches Level 6, you also gain the ability to summon spectres from fallen enemies. Larger enemies yield more powerful spectres. When your summoned spectre damages an enemy, they will heal your Warlock for a portion of their damage done.
All of this extra healing and damage potential results in a huge amount of in-combat sustain for your Warlock – they can continually heal themselves, and the more aggressive you are, the more you can heal.
To learn more about how you can fully utilize this OP new subclass, check our BG3 Hexblade Build.
BG3 Swashbuckler Rogue
The BG3 Rogue has always been a class that can be extremely powerful in the hands of a skilled and patient player, but could be mediocre for beginners or for players who just don’t utilize stealth much. This was true regardless of which Rogue subclass you chose.
However, the Swashbuckler’s thing is that they don’t play by the rules, and this has upended the balance quite significantly. Rogues previously needed to utilize sneak attacks to gain large damage bonuses and unlock their full potential. To execute a sneak attack, you needed to roll with Advantage against an enemy, usually by being undetected when you initiated the Attack Roll. But Swashbucklers can use Rakish sneak attacks, allowing them to gain the same damage bonuses, but ditching the Advantage requirement. You can use a Rakish attack if you are in melee range of your target and do not have a Disadvantage on your Attack Roll.
This makes the Rogue class much easier to play, without really reducing their damage ceiling by much at all. On top of this, Swashbucklers can support their party by messing with enemies – they can disarm an enemy with Flick o’ the Wrist, or Blind an enemy by throwing sand or dirt in their eyes, giving the whole party Advantage against that enemy.
The Swashbuckler’s damage potential is arguably even higher than the Hexblade’s, but you do need to be a bit more careful because the Swashbuckler cannot heal itself like the Hexblade can.
See More: BG3 Swashbuckler Build
A-Tier Subclasses in BG3 Patch 8
The A-Tier subclasses are still very strong but tend to be slightly overshadowed by their S-Tier counterparts, or suffer from one or two mild weaknesses that make them tougher to play.
BG3 Oath of the Crown Paladin
If you want a traditional Heavy Armour Tank build, the Oath of the Crown Paladin is for you. This subclass is highly support-focused and uniquely gifted at taunting enemies, but it can also pack a punch when needed thanks to its Proficiency with all Martial Weapons and its access to Smite Spells.
Not only do you have a unique subclass taunt, you can also add an ally’s Proficiency Bonus to their Attack Rolls, making their attacks more accurate for a time, and you can opt to absorb an attack directed at a nearby ally, redistributing the damage to your Paladin’s health bar.
It’s up to you if you want to fully play into the tank and support aspect of the Crown Paladin or to make them an “aggressive tank”, wielding a great weapon and bogging down enemies with taunts, debuffs and crushing damage output. We chose the latter approach in our build, but it’s very easy to convert it to a full tank if that’s what you’re after. The Crown Paladin excels at both approaches, and they will be a mighty rock at the heart of your party.
Learn More: Oath of the Crown Paladin Build

BG3 Arcane Archer Fighter
The Arcane Archer was always going to be decent. Built on top of the already powerful base class that is the Fighter, it was just a question of what the subclass would add to this foundation.
Arcane Archers gain access to a number of Arcane Arrows after each rest. These arrows can be spent on special ranged attacks that either deal extra damage, apply special debuffs to the target, or a combination of both. The Arcane Archer plays like a ranged version of the Battle Master subclass. I don’t think it’s as good as the Battle Master, mind you, but it is still a solid subclass and will be an asset to your party. Being a Fighter, it’s still more than capable of slugging it out in melee with pretty much any weapon and armour combination being on the table.
Learn More: BG3 Arcane Archer Build

BG3 Path of Giants Barbarian
If you want your character to be the biggest, strongest brute possible, then the Giant Barbarian is the option for you.
Each Barbarian subclass gives its own spin to the Barbarian Rage mechanic. With the Path of Giants, Rage will make your character grow in size, making them stronger and causing their melee attacks to deal a little more damage.
Path of Giants Barbarians can use their Strength to kick a target, an alternative to the shove action which can shift up to double the weight if successful. Your Giant Barbarian also has 25% extra Carrying Capacity, but other than that they don’t do anything to support your party.
This is a cool subclass that can have funny results, especially when combined with a spellcaster who casts the Enlarge spell on your already enlarged Barbarian. I think the Berserker Barbarian is stronger, but the Path of Giants is perhaps the second best Barbarian overall.
Learn More: BG3 Path of Giants Barbarian Build
BG3 Death Domain Cleric
Up to now, Clerics in Baldur’s Gate had a subclass for pretty much every type of magic, except for Necromancy. The Death Domain Cleric finally addresses this imbalance. But if you’re already imagining an army of skeletons, hold your horses for a moment.
The Death Domain Cleric is more focused on maximising the amount of damage you can deal with Necrotic Cantrips and Spells. They do, of course, get the Animate Dead spell as a Domain inclusion, meaning you don’t need to manually prepare it. But besides this, they don’t give you any extras related to summoning undead.
So, what do you get? Well, your Necrotic Cantrips can all target an additional enemy from the beginning of the game, which is certainly handy. You also get a Channel Divinity Action to deal a hefty chunk of Necrotic Damage to an enemy alongside an ordinary attack. These features are especially helpful in the early game, where the Cleric usually struggles the most before the all-important Level 5, when you begin to unlock some of the Cleric’s powerful spells.
Later on, you can completely ignore enemy resistance to Necrotic Damage, and your Divine Strike gives you an extra 1d8 Necrotic Damage on a weapon attack, once per turn. There’s nothing really game-changing in here, and some players will be disappointed with the lack of actual Necromancy here. But still, this is a decent subclass on top of a strong class, so it just about scrapes into A-Tier. But it pretty much goes without saying that the best Clerics are still Light Domain for damage, and Life Domain for support.
Learn More: BG3 Death Domain Cleric Build

B-Tier Subclasses in BG3 Patch 8
B-Tier subclasses are still quite good, but are either tougher to play or have more weaknesses than A and S subclasses.
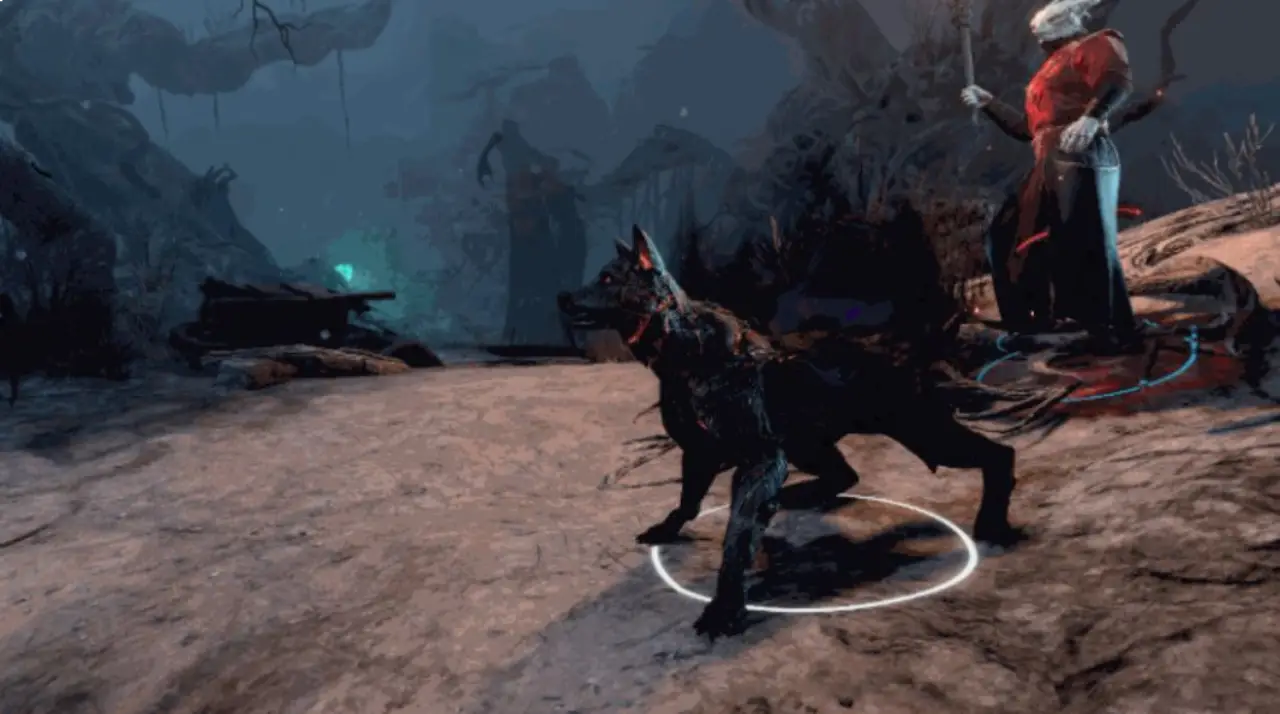
BG3 Shadow Magic Sorcerer
Initially, the Shadow Sorcerer is defined by its ability to cast the Darkness spell, and the ability to see through all darkness, including magical. This allows you to set up traps and plunge enemies into darkness that only you can see through, putting them at a huge disadvantage.
This sounds great on paper, but in practise it isn’t so easy – you need to stop the enemy (usually several of them) from moving out of the darkness, otherwise the shenanigans will end after one turn. Your party needs a specific setup; otherwise, some of them will also be unable to hit the shrouded enemies, and if you lose Concentration, then the darkness disappears. Experienced players with a finely-tuned party can pull this playstyle off for sure, but if it’s your first playthrough, then you will probably just find it frustrating.
Luckily, the Shadow Sorcerer is salvaged by its unique summonable creature, the Hound of Ill Omen. This creature will help your Sorcerer in combat. When attacked, it will summon a weaker shade of itself. The shades have less HP and deal less damage, but they can also summon a shade when they are attacked (if they survive the attack). This can give your Shadow Sorcerer a group of summoned hounds that attack your enemies and distract them – the AI often wastes its time attacking summoned creatures, so this indirectly helps to support and protect your party.
Learn More: BG3 Shadow Sorcerer Build
BG3 Circle of Stars Druid
The Circle of Stars Druid, like the Circle of Spores, gives you a new way to spend your Wild Shape charges.
Instead of transforming into an animal, you can choose one of three Starry Forms. Each Starry Form comes with its own unique features that are applied to your character while active.
The Starry Archer form solves the Druid’s early-game lack of a good cantrip by allowing you to shoot Radiant arrows at your enemies. Later on, Druid players often struggle with keeping Concentration on their spells, since the class is heavily reliant on Concentration Spells to pull of some of its most powerful effects such as Spike Growth, Call Lightning and Insect Plague. But the Circle of Stars Druid also helps you here – you can use the Starry Dragon form to guarantee a roll of at least 10 on Concentration Saving Throws.
Later on, you gain some Cosmic Omens each time you rest. These allow you to boost or reduce dice rolls that happen in your vicinity, helping to sway combat in your favour.
The problem with the Circle of Stars Druid is that it’s overshadowed by the Circle of the Land and Circle of the Moon. Sure, we get a couple of extras from divining the stars, but I’m just hard pressed to think of reasons to choose the Circle of Stars above the aforementioned two subclasses, unless you’ve already played them both and are bored with them.
Still, all Druids are pretty powerful in BG3, if not the most beginner-friendly class, once you get past the early-game you will have a strong spellcaster and shapeshifter on your hands.
Learn More: BG3 Circle of Stars Build
BG3 Bladesinger Wizard
The Bladesinger Wizard combines the Wizard’s expansive spellcasting with melee weapon and light armour proficiency.
The class revolves around the Bladesong mechanic. You can activate your Bladesong to increase your Armour Class and Movement Speed. While active, attacking enemies with your melee weapon and casting spells will accumulate Bladesong Damage and Healing charges. You can then activate Bladesong Climax, consuming all of the charges to deal Force Damage while healing nearby allies.
I do quite like the Bladesinger Wizard, and perhaps it is stronger than this ranking suggests. The problem is that the Bladesinger is overshadowed in Patch 8 by the Hexblade Warlock which fills the same niche of a spellcasting melee fighter, but throws in so many OP extras like the healing from the Hexblade Curses and the summoned spirits.
Despite that, the Bladesinger Wizard freshens up the Wizard by finally offering a playstyle that plays very differently to the other Wizard subclasses.
Learn More: BG3 Bladesinger Wizard Build

BG3 Swarmkeeper Ranger
The Swarmkeeper Ranger can tame one of three swarm types: bees, jellyfish or moths. The swarm type will alter the damage type dealt by the swarm, and the other effects that it grants. All three swarm types can be used to teleport your Ranger over a short distance, which is especially handy if you’re being chased down by a melee assailant.
The really good thing about the swarms is that you don’t need to spend an Action, Bonus Action or Reaction to utilize them. Instead, you can use one Swarm Action each turn. Swarms also enjoy bonus damage when attacking a creature afflicted by Hunter’s Mark, a spell that Rangers will typically utilize to increase their damage output.
This results in consistently high single-target ranged damage. There’s nothing super powerful about the Swarmkeeper, but it does give a bag of cool new tricks to a class that often gets overlooked, so for that reason I quite like it.
Learn More: BG3 Swarmkeeper Ranger Build
C-Tier Subclasses in BG3 Patch 8
While they may still excel in some situations, C-Tier sublasses are typically less versatile than those in higher tiers and require a greater level of player skill to get the best out of them.
BG3 College of Glamour Bard
The College of Glamour Bard isn’t weak because it’s built on the foundation of the Bard class, which is a consistently decent jack-of-all-trades. The problem with the Glamour Bard is that it does so little to build on top of the basic Bard class.
This subclass allows you to give some Temporary HP to allies, attempt to Charm enemies who attack an ally with THP, and get an automatic success on attempts to use the Command effect on enemies who you already Charmed. That is literally everything that this subclass does, and I was able to fit it into one sentence. I think that just isn’t good enough to justify choosing the College of Glamour when you can instead go with the far superior College of Swords, for example.
But if you like the thematic idea behind the College of Glamour, you want to build a party around mind control, or you’re just bored with the other Bards, then you can still make this subclass work pretty well.
Learn More: College of Glamour Bard Build
BG3 Drunken Master Monk
The Drunken Master Monk could be seen as a bit of a meme subclass. It puts fun first, and doesn’t take itself too seriously.
You are immune to the negative effects of being drunk when you use this subclass, and as you level up you gain various bonuses themed around the drunk status. You can use Intoxicating Strike to make enemies drunk, and later on you can gain a special buff called Life of the Party. Each stack gives you additional Armour Class and a bonus to Attack Rolls against Drunk targets. Hitting an enemy with Intoxicating Strike will add another stack to your Life of the Party debuff. You can also use Sobering Realisation to remove Drunk from an enemy and Life of the Party for yourself, which will deal some bonus Psychic Damage.
The Drunken Master gets a couple more neat features, such as being able to perform a quick flurry of attacks and then benefit from the Disengage status, allowing them to easily attack and retreat on the same turn. They can also spend Ki Points to ignore Disadvantage on an Attack Roll or Ability Check (at high levels).
None of these features are at a game-changing level of strength, but they do combine into a fun and engaging set of tools that sets the Drunken Master apart from every other subclass. One of the most important parts of a subclass, in my view, is having a unique identity. The Drunken Master gets this right even though it’s not especially powerful.
Learn More: BG3 Way of the Drunken Master Monk Build
We hope you enjoyed our BG3 Patch 8 Subclass Tier List. Please visit our BG3 Builds Database for any more information on builds and classes.
The post BG3 Patch 8 Best Subclass Tier List | Baldur’s Gate 3 appeared first on AlcastHQ.


