
While the Dark Urge defaults to a Storm Sorcerer, players can change this in character creation, along with all aspects of his appearance and class. We went for the Swashbuckler because it’s powerful, easy to play and one of the best thematic fits for the Dark Urge (in aesthetic terms). However, if you want help with the Storm Sorcerer class, we also have a Storm Sorcerer Build which will work fine with the Dark Urge’s default subclass.
BG3 Best Dark Urge Build
Welcome to the best BG3 Dark Urge Build. The Dark Urge is an origin character in Baldur’s Gate 3, but it is unique because its appearance, race, class and subclass can be freely customised during character creation.
For this build, we’ll be using the new Swashbuckler Rogue subclass, which is easy to play and offers good mobility and single-target damage output. It is also good at stealth and dexterous actions like lockpicking and pickpocketing, when needed.
Please visit our Best BG3 Builds overview page for more builds. To get an overview of all classes, please visit the BG3 Classes overview page.
Dark Urge Build Table of Contents:
- BG3 Dark Urge Overview
- BG3 Dark Urge Character Creation
- BG3 Dark Urge Build Levelling Guide
- BG3 Dark Urge Build Best Equipment
- Dark Urge Build Extra Info
- Dark Urge Build FAQs
BG3 Dark Urge Overview
We’ll start with a quick introduction of the Dark Urge Origin, how it works and how we’ll be structuring the party and build to suit it. If you only want to know about the build itself, you can skip to the Dark Urge Character Creation section.
What Is the Dark Urge?
The Dark Urge is a unique Origin in BG3. While the other Origin characters follow a preset character, the Dark Urge allows you to create a character from scratch, although there is a default option (the white dragonborn sorcerer you see when you first select the origin).
Whatever you choose, your backstory will be the same – you awake on the Nautiloid with no memories, but often possessed by a dark urge to murder and maim.
Sometimes you will have to choose between attempting to resist the urge or giving in to it, which can cause the early demise of some characters.
We won’t give any spoilers, but the reasons for your character’s affliction will become much clearer as you progress through the story. This origin will heavily pull you towards some very evil choices, even if you try to resist it.
It is an ideal origin for an evil playthrough, and it isn’t well-suited to players who only want to choose morally good options – that is pretty much impossible with this origin, no matter how hard you try.
Best Party Composition for the Dark Urge
While you can use any party composition with the Dark Urge, you’ll have an easier time with characters who are morally neutral or evil. This leaves the following four options as the most obvious choices:
 Astarion – Astarion generally isn’t fazed by violence and trickery, especially if it is done for the purpose of increasing his power or that of the party as a whole. It is therefore quite easy for Astarion to get along with the Dark Urge.
 Lae’zel – Lae’zel favours the most direct, often the most violent path to deal with obstructions, and has a low opinion of most people of Faerun, whom she looks down on. While it’s possible for her to have something of a redemption arc later on in the story, Lae’zel fits in very easily with an evil playthrough and has some funny interactions with Astarion as a bonus.
 Shadowheart – Starting the game with probably the most neutral alignment of all of the origins, Shadowheart fits in easily with both evil and good playthroughs. While she isn’t too thrilled with needless displays of violence, particularly against those who are weak or defenceless, she can coexist easily enough with the Dark Urge. In Act I you will have to manage the fierce rivalry between her and Lae’zel, but it is possible to overcome this.
 Minthara – Minthara can be recruited in Act II if she survives Act I (for this you need to side with her and attack the Druid Grove, then avoid conflict with her in the aftermath). As a Lolth-Sworn Drow, she has perhaps the most evil inclination of any recruitable character in BG3. However, she isn’t comically evil, she is simply from a culture where violence and repression of the weak is normal behaviour. You can only have three allies in your party at once, so you’ll have to swap out another party member if you want to have Minthara in your party.
Why We’re Using the Swashbuckler Subclass
You can use any class and any subclass in the game with Dark Urge, so why did we decide on the Swashbuckler Rogue? Let’s examine the basic Rogue class and the Swashbuckler subclass to see what they offer.
Rogue Benefits
 Skill Expertise – You can choose some Skills that you are Proficient in and become an expert at those Skills, doubling your Proficiency Bonus. This allows you to be extremely good at, for example,
  Sleight of Hand and
  Acrobatics (two of the most important Dexterity Skills) right from the start of the game.
 Sneak Attacks – If you have
  Advantage against a target, you can perform a Sneak Attack. This is more likely to hit and deals lots of bonus damage, with the bonus damage increasing as you level up. This allows you to deal crazy damage and even OTK some enemies at the start of combat.
 Cunning Actions – You can perform Dash, Disengage and Hide with a
  Bonus Action instead of a full
  Action, so you can get a lot more done on your turn.
 Uncanny Dodge and
  Evasion – Unlocked at Levels 5 and 7, respectively, these allow you to negate a large portion of damage from attacks, making the Rogue more durable than you would expect.
Swashbuckler Benefits
The Swashbuckler builds on the Rogue’s basic features, making it easier to use and even more effective:
 Rakish Audacity – You no longer need Advantage to perform Sneak Attacks against opponents. You can always use them as long as you are in melee range and don’t have
  Disadvantage. This makes your Dark Urge build much easier to play and more flexible in combat – even in situations where hiding isn’t possible, you can still get the maximum damage.
 Fancy Footwork – Hitting an enemy prevents them from launching an opportunity attack against you. Great for hit-and-run attacks.
 Dirty Tricks – From Level 4, you can use Dirty Tricks to
  Blind or
  Disarm an opponent, making them much easier for your party to fight. Better yet, this only consumes a Bonus Action, so even if it fails, you can still do more attacks on your turn.
On top of all of this, the Swashbuckler is aesthetically perfect for the Dark Urge. Perhaps I’m a simple man, but the glowing red eyes that adorn your character when using the Rakish Sneak Attacks immediately made me think of the Dark Urge.
BG3 Dark Urge Character Creation
We’ll now take you through the full process of creating this BG3 Dark Urge Build, beginning with the best options in Character Creation.
Best Race
You can choose any race you want, and the build will work just fine. However, the following five races stand out the most:
| Race | Strengths | Info |
|---|---|---|
Lolth-Sworn Drow |
|
Not only a great choice due to its racial bonuses, the Lolth-Sworn Drow is also perfect for the aesthetic of the Dark Urge.
You can choose Seldarine Drow instead if you want; they are functionally identical but have a different backstory to their Lolth-Sworn brethren. |
Half Orc |
|
Another good aesthetic choice for the Dark Urge.
Half-Orcs are also some of the best melee damage dealers in BG3, thanks to the Savage Attacks passive feature. |
Duergar |
|
With their wider choice of armour and weapon proficiencies, and resistances to poison, charm, and paralysis, Duergar are one of the strongest races in BG3.
The only downside of Duergar is their small stature – this reduces their base Movement Speed to 7.5 metres per turn (most races get 9 metres). |
Wood Elf |
|
Wood Elves are a good choice for any Rogue build thanks to their innate Proficiency with Stealth and Perception and ability to see in the dark.
Their wider weapon Proficiency is handy, but we won’t need it for this build. However, the extra Movement Speed is great for any build, but especially a Rogue, which leans into an agile, evasive playstyle. You can use Half Wood Elf, too; it retains most of the same features. |
White Dragonborn |
|
While it’s not typically the best fit for a Rogue build, I included the White Dragonborn here for players who want to stick with the default look of the Dark Urge.
The Frost Breath action is quite good for close-quarters fighting – don’t overlook it! |
Class
As mentioned earlier, we’re using the Rogue class for this BG3 Dark Urge Build.
Rogue gives you the following bonuses from the beginning of the game:
 Light Armour Proficiency
- Expertise – Choose two Proficient Skills. Your Profciency Bonus is doubled for the chosen Skills.
- Sneak Attack (Melee) and
 Sneak Attack (Ranged) – When you have Advantage, make a sneak attack and roll bonus damage. The bonus damage increases as you level up.
Abilities
The most important ability for this Dark Urge Build is Dexterity – this will be used for your weapon ![]() Attack Rolls, boosting your attack accuracy and damage. It also boosts your
Attack Rolls, boosting your attack accuracy and damage. It also boosts your ![]() Armour Class and Dexterity-based Skills such as
Armour Class and Dexterity-based Skills such as ![]() Acrobatics and
Acrobatics and ![]() Sleight of Hand. You should also have at least 14 Constitution to ensure that your character isn’t too fragile.
Sleight of Hand. You should also have at least 14 Constitution to ensure that your character isn’t too fragile.
I recommend an ability distribution similar to the following:
 10 Strength
 16 Dexterity
 14 Constitution
 10 Intelligence
 12 Wisdom
 14 Charisma
The Bolded abilities are essential for the build, while the others can be tweaked if you want.
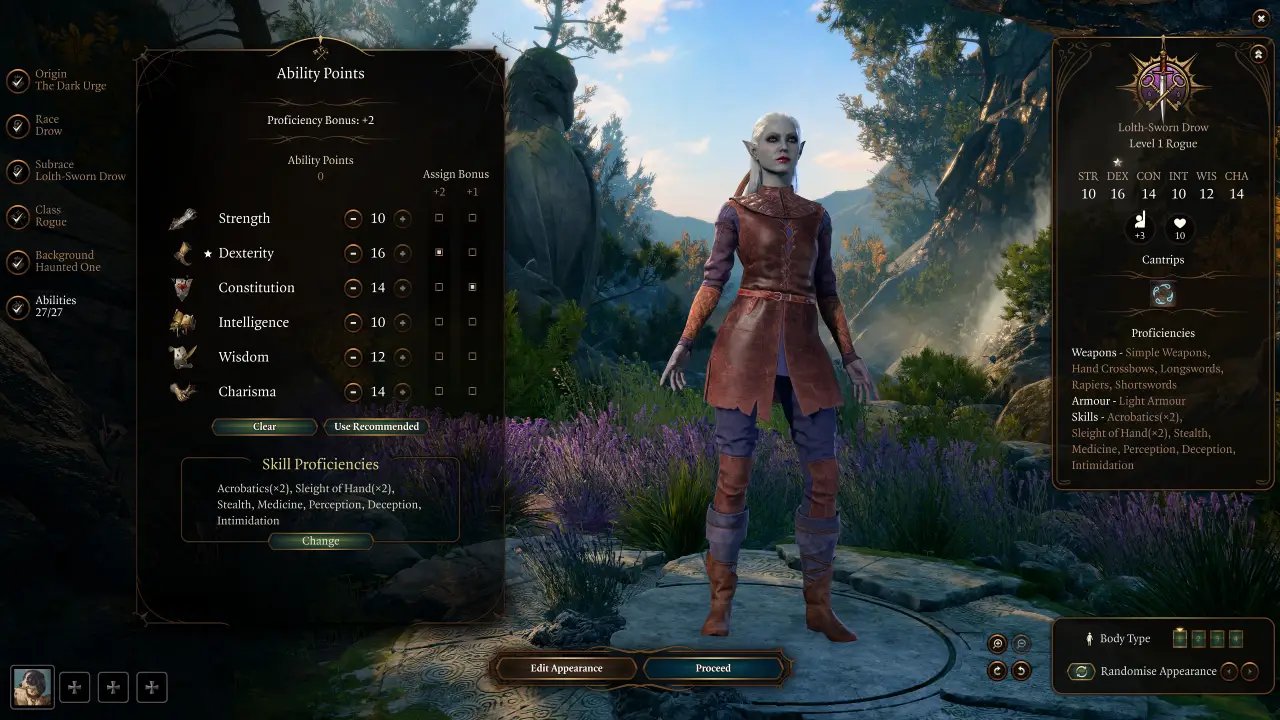
Skills & Background
The Dark Urge is locked into the unique Haunted One background, which gives you the following Skill Proficiencies:
 Medicine (WIS) – Used occasionally in dialogue checks to diagnose or heal NPCs.
 Intimidation (CHA) – Used to scare some NPCs into doing what you want.
You can choose four more Skills to be Proficient at. It’s best to choose skills that align with your Ability Distribution, which means that you should favour Dexterity and Charisma Skills with our recommended Ability Distribution. With this in mind, we recommend:
- Acrobatics (DEX) – Helps you to resist being pushed around by enemies, and reduces how much falling damage you take.
- Sleight of Hand (DEX) – Mainly used for lockpicking and pickpocketing success chance.
 Stealth (DEX) – Helps you to remain hidden when you are sneaking and an NPC looks in your direction.
 Deception (CHA) – Used in some dialogue checks to help you to trick NPCs.
Finally, the Rogue class allows you to assign ![]() Expertise to two of your Proficient Skills, making you even better at them. We chose
Expertise to two of your Proficient Skills, making you even better at them. We chose ![]() Acrobatics and
Acrobatics and ![]() Sleight of Hand for this.
Sleight of Hand for this.
BG3 Dark Urge Levelling Guide
We’ll now provide a step-by-step levelling up guide for this BG3 Dark Urge Build. The Swashbuckler Rogue is fairly linear, so at most levels there aren’t many choices to make compared to some other classes.
Early-Game Levelling
We’ll start with the early-game levels, 2-4.
Level 2
At Level 2, we gain some new Bonus Actions:
- Cunning Action: Dash – Double your Movement Speed this turn.
 Cunning Action: Disengage – Focus on retreating safely. Moving won’t provoke Attack of Opportunity.
 Cunning Action: Hide – Allows you to Hide using a Bonus Action.
While other classes can perform these abilities, doing so consumes a normal ![]() Action rather than a
Action rather than a ![]() Bonus Action. This effectively means that the Swashbuckler can Dash or Disengage on the same turn that they attack, while other classes cannot.
Bonus Action. This effectively means that the Swashbuckler can Dash or Disengage on the same turn that they attack, while other classes cannot.

Level 3
At Level 3, you get an additional 1d6 for Sneak Attack Bonus Damage, meaning Sneak Attacks will now do between 2 and 12 bonus damage (instead of 1-6), depending on the damage roll.
At Level 3, you also need to choose the subclass for your Rogue Build. For this build, we’re using the Swashbuckler subclass.
For choosing the Swashbuckler, you’ll immediately gain the following bonuses:
- Fancy Footwork – If you make a melee attack against a target, they cannot target you with Opportunist Attacks for the rest of your turn.
- Rakish Audacity – You gain a +2 bonus to your Initiative Rolls. You no longer need Advantage to use Sneak Attacks, as long as you do not have Disadvantage and are within 1.5 metres of the target.


Level 4
At Level 4, you must choose a Feat for the BG3 Swashbuckler Build. Feats are strong passive effects that can enable a certain build idea or give a stat buff to increase damage or survivability.
Choose Ability Improvement and use it to improve your ![]() Dexterity score to 18. This will improve your accuracy and weapon damage and make you better at various actions, such as Lockpicking.
Dexterity score to 18. This will improve your accuracy and weapon damage and make you better at various actions, such as Lockpicking.
The Swashbuckler subclass also unlocks the following Bonus Actions at Level 4:
 Dirty Trick: Flick o’ the Wrist – Flick your weapon and attempt to Disarm your target.
 Dirty Trick: Sand Toss – Throw sand in your target’s eyes, attempting to Blind them.
- Dirty Trick: Vicious Mockery – Deals 1d4
 Psychic Damage to the target. The damage increases at Level 5 and Level 10. Gives you Dirty Advantage for up to 2 turns, giving you Advantage on your next attack. Your target also gets Disadvantage on their next
  Attack Roll, unless they succeed on a Wisdom
  Saving Throw.

Mid-Game Levelling
We’ll now go through the mid-game levels, 5-8.
Level 5
When you reach Level 5, your Dark Urge build unlocks a few extra features to make it stronger.
Firstly, your Proficiency Bonus is increased from +2 to +3, meaning you’ll now get a +3 bonus when rolling for skills that you’re Proficient with.
You also get another Sneak Attack Die, so your Sneak Bonus Damage can now roll up to 18.
Lastly, you get the ![]() Uncanny Dodge passive feature. This is a Reaction, meaning it cannot be performed manually. Your character will perform it when they are attacked by an enemy, up to once per round. Uncanny Dodge will cause you to take half damage from the incoming attack.
Uncanny Dodge passive feature. This is a Reaction, meaning it cannot be performed manually. Your character will perform it when they are attacked by an enemy, up to once per round. Uncanny Dodge will cause you to take half damage from the incoming attack.


Level 6
At Level 6, there aren’t many choices to make.
All you need to do is choose two additional Skills to gain ![]() Expertise with.
Expertise with.
I recommend choosing ![]() Stealth and
Stealth and ![]() Deception, but it is up to you.
Deception, but it is up to you.

Level 7
At Level 7, you will gain an additional sneak attack damage die, meaning your bonus damage from stealth will now be 4-24.
You also gain the ![]() Evasion passive, which gives you extra resistance to spells and effects that normally deal half damage on a
Evasion passive, which gives you extra resistance to spells and effects that normally deal half damage on a ![]() Saving Throw. Now they’ll do no damage if you succeed the
Saving Throw. Now they’ll do no damage if you succeed the ![]() Saving Throw, and half damage if you fail it.
Saving Throw, and half damage if you fail it.

Level 8
At Level 8, you’ll get to choose another Feat for your Swashbuckler Build.
Choose the Ability Improvement feat and use it to improve your ![]() Dexterity to 20.
Dexterity to 20.

Late-Game Levelling
Now we will look at the end-game levelling process, at levels 9-12.
Level 9
At Level 9, the Dark Urge’s Proficiency Bonus is improved to +4. This means you now have a +4 bonus added to rolls for any skills you are Proficient at (or Attack Rolls using weapons you’re Proficient with). This bonus always applies unless you roll a 1 (Critical Fail/Miss).
You gain another Sneak Attack Die here, too, meaning your attacks from stealth will now deal 5-30 bonus damage.
You get the ![]() Panache Action from the Swashbuckler subclass. You can use it outside of combat to
Panache Action from the Swashbuckler subclass. You can use it outside of combat to ![]() Charm an enemy, or in combat to impose
Charm an enemy, or in combat to impose ![]() Disadvantage on all of their
Disadvantage on all of their ![]() Attack Rolls against any character other than you. Succeeding with your Panache Action uses the
Attack Rolls against any character other than you. Succeeding with your Panache Action uses the ![]() Persuasion Skill. The target must use their
Persuasion Skill. The target must use their ![]() Insight Roll for the
Insight Roll for the ![]() Saving Throw.
Saving Throw.

Level 10
Unlike most other classes, Rogues can choose an extra Feat at Level 10.
Choose ![]() Savage Attacker. This Feat makes you reroll your damage dice twice when rolling melee weapon attacks and automatically chooses the highest roll. This will increase your average damage output when making melee weapon attacks.
Savage Attacker. This Feat makes you reroll your damage dice twice when rolling melee weapon attacks and automatically chooses the highest roll. This will increase your average damage output when making melee weapon attacks.

Level 11
At Level 11, you’ll gain another Sneak Attack Die, giving your attacks from stealth a possible 6-36 bonus damage.
You also gain the ![]() Reliable Talent passive, which guarantees that rolls with any of your Proficient Skills will be at least 10. If you roll below a 10, the value is increased to 10. This means you can no longer Critically Fail when rolling for skills that you have Proficiency with.
Reliable Talent passive, which guarantees that rolls with any of your Proficient Skills will be at least 10. If you roll below a 10, the value is increased to 10. This means you can no longer Critically Fail when rolling for skills that you have Proficiency with.
Note that this only applies to Skills, not weapons, so you can still roll below 10 when attacking with a weapon you’re Proficient with.

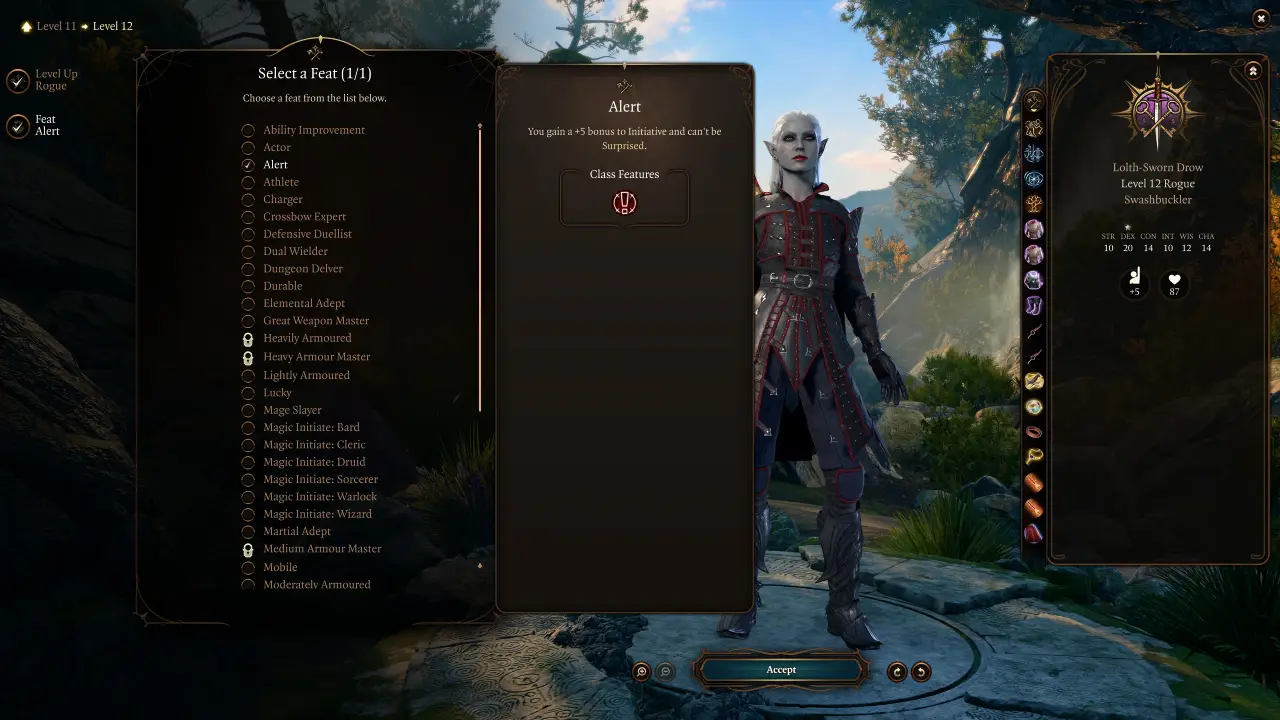
Level 12
If you’ve reached this point, then you have finished levelling up your Dark Urge build. Congratulations!
At Level 12, you’ll get to choose one more Feat for your character.
We got all of the most important Feats already – the last choice is up to you.
Personally, I tend to choose ![]() Alert, which boosts your Initiative by +5, making it very likely that you move first in combat.
Alert, which boosts your Initiative by +5, making it very likely that you move first in combat.
Another handy option is ![]() Mobile, which gives you extra Movement Speed. But if you want to try something else, go for it.
Mobile, which gives you extra Movement Speed. But if you want to try something else, go for it.
BG3 Dark Urge Build Best Equipment
Below is the recommended Equipment setup for this Dark Urge Build. We have split the equipment into an early-game and late-game section to ensure you can make use of this build regardless of how far into the game you are.
In each section, there is a table with an overview of the recommended equipment. Below the table, there is more detailed information about each item, including how to obtain it.
Don’t worry if your equipment doesn’t exactly match what is listed here – the build still works fine if some pieces of equipment are different. Don’t be afraid of experimenting and trying different combinations, too.
Early-Game
Early-game equipment can be obtained in Act I and the earlier parts of Act II.
| Slot | Icon | Item | Effects | Location |
|---|---|---|---|---|
| Head |  |
Haste Helm |
|
In a wooden chest next to a cart, by the Blighted Village Waypoint |
| Cloak |  |
Cloak of Protection |
|
Purchased from Quartermaster Talli in Last Light Inn |
| Chest |  |
Spidersilk Armour |
|
Dropped by Minthara in the Shattered Sanctum |
| Gloves |  |
Gloves of Thievery |
|
Sold by Brem in the Zhentarim Hideout |
| Boots |  |
Disintegrating Night Walkers |
|
Looted from True Soul Nere in the Grymforge |
| Necklace |  |
Amulet of Misty Step |
|
Found in a chest in the Defiled Temple |
| Ring 1 |  |
Crusher’s Ring |
|
Loot from Crusher in the Goblin Camp, or steal it during dialogue. |
| Ring 2 |  |
Caustic Band |
|
Sold by Derryth Bonecloak in the Myconid Colony. |
| Melee | Sword of Screams |
|
Dropped by True Soul Nere in the Grymforge | |
| Ranged |  |
Hand Crossbow +1 (Dual Wield) |
|
Sold by Derryth Bonecloak in the Myconid Colony. |
IMPORTANT: It is also highly recommended that you obtain ![]() Broodmother’s Revenge. We’ll need this amulet later in the game, but it is located in Act I. It can be looted from Kagha, the leader of the Druid Grove. It grants 1d6 bonus Poison Damage when you are healed. We aren’t equipping it yet because it’s difficult to reliably activate the item, but later in the game there will be better equipment that synergises extremely well with this effect.
Broodmother’s Revenge. We’ll need this amulet later in the game, but it is located in Act I. It can be looted from Kagha, the leader of the Druid Grove. It grants 1d6 bonus Poison Damage when you are healed. We aren’t equipping it yet because it’s difficult to reliably activate the item, but later in the game there will be better equipment that synergises extremely well with this effect.
In the early game, the Dark Urge Swashbuckler can be a little bit fragile. The equipment selection here is intended to improve your defences, make you very mobile and increase your damage potential.
- Defensive items
- Cloak of Protection
- Spidersilk Armour
- Mobility items
- Haste Helm
- Disintegrating Night Walkers
- Amulet of Misty Step
- Crusher’s Ring
- Damage Boosters
- Caustic Band
- Sword of Screams
- Utility items
- Gloves of Thievery (Makes Lockpicking and Pickpocketing much easier!)
Late-Game
Late-game equipment is available in Act III and the latter parts of Act II, however sometimes items from the early-game section remain powerful enough to be carried into late-game.
Don’t worry if you don’t have everything on the list. View it as more of a wishlist than a precise blueprint. You may not be able to get everything in your playthrough, depending on your choices.
| Slot | Icon | Item | Effects | Location |
|---|---|---|---|---|
| Head |  |
Mask of Soul Perception |
|
In a locked Gilded Chest in Helsik’s room |
| Cloak |  |
Shade-Slayer Cloak |
|
Sold by Sticky Dondo in the Guildhall, Lower City Sewers. |
| Chest |  |
Bhaalist Armour |
|
Sold by Echo of Abazigal in the Murder Tribunal, if you become an Unholy Assassin |
| Gloves | Bhaalist Gloves |
|
Sold by Echo of Abazigal in the Murder Tribunal, if you become an Unholy Assassin | |
| Boots | |
Disintegrating Night Walkers |
|
Looted from True Soul Nere in the Grymforge |
| Necklace |  |
Broodmother’s Revenge |
|
Loot from Kagha in the Druid Grove. |
| Ring 1 |  |
Ring of Regeneration |
|
Purchase from Sorcerous Sundries |
| Ring 2 | |
Caustic Band |
|
Sold by Derryth Bonecloak in the Myconid Colony. |
| Melee Mainhand |  |
Crimson Mischief |
|
Looted from Orin during “Get Orin’s Netherstone” |
| Melee Offhand |  |
Bloodthirst |
|
Looted from Orin during “Get Orin’s Netherstone” |
| Ranged Mainhand |  |
Hellfire Hand Crossbow |
|
Looted from Yurgir in the Gauntlet of Shar |
| Ranged Offhand | |
Any other Hand Crossbow |
|
N/A |
An overview of the purpose of these items:
- Defensive Items
- Ring of Regeneration
- Bloodthirst
- Mobility Items
- Disintegrating Night Walkers
- Damage Boosters
- Bhaalist Armour
- Broodmother’s Revenge & Ring of Regeneration Synergy (important)
- Caustic Band
- Crimson Mischief
- Shade-Slayer Cloak
- Bloodthirst
- Accuracy Items
- Mask of Soul Perception
- Bhaalist Gloves
Interesting Alternative Items
These items are also very useful, and you may want to use them instead of the above recommendations:
| Slot | Icon | Item | Explanation | Location |
|---|---|---|---|---|
| Offhand Melee | Rhapsody | Use in your Offhand slot to make attacks more accurate. Up to +3 |
Looted from Cazadorr Szarr in Cazadorr’s Dungeon | |
| Gloves | |
Gloves of Thievery | From Early-Game items. Re-equip before Lockpicking or Pickpocketing to increase your success chance. | Sold by Brem in the Zhentarim Hideout |
| Gloves | Gloves of the Automaton | Gives you a unique action that gives you |
Sold by Barcus Wroot in his workshop, at Last Light Inn | |
| Gloves |  |
Bonespike Gloves | Ignore Resistance to |
Worn by Strangler Luke in Lower City Sewers, during Get Orin’s Netherstone |
| Cloak | |
Cloak of Protection | +1 to |
Purchased from Quartermaster Talli in Last Light Inn |
Dark Urge Build Extra Info
Here is some extra information about the Dark Urge Build, including how to play it, which Potions work well and which Illithid Powers are a good fit.
How to Play the Dark Urge Swashbuckler Build
This BG3 Dark Urge Swashbuckler build is designed to cover all the bases of a good build in BG3, affording your character high damage output, accurate attacks, good mobility and a decent baseline of survivability.
It is also intended to be easy to play – most of the items synergise together automatically, requiring little to no player intervention to activate them. One such synergy is the ![]() Ring of Regeneration and
Ring of Regeneration and ![]() Broodmother’s Revenge. Every turn, Ring of Regeneration gives you a small heal, which will activate Broodmother’s Revenge, giving your first attack on every turn a bonus 1d6
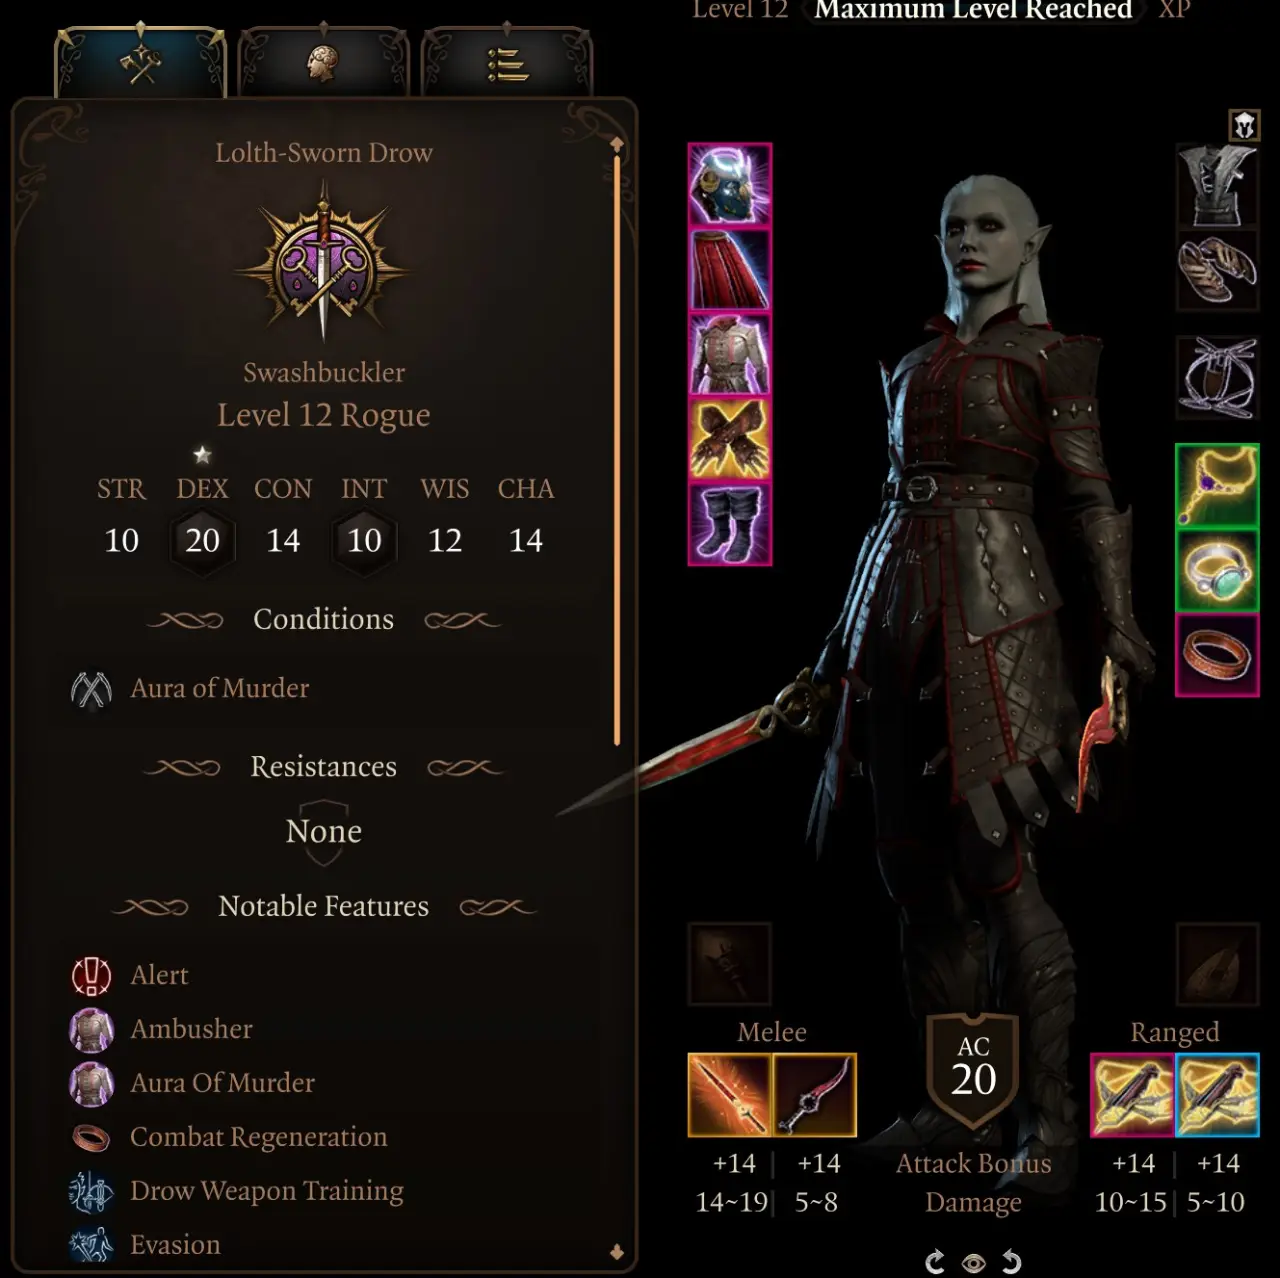
Broodmother’s Revenge. Every turn, Ring of Regeneration gives you a small heal, which will activate Broodmother’s Revenge, giving your first attack on every turn a bonus 1d6 ![]() Poison Damage. With this in mind, it could be said that the only downside of this build is that it is quite gear dependant. I do highly recommend collecting as much of the recommended equipment as you can, though, as it will greatly improve the damage potential of your Rakish Sneak Attacks; see the image below as an example:
Poison Damage. With this in mind, it could be said that the only downside of this build is that it is quite gear dependant. I do highly recommend collecting as much of the recommended equipment as you can, though, as it will greatly improve the damage potential of your Rakish Sneak Attacks; see the image below as an example:

You should use your ![]() Rakish Sneak Attacks as often as possible to get the highest damage output possible – there is no reason not to, because you don’t need to be sneaking to activate them. Just ensure you don’t have
Rakish Sneak Attacks as often as possible to get the highest damage output possible – there is no reason not to, because you don’t need to be sneaking to activate them. Just ensure you don’t have ![]() Disadvantage versus the target.
Disadvantage versus the target.
However, do not disregard your Dirty Trick Actions. In particular, ![]() Flick o’ the Wrist and
Flick o’ the Wrist and ![]() Sand Toss are easy ways to apply severe debuffs (
Sand Toss are easy ways to apply severe debuffs (![]() Disarmed and
Disarmed and ![]() Blinded) to an enemy with a
Blinded) to an enemy with a ![]() Bonus Action, meaning you can still do a normal attack on the same turn.
Bonus Action, meaning you can still do a normal attack on the same turn.
Dark Urge Build Best Potions

The ![]() Potion of Speed is arguably the most powerful potion in Baldur’s Gate 3. It doubles your Movement Speed and gives you an
Potion of Speed is arguably the most powerful potion in Baldur’s Gate 3. It doubles your Movement Speed and gives you an ![]() extra Action each turn.
extra Action each turn.
One drawback of this potion is that when it expires, your character will be ![]() Lethargic for one turn, unable to move or take any
Lethargic for one turn, unable to move or take any ![]() Actions. So you should be careful not to have your character stranded in a dangerous position when the potion runs out!
Actions. So you should be careful not to have your character stranded in a dangerous position when the potion runs out!
You can craft the Potion of Speed in the alchemy menu by combining ![]() Ashes of Hyena Ear with any Salt. Create ashes, salts and other alchemy concentrates by combining three of the same ingredients together – for example, combining three
Ashes of Hyena Ear with any Salt. Create ashes, salts and other alchemy concentrates by combining three of the same ingredients together – for example, combining three ![]() Hyena Ears will create
Hyena Ears will create ![]() Ashes of Hyena Ear.
Ashes of Hyena Ear.
Hyena Ears can normally be looted from either Hyenas or Gnolls – you can find a lot of them around the Risen Road in Act I, for a good supply of them, which should last you a while.
You can combine this with the ![]() Elixir of Bloodlust. Elixirs and Potions can be stacked with each other, but you can only have one Elixir active at a time. Potions tend to expire after a few turns, whereas Elixirs last until your next Long Rest, unless you drink a different Elixir in the meantime.
Elixir of Bloodlust. Elixirs and Potions can be stacked with each other, but you can only have one Elixir active at a time. Potions tend to expire after a few turns, whereas Elixirs last until your next Long Rest, unless you drink a different Elixir in the meantime.
The ![]() Elixir of Bloodlust grants your character another
Elixir of Bloodlust grants your character another ![]() Action when you kill an enemy. This effect can only trigger once per turn. Combined with the
Action when you kill an enemy. This effect can only trigger once per turn. Combined with the ![]() Potion of Speed, this gives you two additional attacks if you defeat an enemy on your turn.
Potion of Speed, this gives you two additional attacks if you defeat an enemy on your turn.
It can be crafted by combining ![]() Ashes of Worg Fang with any Salt.
Ashes of Worg Fang with any Salt. ![]() Worg Fangs are looted from Worgs, the beasts usually kept by Goblins.
Worg Fangs are looted from Worgs, the beasts usually kept by Goblins.
This is an OP alchemy combo that you can use to turbocharge the Dark Urge’s damage output in tough fights!
Dark Urge Best Illithid Powers (Optional)

Illithid Powers are unlocked later in BG3 when you learn more about Mind Flayers and Tadpoles. By eating Jars of Mind Flayer Parasites you gain one point. This is another optional skill tree that you can get access to if you want. Here are some of the best Illithid Powers for the BG3 Dark Urge Build with the Swashbuckler subclass:
 Mind Blast: A conal blast of Psychic Damage that can also stun several targets at once. If the Dark Urge is outnumbered by several advancing enemies, then Mind Blast can help to swing things back in your favour.
 Cull the Weak: When you reduce a creature’s hit points below a certain threshold, this power instantly kills it and deals 1-4 Psychic Damage to nearby enemies. This is particularly effective when engaging groups of weaker foes, enabling you to thin their numbers rapidly.
 Fly: This can be used to reach hard to get to places or change positions in combat.
 Mind Sanctuary: This creates an area that allows all within to use Actions and Bonus Actions interchangeably. This typically means you can deal more damage, since you can use your Bonus Action as a normal Action. However, enemies who are inside the area will also enjoy its benefits. Be careful with your placement so that your party gets buffed by the Mind Sanctuary and not the enemies!
 Psionic Backlash: This is a top-tier
  Reaction from the Illithid Powers skill tree in BG3. It allows you to deal Psychic Damage when a nearby enemy casts a spell. This is especially useful if the target is casting a Concentration Spell. The damage from Psionic Backlash can immediately break their Concentration, ending the spell’s effects.
Dark Urge Build Frequently Asked Questions (FAQs)
Can I Keep the Dark Urge’s Original Appearance?Andrew2025-05-23T14:44:02+00:00
While we played this build with a Drow, it’s absolutely fine to use the Dark Urge’s original appearance if you want. Either way, the story will be the same, and the impact of your chosen race on the build is quite small.
Is This Dark Urge Build Any Good for Tactician/Honour Difficulty?Andrew2025-05-23T14:42:13+00:00
The Swashbuckler is one of the strongest classes in Baldur’s Gate 3, and we are using equipment that greatly improves your damage output, mobility and accuracy, so this build is more than capable of handling Tactician and Honour difficulty. You will need to take extra care for the first few levels, when the Rogue class is very fragile. Please keep in mind that completing Honour Difficulty requires a lot of skill and experience with the game, no matter how OP your build is.
Should I Use Illithid Powers with the Dark Urge?Andrew2025-05-23T14:38:43+00:00
While the Illithid Powers can make your character stronger, they are completely optional and the build works just fine without them. It is really up to you whether or not you’re happy to allow your Dark Urge character to become more Illithid.
Is this Dark Urge Build Beginner Friendly?Andrew2025-05-23T14:36:05+00:00
Recently added in BG3, the Swashbuckler is one of the easiest classes to play in Baldur’s Gate 3, allowing you to utilize the Rogue’s powerful sneak attacks with very few limitations. Using this class for the Dark Urge makes them much easier to play than the default Sorcerer class, which is ideal for beginner players.
Related Builds:
- BG3 Shadowheart Build Guide
- BG3 Astarion Build Guide
- BG3 Gale Build Guide
- BG3 Lae’zel Build Guide
- BG3 Karlach Build Guide
- BG3 Wyll Build Guide
- BG3 Minthara Build Guide
- BG3 Jaheira Build Guide
- BG3 Minsc Build Guide
- BG3 Halsin Build Guide
The post BG3 Best Dark Urge Build appeared first on AlcastHQ.


