Best BG3 Lorecerer Build – Bard Sorcerer Multiclass Build

Welcome to the best Lorecerer Build for BG3 (Bard Sorcerer Multiclass Build).
This build combines the control-focused College of Lore Bard with the Sorcerer’s unmatched spellcasting power, excelling at battlefield control while remaining highly adaptable.
Table of Contents:
- Bard Sorcerer Build Overview
- Character Creation – Level 1
- Lorecerer Leveling Guide (2-12)
- Lorecerer Best Equipment
- Lorecerer Extra Info
- Lorecerer Build FAQ
BG3 Bard & Sorcerer Multiclass Build Strengths & Weaknesses:
LORECERER PROS
LORECERER CONS
Bard & Sorcerer Multiclass Build Overview
For our Lorecerer Build, we are combining the Sorcerer class with the College of Lore Bard. The Sorcerer class allows you to boost your spells with powerful Metamagic features, and the Draconic Bloodline subclass boosts your elemental damage.
In contrast, Bard brings additional proficiencies, buffs and superior crowd-control options that Sorcerer not offer otherwise. These classes work well together because they both favour Charisma as their most important ability.
BG3 Multiclass Explainer:
- How it works: New classes can be added as you level up. They are added on a level-by-level basis.
- Example: If you are a level 6 Bard and decide to add 1 Sorcerer level, you will only get the features of Sorcerer level 1.
- Example 2: If you want the features of a level 6 Bard and Sorcerer, you need to be max level and add 6 levels of each class.
Pro Tip: It’s usually best to choose subclasses that work together easily. For example, the Bard and Sorcerer go well together because they both use Charisma as their spellcasting attribute.
This means that we have to be sure that the payoff of adding new classes to your build is worth it, because every level of a secondary class reduces the highest level we can reach with our primary class.
In this Bard and Sorcerer Multiclass Build, we’ll be combining the following classes:
- This will be our primary class, and we’re using the College of Lore subclass.
- It gives you a wide range of Skill Proficiencies and lots of good spells.
- We’ll use six Bard levels to unlock the first helping of Magical Secrets from the College of Lore subclass.
- Our secondary class is Sorcerer. Draconic Bloodline is strongly recommended as the subclass, because it will eventually boost your elemental damage.
- The Sorcerer allows you to buff your spells with Metamagic, for example increasing their range or success chance.
- We’ll use six levels of the Sorcerer, because this is what is required to unlock this bonus elemental damage.
Here is a quick overview of which class we pick when, this is important!
Lorecerer Leveling Progress Overview
- Level 1: Bard 1
- Level 2: Sorcerer 1 (Draconic Power subclass)
- Level 3: Sorcerer 2
- Level 4: Sorcerer 3
- Level 5: Sorcerer 4
- Level 6: Sorcerer 5
- Level 7: Sorcerer 6
- Level 8: Bard 2
- Level 9: Bard 3 (College of Lore subclass)
- Level 10: Bard 4
- Level 11: Bard 5
- Level 12: Bard 6
Lorecerer Character Creation (Level 1)

In this section, we will guide you through the best starting choices for creating your BG3 Lore Bard & Sorcerer Multiclass Build.
Starting Class (Bard)
We’ll start off by choosing the Bard class. The Sorcerer elements of the build will be added later.
The Bard starts the game with the following features, which we’ll build on over the course of this guide:
Core Bard Features
Item Proficiency:
![]() Hand Crossbows,
Hand Crossbows, ![]() Rapiers,
Rapiers, ![]() Longswords,
Longswords, ![]() Shortswords,
Shortswords, ![]() Light Armour (in addition to any Proficiencies that come from your chosen race).
Light Armour (in addition to any Proficiencies that come from your chosen race).
Skill Proficiencies:
Choose 3 Skill Proficiencies. Unlike other classes, your choice is not restricted – you can pick any Skills in the game!
Musical Instrument Proficiency:
You can play music. In character creation, you can choose which instrument you want to start with.
Inspire an ally, adding 1d6 to their next Attack Roll, Ability Check or Saving throw.
Bardic Inspiration Charges – You start with 3 charges, which are replenished on Long Rests.
Bard Magic:
You can choose four spells and two cantrips from the Bard Spell List. You’ll get more later.
Best Race
While this build will work fine with any race in the game, there are a few choices that stand out above the rest and can be chosen if you want to optimize the build as much as possible. Here are the five best race choices for the Lorecerer Build:
| Race | Strengths | Info |
|---|---|---|
Wood Elf |
|
Wood Elves are one of the best races in BG3, thanks to their increased Movement Speed which can give you an upper hand in many situations.
Their immunity to Sleep is especially useful in the early-game, where your low HP will cause you to fall victim to enemy mages who love to cast the Sleep spell. You can also choose Wood Half-Elf, which comes with many of the same benefits and gives you proficiency with Shields. |
|
High Elf |
|
Very similar to Wood Elf, but missing the Stealth Proficiency and doesn’t get extra Movement Speed. You can choose an extra Cantrip to learn, which is handy but not super important. |
Duergar |
|
With their wide choice of armour and weapon proficiencies, and resistances to poison, charm, and paralysis, Duergar are one of the strongest races in BG3.
The only downside of Duergar is their small stature – this reduces their base Movement Speed to 7.5 metres per turn (most races get 9 metres). |
Drow |
|
Drow have similar bonuses to other Elves, but also come with a couple of extra Spells and Superior Darkvision. |
Human |
|
The Human race is useful because you get an extra Skill pick and additional Carrying Capacity.
You also get Shield Proficiency, which is useful if you want to equip a Shield for extra armour. |
Wood Elf
![]()
Wood Elves are one of the best races in BG3, thanks to their increased Movement Speed which can give you an upper hand in many situations.
Their immunity to Sleep is especially useful in the early-game, where your low HP will cause you to fall victim to enemy mages who love to cast the Sleep spell.
You can also choose Wood Half-Elf, which comes with many of the same benefits and gives you proficiency with Shields.
- Proficiency in
 Stealth and
  Perception
 - Extra Weapon Proficiencies:
 Shortswords
 Longswords
 Shortbows
 Longbows
 Fey Ancestry
 Advantage against
  Charmed
- Immune to
 Magical Sleep
 Darkvision
 Fleet of Foot – 1.5 metres of extra Movement Speed
High Elf
![]()
Very similar to Wood Elf, but missing the Stealth Proficiency and doesn’t get extra Movement Speed.
You can choose an extra Cantrip to learn, which is handy but not super important.
- Proficiency in and
 Perception
 - Extra Weapon Proficiencies:
 Shortswords
 Longswords
 Shortbows
 Longbows
 Fey Ancestry
 Advantage against
  Charmed
- Immune to
 Magical Sleep
 Darkvision
- Choose an extra Cantrip (cast with Intelligence)
Duergar
![]()
With their wide choice of armour and weapon proficiencies, and resistances to poison, charm, and paralysis, Duergar are one of the strongest races in BG3.
The only downside of Duergar is their small stature – this reduces their base Movement Speed to 7.5 metres per turn (most races get 9 metres).
- Can wear
 Medium Armour
 - Can wield axes and hammers
 Dwarven Resilience
 Advantage against
  Poisoned
- Resistance to
 Poison Damage
 Superior Darkvision
 Duergar Resilience
 Advantage on
  Saving Throws against illusions
 Advantage against
  Charmed and
  Paralysed
 Duergar Magic
 Enlarge (Level 3)
 Invisibility (Level 5)
Drow
![]()
Drow have similar bonuses to other Elves, but also come with a couple of extra Spells and Superior Darkvision.
 Perception Proficiency
 Fey Ancestry
 Advantage against
  Charmed
- Immune to
 Magical Sleep
 Superior Darkvision
 Drow Magic
 Dancing Lights (Level 1)
 Faerie Fire (Level 3)
 Darkness (Level 5)
Human
![]()
The Human race is useful because you get an extra Skill pick and additional Carrying Capacity.
You also get Shield Proficiency, which is useful if you want to equip a Shield for extra armour.
- Can wear
 Light Armour and
  Shields
 - Extra Weapon Proficiencies:
 Spears
 Pikes
Pikes Halberds
 Glaives
- Human Versatility
- One unrestricted Skill choice
- Increases
 Carrying Capacity by 25%
Background & Skills
For your Bard/Sorcerer Multiclass Background, we recommend choosing Entertainer. Not only does this feel like a good fit for a Bard from a backstory perspective, it also works really well with this build.
The Entertainer background gives us the following Skill Proficiencies:
Entertainer Background
![]() Acrobatics
Acrobatics
This is a Dexterity-based Skill that gives you resistance to enemy Shove actions.
![]() Performance
Performance
A Charisma-based Skill that will sometimes appear as a Dialogue option, allowing you to sway some NPCs to do what you want, or simply impress them.
Choose any Skills that are based on Charisma or Dexterity. We went with ![]() Deception,
Deception, ![]() Intimidation and
Intimidation and ![]() Persuasion, which will give you an easier time in most dialogue rolls.
Persuasion, which will give you an easier time in most dialogue rolls.
Ability Points

For both the Bard and the Sorcerer class, the most important ability is Charisma, which is used to determine the effectiveness of our spellcasting. We will be focusing on this ability above all others.
Other important abilities are Dexterity, which boosts our Armour Class, and Constitution, which increases our Hitpoints and improves our Concentration Checks.
![]() Strength – 10 Points
Strength – 10 Points
- Improves jump distance and carry weight.
- Low priority for this build.
![]() Dexterity – 16 Points
Dexterity – 16 Points
- Boosts Armour Class (AC) and Initiative.
- Helps you act sooner in combat.
![]() Constitution – 14 Points
Constitution – 14 Points
- Increases Max HP.
- Vital for Concentration Checks to keep spells active.
![]() Intelligence – 8 Points
Intelligence – 8 Points
- Not relevant for our build.
![]() Wisdom – 10 Points
Wisdom – 10 Points
- Used in some Saving Throws.
- Low priority.
![]() Charisma – 16 Points
Charisma – 16 Points
- Primary stat.
- Boosts our Cantrips, Spells and dialogue checks.
| Ability | Points | Why it matters |
|---|---|---|
| 10 | Mostly for jump distance and carry weight. Low priority for this build. | |
| 16 | Important: Gives you a higher Armour Class and improves initiative. | |
| 14 | Important: Increases HP and helps Concentration checks for spells. | |
| 8 | Not relevant for our build. | |
| 10 | Helps with some Saving Throws. Low importance for this build. | |
| 16 | Our primary stat. Boosts Cantrips, Spells and dialogue checks. |
Important Tips:
- The “Even Number” Rule: In Baldur’s Gate 3, only even numbers (12, 14, 16) increase your ability modifier. This means an 11 is functionally the same as a 10, so we aim for even numbers to maximize efficiency.
- Concentration is Key: Many important Bard and Sorcerer spells (like
 Hold Person or
  Call Lightning) require Concentration. A high Constitution ensures you don’t lose your spell just because you took a hit.
Spells
To start with, you’ll need to select four first-level Spells for your character to learn. We recommend going with the following options for our Lorecerer Build:
Spell Selection
- Consumes a
 Bonus Action rather than a regular one.
 - Allows you to heal and attack or cast another spell on the same turn.
- It can also be used at long-range rather than being melee-only.
Pro Tip: While the maximum healing roll on this spell is a little lower than Cure Wounds; Healing Word is still preferable thanks to its much greater versatility.
- Allows you to speak with animals, opening up extra dialogue and quest paths.
- Ritual spell – can be cast for free outside combat.
- Replace with another spell of your choice if another character is using this already.
- Deals
 Psychic Damage and also afflicts them with
  Frightened (unless they perform a Wisdom
  Saving Throw).
 - Targets remain Frightened for two turns.
- This is a great spell for locking down annoying or dangerous enemies.
Pro Tip: Frightened enemies have a ![]() Disadvantage on ability checks and attack rolls, and cannot willingly move closer to the source of their fear (the caster).
Disadvantage on ability checks and attack rolls, and cannot willingly move closer to the source of their fear (the caster).
- Another great spell for locking down enemies.
- This causes the enemy to be overcome with fits of laughter, making them fall prone and unable to get up.
- The caster can maintain this effect for up to 10 turns, as long as they can maintain Concentration.
- Also, the target will try to shake off the effect at the end of their turn, and every time they take damage.
Cantrips
In addition to the Spells, you’ll need to choose two Cantrips. These are less powerful spells that do not consume a Spell Slot when cast, meaning you can generally cast them every turn if you want to, with no limitations.
We recommend choosing the following Cantrips for your Lorecerer build:
New Cantrips
- This deals a small amount of
 Psychic Damage to the enemy targeted.
 - Also gives them a
 Disadvantage on their next
  Attack Roll.
 - This is a handy debuff spell that can be used to lessen the danger of troublesome enemies.
- This is a basic spell that lets you infuse an object or ally with light.
- It’s useful for navigating and fighting in dark places.
Pro Tip: This spell doesn’t need Concentration, so it won’t mess with our other Concentration Spells, which is why we chose this instead of other more powerful light cantrips.
BG3 Bard Sorcerer Multiclass Build Leveling Guide (2-12)
Now, we are going to look at how to level up your Lorecerer Build for Baldur’s Gate 3.
Early-Game Leveling (2-4)
In this section, we’ll cover the first four levels.
Level 2

For this level, we will already add the Sorcerer class to the build. The image above shows where you need to click to add a new class.
Adding the Sorcerer to our build gives us the following benefits:
Core Sorcerer Features
- Item Proficiency –
 Daggers,
  Quarterstaves,
  Light Crossbows.
 - Sorcerer Magic – To begin with, you can learn 4 Cantrips and 2 Spells from the Sorcerer Spell List.
- Subclass Choice – You must choose your Sorcerer subclass.
New Sorcerer Spells – Choose 2
- A powerful linear AoE (Area of Effect) that deals damage and knocks enemies back.
- Great at knocking enemies backwards or off cliffs.
- Deals
 Poison Damage and potentially poisons the target.
  Poisoned enemies have
  Disadvantage on Attack Rolls and Ability Checks.
New Sorcerer Cantrips – Choose 4
Sorcerer Cantrips are much better than the Bard options, allowing you to deal reliable ranged damage without using a bow or casting spells.
- Deals
 Fire Damage from range.
 - Our preferred Cantrip most of the time, because it has the most damage.
- Deals
 Necrotic Damage and prevents the target from healing.
 - Undead targets get
 Disadvantage on Attack Rolls.
- Cause a corpse to explode, dealing
 Piercing Damage in a small area.
- Summon a spectral hand that can pick up objects from a distance.
- Useful for solving puzzles or reaching distant objects.
Subclass – Draconic Bloodline
As mentioned above, you must choose your Sorcerer subclass immediately. We opted for Draconic Bloodline because you’ll get extra defenses and an elemental damage boost later in the game, but you can change this if you want.
Draconic Bloodline Features
 Draconic Resilience – Your base Armour Class is increased to 13 when you are not wearing armour. You gain 1 additional HP per Sorcerer Level.
- Draconic Ancestry – You must choose a Draconic Ancestry to align with. We recommend choosing any of the
 Fire variants (Red, Gold or Brass) but you can change it if you want to focus on a different element.
- For now, this just gives you a free spell depending on your choice. But later in the game you’ll get bonus damage with your chosen elemental affinity.
Level 3
We’ll add another Sorcerer level here, so that we can begin using one of the strongest Sorcerer features, Metamagic.
You unlock a new resource called Sorcery Points. These are spent to activate Metamagic powers, and can be replenished by Long Resting. You’ll also gain +1 Sorcery Point at every Sorcerer Level up.
Metamagic – Choose 2:
- Increases the range of the spell by 50%.
- Melee-only spells get a range of 9m.
- Spells that only target 1 creature can target an additional creature.
- Costs 1 Sorcery Point per Spell Slot level used. Cantrips also cost 1 Sorcery Point.
You can also unlock a new spell. We recommend:
New Sorcerer Spell
- Fires 3 projectiles. The projectiles cannot miss their target.
- Each projectile deals 2-5
 Force Damage.
 - Later on, you can upcast the spell for additional projectiles.
Level 4
We’re adding another Sorcerer Level, Giving you a total of Bard Level 1, Sorcerer Level 3 so far.
This gives you access to better Sorcerer spells, and an additional Metamagic power.
Metamagic – Choose 1:
- Targets of spells that require Saving Throws have
 Disadvantage on their first Saving Throw.
 - Costs 3 Sorcery Point per spell.
You can choose another Sorcerer spell to learn:
New Sorcerer Spell
- Fire three bolts of fire in rapid succession.
- Each bolt does 2-12
 Fire Damage.
 - Later on, you can upcast the spell to fire more bolts.
Mid-Game Leveling (5-8)
In this section, we’ll cover the mid-game. During these levels, the Bard Sorcerer Multiclass Build will become much more powerful, accessing a wider array of spells.
Level 5
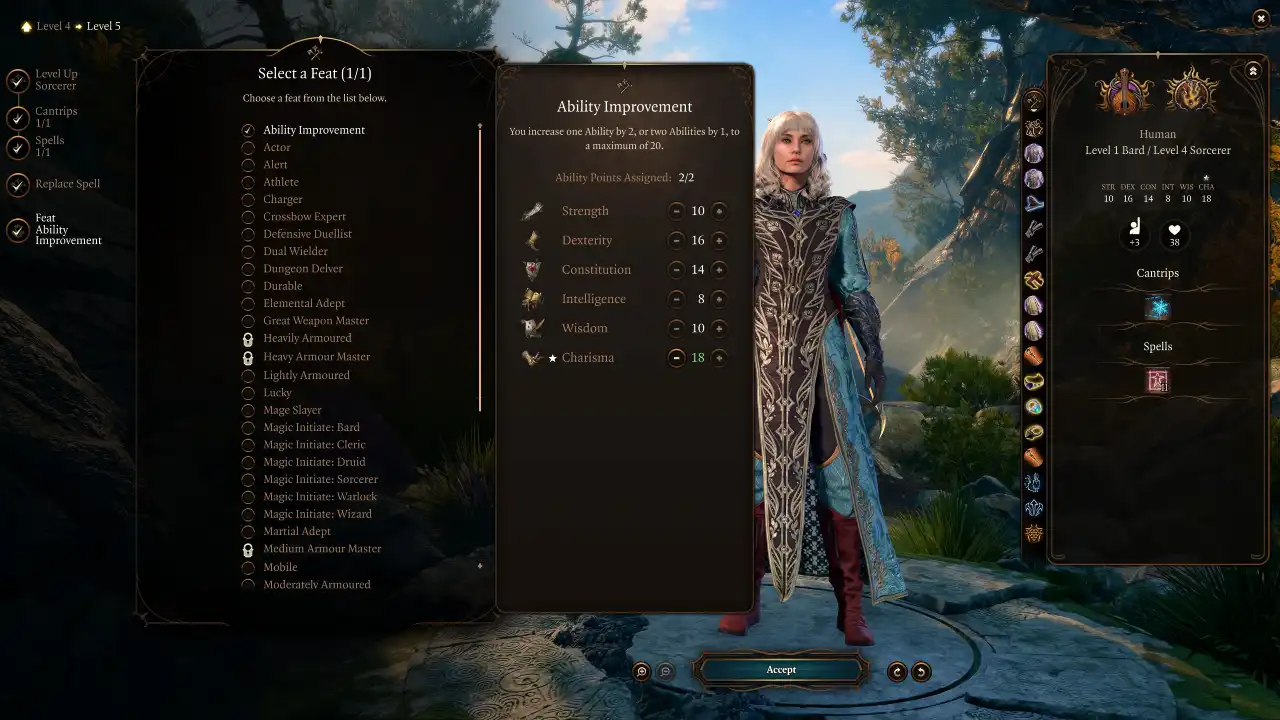
We’re adding our fourth Sorcerer level here.
This will give you access to a Feat to improve your Lorecerer’s stats, and another new spell.
First, let’s choose a new spell:
New Sorcerer Spell
- Holds a humanoid enemy in place, preventing them from acting and leaving them defenseless.
- Upcast to attempt on several targets at once.
- The target attempts a new Saving Throw to break free every turn.
- Melee Attack Rolls against the target are guaranteed Critical Hits.
- Use with
 Heightened Spell to markedly increase the success chance.
 - Good combo with melee heavy-hitters like our BG3 Fighter Build.
Choose a Feat – Feats are bonuses for your character that give them a special passive or just increase an Ability Score.
- I recommend choosing Ability Improvement and putting both of the points into Charisma.
- This will make your spells and cantrips more potent, and boost your Charisma-based skills like
 Persuasion and
  Performance.
Level 6
We’ll now add the fifth level of the Sorcerer class to our Lorecerer Build.
This is quite a simple level in terms of what you unlock. As usual you get a new Sorcery Point, but besides that you just get one more spell.
New Sorcerer Spell
- Deal up to 48
 Fire Damage.
 - Large AoE.
- Upcast to increase the maximum damage.
Level 7
We’re adding the sixth Sorcerer Level to our Lorecerer, taking the total to 1 Bard, 6 Sorcerer. This will be the final Sorcerer level we add to the build.
This level is important, particularly if you chose the recommended Draconic Bloodline subclass, because you gain a selection of new features from your Sorcerer subclass.
New Subclass Features – Draconic Bloodline
- When you cast a spell that deals damage of the same type associated with your Draconic Ancestry, add your Charisma Modifier to the damage.
- This is currently 4 extra damage, if you followed the guide.
![]() Elemental Affinity: Resistance
Elemental Affinity: Resistance
- When you cast a spell that deals damage matching your Draconic Ancestry, gain Resistance to that damage type until next Long Rest.
- Costs a
 Sorcery Point and a
  Reaction to activate.
Tip: Our spell recommendations so far have assumed that you chose a fire-based Draconic Ancestry as advised earlier in the guide. If you chose a different type, you might want to replace ![]() Fireball with a spell that matches your type.
Fireball with a spell that matches your type.
New Sorcerer Spell
- Target yourself or an ally to Hasten them.
- Gives the target an extra Action, double Movement Speed, +2 to Armour Class, and Advantage on Dexterity Saving Throws.
- When the buff ends, the beneficiary will be Lethargic, unable to move for 1 turn.
- Requires Concentration
Tip: If Haste ends early due to you losing Concentration, the beneficiary will still become Lethargic. Try to keep your Lorcerer safe from damage when they are using this spell!
Level 8

We’ll now add the second Bard level to the Lorecerer Build. Remember to click on the Bard icon so you don’t accidentally add another Sorcerer level! See the image above if you’re unsure where to click.
Adding the second level of the Bard class gives you the following benefits:
New Bard Features
- Automatically add half of your Proficiency Bonus to Ability Checks that you’re not Proficient in.
- This is essentially an extra Short Rest that can be used to heal and revitalise your party.
You can choose another First Level Bard Spell to unlock. Our recommendation:
New Bard Spell
- An AoE debuff that makes enemies much easier to hit and illuminates them.
- It prevents enemies from hiding or turning invisible.
- A very strong debuff, but enemies can roll a Saving Throw to resist it, so it’s not always reliable.
Late-Game Leveling (9-12)
As we move into the final few levels for the Bard and Sorcerer Multiclass Build, you’ll continue to gain new spells and features that ramp up your character’s power.
Level 9
We will now unlock the next level of the Bard class.
You’ll need to choose your Bard subclass. Choose College of Lore – This is essential, you will miss out on a vital feature of the Bard otherwise.
Here are the full list of choices for this level:
Bard Subclass – College of Lore
- Gain Proficiency with 3 additional skills. Prioritize Charisma and Dexterity Skills for the best results.
 Cutting Words – Use your Bardic Inspiration Charges to debuff an enemy.
New Bard Features
Gain Expertise with 2 Skills you are Proficient in.
- This doubles your Proficiency Bonus.
- Choose skills that you use frequently, like Persuasion and Sleight of Hand.
You can now access second-level Bard spells.
New Bard Spell
- Create a small AOE, dealing Slashing Damage to those within.
- Works very well in chokepoints and crowded areas.
Level 10
Once again, we’ll add another Bard level.
This gives the following new features:
New Feat – Choose one of these:
- Ability Improvement: Charisma – Brings your Charisma score up to 20, giving another boost to your spells, cantrips and Charisma Skills.
- War Caster – Gain
 Advantage on Concentration Saving Throws. Makes it easier to maintain Concentration when you take damage.
New Bard Cantrip– We already got the best options, so choose whatever you like from the remaining list.
You can unlock another spell from the Bard list. We recommend:
New Bard Spell
- Deal
 Fire Damage and heat up an enemy’s metal weapon or armour.
 - The weapon is prioritised – armour is only heated if there is no metal weapon.
- The target must roll a Constitution Saving Throw.
- If they succeed, they are forced to drop the weapon.
- If they fail, they get
 Disadvantage on Attack Rolls and Ability Checks for this turn.
 - If you maintain Concentration, you can recast the spell every turn for up to 10 turns.
Pro Tip: The Heat Metal spell is very good because even if the enemy rolls a Saving Throw, they still take full damage and get Disadvantage on their attacks and ability checks, a severe debuff.
Level 11
Add another Bard Level, taking you to Bard Level 5 and Sorcerer Level 6.
At this level, you get a bunch of upgrades to your Bard class features:
New Bard Features
- You now have four charges instead of three.
- Your Bardic Inspiration Dice are now 1d8 instead of 1d6.
- You will now regain Bardic Inspiration charges on both Short and Long Rests.
You can now access Third Level Bard Spells, and can choose one more spell to unlock. We recommend:
New Bard Spell
- An AoE spell that uses a chosen element to deal up to 40 damage per enemy, or puts enemies in the area to sleep.
- When casting, choose the variant that matches your Draconic Affinity, unless the enemies are Resistant to it.
Level 12

You’ve now reached the maximum level of this BG3 Bard & Sorcerer Multiclass Build!
We’ll now add one final level of the Bard class, giving the following features:
New Bard Features
- You and any allies within 9 metres have
 Advantage on
  Saving Throws against being
  Charmed or
  Frightened.
You also get to select a new Bard spell.
New Bard Spell
- Forces targets in range to drop their weapon and run away for 2 turns, unless they succeed a Wisdom Save.
- This effect is stronger than Frighten, which debuffs an enemy’s attacks but doesn’t force them to flee.
Learn two non-Bard spells (up to third level) from the ![]() Magical Secrets list. We recommend the following options:
Magical Secrets list. We recommend the following options:
![]() Magical Secrets – Choose 2:
Magical Secrets – Choose 2:
- Force a target to spend their next turn taking an action of your choice.
- You can make them halt, approach, drop to the ground, run away or drop their weapon.
- Upcast the spell to increase the number of targets.
- Create a black sphere that Blinds and hinders all enemies within.
- Also deals Cold and Acid Damage every turn to those within.
- One of the strongest AoE spells in the game. Ruinous when used correctly.
Tip: You can combine this with the ![]() Command spell to force enemies to stay in the AoE. This requires the
Command spell to force enemies to stay in the AoE. This requires the ![]() Eversight Ring, otherwise you won’t be able to see enemies within Hunger of Hadar.
Eversight Ring, otherwise you won’t be able to see enemies within Hunger of Hadar.
Note: If you don’t like the Command & Hunger of Hadar combo and want some spells that are easier to use, you can respec and replace them with ![]() Call Lightning and
Call Lightning and ![]() Spirit Guardians. There are many ways to play this build – it’s up to you.
Spirit Guardians. There are many ways to play this build – it’s up to you.
BG3 Lorecerer Build Equipment

Now, let us take a look at some of the equipment choices you can make for your BG3 Bard & Sorcerer Multiclass Build.
Don’t worry if you miss out on some of the items. Just enjoy your playthrough and try to view this as a wishlist rather than a precise blueprint. The names of the most essential, build-defining items are written in Bold Italic.
Early Game Equipment
This is the early-game gear setup that you can use for your Bard/Sorcerer Multiclass Build. You don’t need to get all the items, but the build will perform better if you find some of them. You can find these items in Act 1 or early Act 2. Essential items are written in Bold Italic.
| Slot | Icon | Item | Effects | Location |
|---|---|---|---|---|
| Head |  |
The Shadespell Circlet |
|
Sold by Omeluum in the Underdark, after helping him to investigate the Parasite |
| Cloak |  |
Cloak of Protection |
|
Purchased from Quartermaster Talli in Last Light Inn |
| Chest |  |
The Protecty Sparkswall |
|
Looted from a gilded chest at the far end of the trapped bridge in Grymforge |
| Gloves |  |
Bracers of Defence |
|
Looted from a gilded chest in the secret area of the Apothecary’s Cellar |
| Boots | Boots of Stormy Clamour |
|
Sold by Omeluum in the Underdark, after helping him to investigate the Parasite | |
| Necklace |  |
Pearl of Power Amulet |
|
Sold by Omeluum in the Myconid Colony |
| Ring 1 |  |
Ring of Protection |
|
Steal the Sacred Idol in Druid Grove (quest) |
| Ring 2 |  |
Crusher’s Ring |
|
Dropped by Crusher in the Goblin Camp |
| Main Weapon |  |
The Spellsparkler |
|
Rescue Counsellor Florrick from the fire in Waukeen’s Rest |
| Second Weapon | Any |
|
N/A |
Head: ![]() The Shadespell Circlet
The Shadespell Circlet
- When obscured in Shadow, gain +1 Spell Save DC
- Sold by Omeluum in the Underdark, after helping him to investigate the Parasite
Cloak: ![]() Cloak of Protection
Cloak of Protection
- +1 to
 Armour Class and
  Saving Throws
 - Purchased from Quartermaster Talli in Last Light Inn
Chest: ![]() The Protecty Sparkswall
The Protecty Sparkswall
- +1 to Spell Save DC
- +1 to
 Armour Class and
  Saving Throws if you have at least 1
  Lightning Charge
 - Looted from a gilded chest at the far end of the trapped bridge in Grymforge
Gloves: ![]() Bracers of Defence
Bracers of Defence
- +2 to
 Armour Class, if you have no armour or shield equipped
 - Looted from a gilded chest in the secret area of the Apothecary’s Cellar
Boots: ![]() Boots of Stormy Clamour
Boots of Stormy Clamour
- Inflicting a condition on an enemy applies 2 turns of Reverberating.
- Reverberation applies -1 to Strength, Dexterity and Constitution Saves per remaining turn.
- When the target has 5 stacks, they take 1d4
 Thunder Damage and must succeed a DC 10 CON save or fall
  Prone.
 - Sold by Omeluum in the Underdark, after helping him to investigate the Parasite
Necklace: ![]() Pearl of Power Amulet
Pearl of Power Amulet
- Recover a Spell Slot up to Third Level, once per Long Rest
- Sold by Omeluum in the Myconid Colony
Ring 1: ![]() Ring of Protection
Ring of Protection
- +1 to
 Armour Class and
  Saving Throws
 - Steal the Sacred Idol in Druid Grove (quest)
Ring 2: ![]() Crusher’s Ring
Crusher’s Ring
- +3 metres Movement Speed per turn
- Dropped by Crusher in the Goblin Camp
Melee Weapon: ![]() The Spellsparkler
The Spellsparkler
- Gain 2
 Lightning Charges when you deal damage with a Spell or Cantrip
 - Each charge has a +1 bonus to
 Attack Rolls and +1 bonus
  Lightning Damage on attacks
 - Reaching 5 charges consumes them all to deal 1d8 bonus
 Lightning Damage
 - Rescue Counsellor Florrick from the fire in Waukeen’s Rest
We aren’t using a Ranged weapon because it isn’t required – you can use your Sorcerer Cantrips to deal ranged damage.
Endgame Equipment
The endgame gear for the Lorecerer can be obtained either in late Act 2 or Act 3 of Baldur’s Gate 3. If you manage to complete all the items below, you will be an unstoppable force of power. Essential items are written in Bold Italic.
| Slot | Icon | Item | Effects | Location |
|---|---|---|---|---|
| Head |  |
Hat of Fire Acuity |
|
Looted from the Strange Ox in Act II or Act III (Do NOT kill the Ox in Act I!) |
| Cloak |  |
Cloak of the Weave |
|
Sold by Helsik at the Devil’s Fee, once her special stock is unlocked |
| Chest |  |
Potent Robe |
|
Given as a reward by Alfira for completing the Rescue the Tieflings quest in Act II |
| Gloves |  |
Helldusk Gloves |
|
Dropped by Haarlep in the House of Hope. |
| Boots | Boots of Stormy Clamour |
|
Sold by Omeluum in the Underdark, after helping him to investigate the Parasite | |
| Necklace |  |
Spineshudder Amulet |
|
In the Mimic Chest in Isobel’s Room, Moonrise Towers. |
| Ring 1 |  |
Ring of Mental Inhibition |
|
In a locked chest in the House in Deep Shadows, east of the Shadowed Battlefield Waypoint. |
| Ring 2 | Eversight Ring |
|
House of Healing Morgue – in the locked opulent chest in the morgue lab. | |
| Main Weapon |  |
Markoheshkir |
|
Found inside a Globe of Invulnerability in Ramazith’s Tower |
| Second Weapon |  |
Darkfire Shortbow |
|
Buy or steal from Dammon in Last Light Inn. |
Head: ![]() Hat of Fire Acuity
Hat of Fire Acuity
Cloak: ![]() Cloak of the Weave
Cloak of the Weave
- +1 to Spell Save DC and Spell
 Attack Rolls
 - Sold by Helsik at the Devil’s Fee, once her special stock is unlocked
Chest: ![]() Potent Robe
Potent Robe
- +1
 Armour Class
 - Your Cantrips deal bonus damage equal to your Charisma Modifier (Should be +5 by now)
- Gain THP equal to your Charisma Modifier at the start of every turn
- Given as a reward by Alfira for completing the Rescue the Tieflings quest in Act II
Gloves: ![]() Helldusk Gloves
Helldusk Gloves
- +1 to Strength
 Saving Throws
 - +1 to Spell Save DC and Spell
 Attack Rolls
  Rays of Fire (Unique Cantrip)
- Dropped by Haarlep in the House of Hope.
Boots: ![]() Boots of Stormy Clamour
Boots of Stormy Clamour
- Inflicting a condition on an enemy applies 2 turns of Reverberating.
- Reverberation applies -1 to Strength, Dexterity and Constitution Saves per remaining turn.
- When the target has 5 stacks, they take 1d4
 Thunder Damage and must succeed a DC 10 CON save or fall
  Prone.
 - Sold by Omeluum in the Underdark, after helping him to investigate the Parasite
Necklace: ![]() Spineshudder Amulet
Spineshudder Amulet
- When you deal damage with a ranged spell attack, inflict 2 turns of Reverberation.
- In the Mimic Chest in Isobel’s Room, Moonrise Towers.
Ring 1: ![]() Ring of Mental Inhibition
Ring of Mental Inhibition
- When a foe fails a Saving Throw against your Spell or Action, they gain 2 turns of Mental Fatigue.
- -1 to Wisdom, Intelligence and Charisma Saving Throws per turn remaining.
- When the target fails a WIS, INT or CHA save with 5 or more turns remaining, they take 1d4
 Psychic Damage and lose all stacks.
 - In a locked chest in the House in Deep Shadows, east of the Shadowed Battlefield Waypoint.
Ring 2: ![]() Eversight Ring
Eversight Ring
- Immunity to Blindness.
- Also allows you to see through magical darkness, though this isn’t on the tooltip.
- House of Healing Morgue – in the locked opulent chest in the morgue lab.
Melee Weapon: ![]() Markoheshkir
Markoheshkir
- +1 to Spell Save DC and Spell
 Attack Rolls
 - Arcane Battery – Cast any spell for free, once per Long Rest
 Kereska’s Favour, once per Long Rest
- Found inside a Globe of Invulnerability in Ramazith’s Tower
Ranged Weapon: ![]() Darkfire Shortbow
Darkfire Shortbow
Here’s a summary of how these items work together to boost this Lorecerer Build for Baldur’s Gate 3:
Attacking Items:
 Hat of Fire Acuity – Allows you to massively increase your spell accuracy/success chance by up to +10. Upcasting
  Scorching Ray at the beginning of a battle is a good way to immediately get several stacks.
 Cloak of the Weave– Gives another small boost to spell success chance.
 Potent Robe – Adds up to 5 bonus damage to your Cantrips.
 Helldusk Gloves– Another small boost to spell success chance.
 Markoheshkir– Empowers your spellcasting with
  Kereska’s Favour, gives you one free Spell per Long Rest and gives another small boost to spell success chance.
Debuff Items:
 Boots of Stormy Clamour – Applies Reverberation to enemies, debuffing their physical Saving Throws and eventually knocking them
  Prone.
 Spineshudder Amulet – Allies more stacks of Reverberation.
 Ring of Mental Inhibition– Applies Mental Fatigue to enemies, debuffing their mental Saving Throws.
Utility & Defensive Items:
 Eversight Ring– Gives you immunity to
  Blindness and allows you to see through magical darkness.
 Darkfire Shortbow – Gives resistance to
  Fire and
  Cold, and lets you use the
  Haste spell for free once per rest.
Lorecerer Build Extra Info

Here is some extra information that will help you to get the most out of this Bard & Sorcerer Multiclass Build in Baldur’s Gate 3.
How to Play this Lorecerer Build
In the Early-Game
- To begin with, you will primarily deal damage with Cantrips.
- Use your spells to augment your damage when necessary.
- You can also spend your spell slots to buff and heal allies or debuff enemies.
- Remember to use your Sorcerer Metamagic features. Splitting spells into two, boosting their range or increasing their success chance.
- Get the Spellsparkler staff from Waukeen’s Rest (save Councillor Florick to get this staff as a reward) you can gain an Attack Roll bonus of up to 5 and as bonus
 Lightning Damage.
In this stage of the game, the Lorecerer is focused on being a useful all-rounder, but doesn’t yet have any complicated synergies to speak of.
Playing the build in the Late-Game
By far the most important item for this build is the ![]() Hat of Fire Acuity. Once you obtain it, the build comes alive. You can get it by defeating the Strange Ox in Act II or Act III. Do not do it in Act I, because the Strange Ox drops a different item if you do that.
Hat of Fire Acuity. Once you obtain it, the build comes alive. You can get it by defeating the Strange Ox in Act II or Act III. Do not do it in Act I, because the Strange Ox drops a different item if you do that.
Here’s how to best use it:
- When wearing the hat, you can upcast your
 Scorching Ray to immediately gain a large amount of stacks of Arcane Acuity.
 - If you combine this with the
 Elixir of Battlemage’s Power (crafted with
  Suspension of Gauth Eye and any Sublimate) you can pretty much reach the maximum +10 buff at the beginning of every combat.
 - Prebuff with
 Haste before entering combat (or drink a
  Potion of Speed) to get an extra Action, allowing you to immediately follow up with another spell.
 - With a +10 Arcane Acuity bonus, enemies will have a very hard time winning Saving Throws against your spells – you’ll soon get accustomed to 90-95% success rates.
At max level, you unlock the Command spell. This is usually a modest early-game control spell, but with this build its insanely strong:
- Make sure you have lots of Arcane Acuity stacks and are Hastened
- Cast
 Hunger of Hadar (upcast to increase the damage) on a cluster of enemies
 - Cast
 Command (Halt) on the enemies in the area to force them to stay in the AoE, taking damage each turn.
 - This works because
 Command isn’t a Concentration Spell. You’ll need to recast it every turn to maintain the effect.
This combo can be a bit tricky to pull off, but when it works out you can neutralize multiple enemies with ease.
Alternatively, you can just use Command on its own to stun enemies for as long as you need.
Lorecerer Best Potions
Using the right Potions for your Lorecerer Build will make it much easier to play, especially later in the game when you have complicated synergies between the Hat of Fire Acuity and various spells.
There are two potions I want to draw your attention to – they were mentioned above but here I will explain how to find the ingredients and craft them.
![]() Potion of Speed
Potion of Speed
- Hastens your character for 3 turns, giving you more Movement Speed and an extra Action.
- Drink this potion when you need to cast two spells in the same turn, i.e.
 Hunger of Hadar and
  Command.
 - Your character will be
 Lethargic for 1 turn when the potion runs out, so be careful.
 - Craft by combining any Salt with
 Ashes of Hyena Ear
- Combine three
 Hyena Ears to create
  Ashes of Hyena Ear
- Combine three
- You can get a lot of
 Hyena Ears in Act I, by defeating all of the Hyenas and Gnolls in the Risen Road area.
 - Later on, they are sold by Derryth Bonecloak in the Myconid Colony (Act I – Underdark) and found in Alchemy Labs throughout BG3.
 Elixir of Battlemage’s Power
- Gives you 3 stacks of Arcane Acuity that won’t expire until your next Long Rest.
- Makes it easier to each +10 stacks with the
 Hat of Fire Acuity.
 - Craft by combining any Sublimate with
 Suspension of Gauth Eye.
- Combine three
 Gauth Eyestalks to create
  Suspension of Gauth Eye.
- Combine three
 Gauth Eyestalks are quite rare. You can find one in Balthazar’s Room in the Gauntlet of Shar.
- In Act III, you can buy
 Gauth Eyestalks from Blurg (Lower City Lodge), Popper (Rivington) and Stylin’ Horst (Rivington).
 - Due to its rarity, this powerful Elixir is best off saved to help you with the toughest parts of Act III.
Tip: You can only have one Elixir active at a time, be careful not to accidentally replace it. You can safely combine it with the ![]() Potion of Speed and anything else called a Potion, though.
Potion of Speed and anything else called a Potion, though.
Lorecerer Build Illithid Powers (optional)

Illithid Powers are unlocked later in BG3 when you learn more about Mind Flayers and Tadpoles. By eating Jars of Mind Flayer Parasites you gain one point. This is another optional skill tree that you can get access to if you want. Here are some of the best Illithid Powers for the BG3 Lorecerer Build:
- Allows you to deal extra damage to a target when you are Concentrating on a spell, potentially also healing if the target is Concentrating too.
- Ideally, you will spend a lot of time concentrating on either Hex or an AoE like Hunger of Hadar, so you should be able to get good use from this.
- When you reduce a creature’s hit points below a certain threshold, this power instantly kills it and deals 1-4 Psychic Damage to nearby enemies.
- This is particularly effective when engaging groups of weaker foes, enabling you to thin their numbers rapidly.
- This can be used to reach hard to get to places or change positions in combat.
- Use this to keep your Lorecerer safe from enemy attacks, so your Concentration won’t get disrupted as easily.
- This power creates an area-based effect that pulls in and slows targets.
- It’s particularly useful for crowd control, allowing you to cluster enemies together for area-of-effect attacks or to isolate them from vulnerable allies.
Pro Tip: Try getting the Haste buff from a Potion of Speed or the Haste spell (lets you perform 2 Actions on one turn), then casting Black Hole and then Hunger of Hadar to cause a world of pain for a group of enemies.
- This is a top-tier reaction from the Illithid Powers skill tree in BG3.
- This allows you to deal psychic damage when a nearby enemy casts a spell.
- This is especially useful if the target is casting a Concentration Spell.
- The damage from Psionic Backlash can immediately break their Concentration, ending the spell’s effects.
Lorecerer Build FAQs
Here are some frequently asked questions related to the BG3 Lore Bard & Sorcerer Multiclass Build. Most of these questions have already been answered in the guide itself.
- What’s the best race for a Bard Sorcerer Multiclass Build?
- What roles can the Lorecerer fill in my party?
- What abilities are most important for the Lorecerer?
- Which Bard and Sorcerer subclasses should I use?
FAQ: What’s the best race for a Bard Sorcerer Multiclass Build?
While any race will work just fine for this build, the best options are:
- Wood Elf – Very high mobility, resistance to effects like magical sleep and Charm, innate Darkvision. The extra Movement Speed is an underrated bonus that allows you to outrun foes.
- Duergar – Gives you innate Superior Darkvision. Allows you to wear Medium Armour. Gives you Resistance to Poison Damage and Advantage against the Poisoned, Charmed and Paralysed effects. This wide range of bonuses makes the Duergar very tough.
- Drow – Similar bonuses to the Wood Elf, but doesn’t have the extra Movement Speed. However, you do get Superior Darkvision and can debuff enemies with Faerie Fire.
For more info about the best races, see the Best Race section above.
FAQ: What roles can the Lorecerer fill in my party?
The most natural role of the Lorecerer is that of a “support damage dealer”. It deals good damage with its Cantrips, and can use their Bard spells for a range of purposes; your spells are particularly good at AoE damage, buffing allies and debuffing or stunning enemies. Later in the game, once you have obtained the Hat of Fire Acuity, your Lorecerer becomes extremely good at locking down enemies with debuffs and stun spells.
The Lorecerer can also act as a healer in an emergency, but you should not use them as your party’s dedicated healer because it’d be a waste of their potential, and other builds like the Life Domain Cleric do a much better job.
While they can fight in melee in a pinch, you should not try to use the Lorecerer as a tank. They are not durable enough for that, and they will be much more effective staying at a distance from enemies and causing havoc with their cantrips and spells.
FAQ: What Abilities are most important for the Lorecerer?
- Charisma is the most important ability for your Lorecererbuild, because it determines the efficacy of your spells and cantrips and will also boost many of your Skills, such as Persuasion, Performance and Intimidation. Put 16 points in Charisma at the start and increase it later in the game.
- Dexterity is also very important. It boosts your Armour Class and Initiative, allowing you to move earlier in the turn. Put 16 points in this.
- Constitution should always be at least 14 for any build in Baldur’s Gate 3, and this one is no different. This gives you a neccessary baseline of HP, and helps you to resist a wide range of hostile effects with Constitution Saving Throws. It also helps you to keep Concentration on spells when you take damage.
FAQ: Which Bard and Sorcerer subclasses should I use?
- For the Bard, I strongly recommend the College of Lore subclass for this build. It will give you 3 extra Skill Proficiencies, but more importantly allows you to unlock two non-Bard spells with the Magical Secrets feature, such as Command and Hunger of Hadar which are both important spells for this build.
- For the Sorcerer, the Draconic Bloodline subclass works very well. You get extra Armour Class to help you through the early game. Later on, you’ll gain affinity with your chosen element, allowing you to deal extra spell damage and gain Resistance against that element.
Related Guides for Baldur’s Gate 3
The post Best BG3 Lorecerer Build – Bard Sorcerer Multiclass Build appeared first on AlcastHQ.


