
Best BG3 Sorcadin Build – Sorcerer Paladin Mutliclass Build

Welcome to the best Sorcadin Build for BG3 (Sorcerer Paladin Multiclass Build). This multiclass build excels in both spellcasting and melee combat. Paladin benefits from higher-level spell slots for more powerful smites, while Sorcerer adds Metamagic, offering versatile spellcasting when needed.
Table of Contents:
- Sorcerer Paladin Build Overview
- Character Creation – Level 1
- Sorcadin Levelling Guide (2-12)
- Sorcadin Best Equipment
- Sorcadin Extra Info
- Sorcadin Build FAQ
BG3 Sorcerer & Paladin Multiclass Build Strengths & Weaknesses:
SORCADIN PROS
SORCADIN CONS
Sorcerer & Paladin Multiclass Build Overview
For our Sorcadin Build, we are combining the Sorcerer class with the Paladin. The Sorcerer class allows you to boost your spells with powerful Metamagic features.
The Paladin gives you prowess with melee weapons and allows you to wear armour. You will also unlock powerful Smite spells to boost your damage with weapons.
BG3 Multiclass Explainer:
- How it works: New classes can be added as you level up. They are added on a level-by-level basis.
- Example: If you are a level 6 Paladin and decide to add 1 Sorcerer level, you will only get the features of Sorcerer level 1.
- Example 2: If you want the features of a level 6 Paladin and Sorcerer, you need to be max level and add 6 levels of each class.
Pro Tip: It’s usually best to choose subclasses that work together easily. For example, the Paladin and Sorcerer go well together because they both use Charisma as their spellcasting attribute.
This means we have to be sure that the payoff of adding new classes to your build is worth it, because every level of a secondary class reduces the highest level we can reach with our primary class.
In this Sorcerer and Paladin Multiclass Build, we’ll be combining the following classes:
- The Paladin has proficiency with a wide array of weapons and can wear any armour in the game, making them excellent in melee. We’ll use the Oath of Vengeance subclass to unlock Vow of Enmity, Hold Person and Misty Step.
- Paladins also unlock powerful Smite spells, infusing their weapon with elemental damage in exchange for a Spell Slot.
- We’ll take six Paladin levels, sufficient to unlock their Extra Attack bonus and the Aura of Protection, giving a bonus to Saving Throws.
- Our main class is Sorcerer. We’re using the Shadow Magic subclass to summon the shadow hound companion, who will help you in melee by distracting and pinning down enemies. But the other subclasses work fine, too.
- The Sorcerer allows you to buff your spells with Metamagic, for example, increasing their range or success chance.
- We’ll use 6 levels of the Sorcerer, just enough to unlock the main subclass feature (the shadow hound, in our case).
Here is a quick overview of which class we pick when, this is important!
Sorcadin Levelling Progress Overview
- Level 1: Paladin 1 (Oath of Vengeance)
- Level 2: Paladin 2
- Level 3: Paladin 3
- Level 4: Paladin 4
- Level 5: Paladin 5
- Level 6: Paladin 6
- Level 7: Sorcerer 1 (Shadow Magic)
- Level 8: Sorcerer 2
- Level 9: Sorcerer 3
- Level 10: Sorcerer 4
- Level 11: Sorcerer 5
- Level 12: Sorcerer 6
Sorcadin Character Creation (Level 1)

In this section, we will guide you through the best starting choices for creating your BG3 Sorcerer & Paladin Multiclass Build.
Starting Class (Paladin)
We’ll start by choosing the Paladin class. The Sorcerer elements of the build will be added later.
The Paladin starts the game with the following features, which we’ll build on over the course of this guide:
Core Paladin Features
- Item Proficiency – Martial Weapons, All Armour, Shields
- Channel Oath – You gain one Channel Oath charge and a Channel Oath ability derived from your chosen subclass.
- Lay on Hands – You can use Lay on Hands charges to heal allies who are within touching distance.
- Subclass Choice – You must choose your Paladin subclass.
We’ll explain what to choose for these options below.
Best Race
While this build will work fine with any race in the game, there are a few choices that stand out above the rest and can be chosen if you want to optimize the build as much as possible. Here are the five best race choices for the Sorcadin Build:
| Race | Strengths | Info |
|---|---|---|
Half Orc |
|
Gets an additional damage die when landing a Critical Hit with a melee weapon (3 dice instead of the usual 2). This makes for a nice boost to your melee damage potential.
You also get Darkvision, Intimidation Proficiency (a good fit since we have high Charisma) and can resist being downed once per Long Rest. |
Duergar |
|
With their wide choice of armour and weapon proficiencies, and resistances to poison, charm, and paralysis, Duergar are one of the strongest races in BG3.
The only downside of Duergar is their small stature – this reduces their base Movement Speed to 7.5 metres per turn (most races get 9 metres). |
Wood Elf |
|
Wood Elves are a great choice for most build types in BG3, thanks to their superior movement speed. Natural Proficiency in Perception is always useful, and immunity to magical Sleep will help you out a lot, especially in the early game when enemy mages love to spam this spell. |
|
Zariel Tiefling |
|
Gets Resistance to Fire Damage, Darkvision, and unlocks the Searing Smite and Branding Smite spells after a few levels up.
You can, of course, already get these spells from the Paladin class, but having them from your race means that you can cast them without needing a Spell Slot once per Long Rest, which is handy. |
|
Dragonborn, Any |
|
Dragonborns get access to a special Breath attack they can use once per Short Rest, which deals elemental damage in a directional AoE. They also get 50% Resistance to the same element. The damage element in question depends on which Dragonborn variant you choose.
The Fire and Poison variants are slightly better because many enemies attack with these damage types, making resistance to them more valuable. But don’t let this stop you from using whichever type of Dragonborn you like the most. Since we’ll be spending a lot of time in melee, the Dragonborn Breath attacks can fit in quite nicely with the Paladin playstyle. |
Half-Orc
![]()
Gets an additional damage die when landing a Critical Hit with a melee weapon (3 dice instead of the usual 2). This makes for a nice boost to your melee damage potential.
You also get Darkvision, Intimidation Proficiency (a good fit since we have high Charisma) and can resist being downed once per Long Rest.
 Intimidation Proficiency
 Darkvision
 Savage Attacks
- You roll an extra damage dice when you crit
 Relentless Endurance
- Once per Long Rest, restore to 1 HP instead of being
 Downed
- Once per Long Rest, restore to 1 HP instead of being
Duergar
![]()
With their wide choice of armour and weapon proficiencies, and resistances to poison, charm, and paralysis, Duergar are one of the strongest races in BG3.
The only downside of Duergar is their small stature – this reduces their base Movement Speed to 7.5 metres per turn (most races get 9 metres).
- Can wear
 Medium Armour
 - Can wield axes and hammers
 Dwarven Resilience
 Advantage against
  Poisoned
- Resistance to
 Poison Damage
 Superior Darkvision
 Duergar Resilience
- Advantage on
 Saving Throws against illusions
 - Advantage against
 Charmed and
  Paralysed
 Duergar Magic
 Enlarge (Level 3)
 Invisibility (Level 5)
Wood Elf
![]()
Wood Elves are a great choice for most build types in BG3, thanks to their superior movement speed. Natural Proficiency in Perception is always useful, and immunity to magical Sleep will help you out a lot, especially in the early game when enemy mages love to spam this spell.
- Proficiency in
 Stealth and
  Perception
 - Extra Weapon Proficiencies:
 Shortswords
 Longswords
 Shortbows
 Longbows
 Fey Ancestry
- Advantage against Charmed
- Immune to
 Magical Sleep
- Darkvision
 Fleet of Foot – 1.5 metres of extra Movement Speed
Zariel Tiefling
![]()
Gets Resistance to Fire Damage, Darkvision, and unlocks the Searing Smite and Branding Smite spells after a few levels up.
You can, of course, already get these spells from the Paladin class, but having them from your race means that you can cast them without needing a Spell Slot once per Long Rest, which is handy.
- Resistance to
 Fire Damage
 - Darkvision
- Tiefling Magic
 Thaumaturgy (Level 1)
 Searing Smite (Level 3)
 Branding Smite (Level 5)
Dragonborn, Any
![]()
Dragonborns get access to a special Breath attack they can use once per Short Rest, which deals elemental damage in a directional AoE. They also get 50% Resistance to the same element. The damage element in question depends on which Dragonborn variant you choose.
The Fire and Poison variants are slightly better because many enemies attack with these damage types, making resistance to them more valuable. But don’t let this stop you from using whichever type of Dragonborn you like the most.
Since we’ll be spending a lot of time in melee, the Dragonborn Breath attacks can fit in quite nicely with the Paladin playstyle.
- Draconic Ancestry – Depending on which Dragonborn variant you choose, you’ll gain:
- Resistance to an elemental damage type
- A special AoE elemental breath attack
Background & Skills
For your Sorcerer/Paladin Multiclass Background, we recommend choosing Soldier.
The Soldier background gives us the following Skill Proficiencies:
Soldier Background
![]() Athletics
Athletics
A Strength skill that makes you better at pushing characters and increases your resistance to enemies’ pushes. This is important because it’s one of the only skills in the game with a combat impact.
![]() Intimidation
Intimidation
A Charisma-based Skill that will sometimes appear as a Dialogue option, allowing you scare NPCs into doing what you want.
You can manually choose two other Skills in addition to those granted by your Background. These choices are restricted to the Paladin Skill list.
We ideally want to focus on Strength and Charisma skills, but there aren’t many available. We went with ![]() Persuasion and
Persuasion and ![]() Insight.
Insight.
If you’re a Human, you’ll get one extra unrestricted Skill Choice, which you should put in any remaining Charisma Skill.
Ability Points
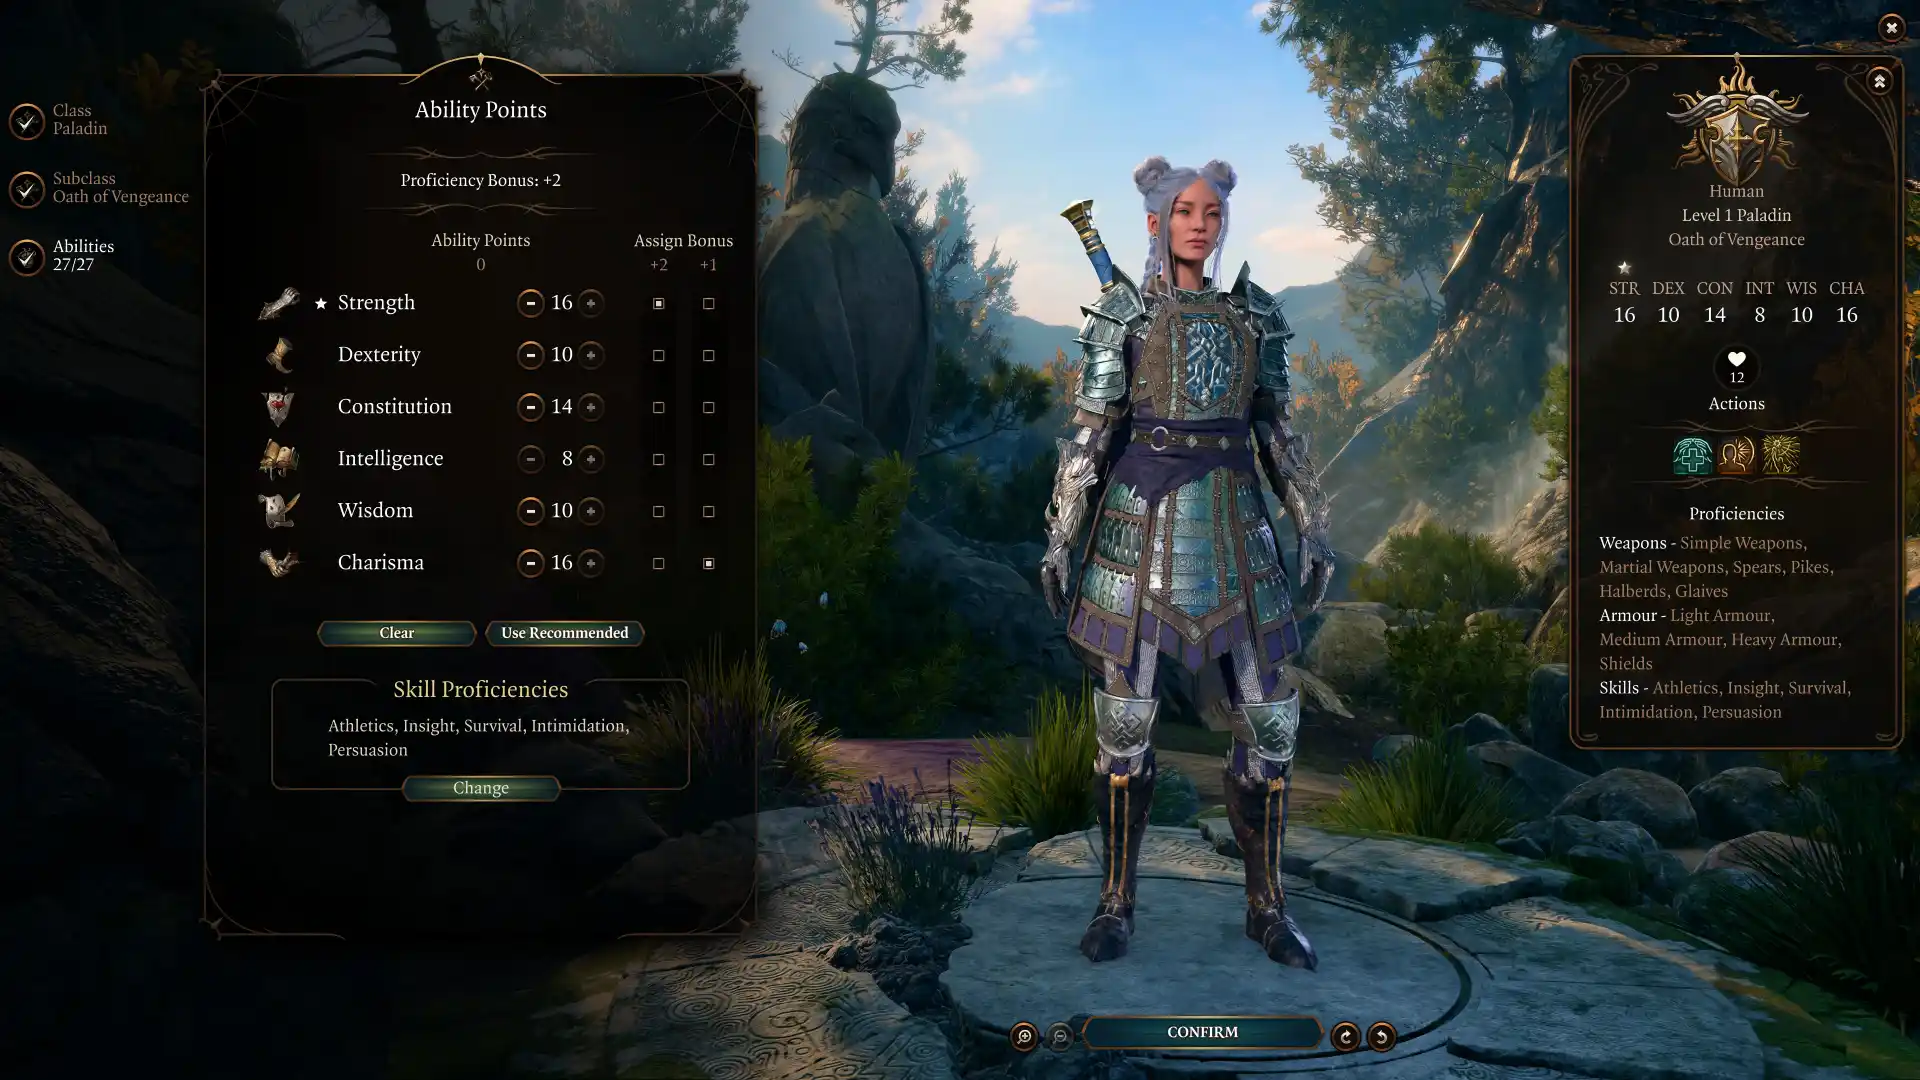
Strength will be our most important ability for the Sorcadin Build, because it’s used to determine the accuracy and damage of your melee attacks.
This is closely followed by Charisma, which is used to determine the effectiveness of our spellcasting. We will be focusing on this ability above all others.
The final important ability is Constitution, which increases our Hitpoints and improves our Concentration Checks.
![]() Strength – 16 Points
Strength – 16 Points
- Makes your melee attacks stronger and more accurate.
- Improves jump distance and carry weight.
![]() Dexterity – 10 Points
Dexterity – 10 Points
- Affects your Initiative (how early you move in the turn compared to other characters).
- While high Initiative is good, other Abilities are more important for this build.
- We’ll be using Heavy Armour, so increasing Dexterity won’t buff your Armour Class.
![]() Constitution – 14 Points
Constitution – 14 Points
- Increases Max HP.
- Helps you to maintain Concentration Spells when you take damage.
- Provides some resistance to a wide range of debilitating debuffs.
![]() Intelligence – 8 Points
Intelligence – 8 Points
- Not relevant for our build.
![]() Wisdom – 10 Points
Wisdom – 10 Points
- Used in some Saving Throws.
- Low priority.
![]() Charisma – 16 Points
Charisma – 16 Points
- Boosts our Cantrips, Spells and dialogue checks.
| Ability | Points | Why it matters |
|---|---|---|
| 16 | Boosts melee attacks, jump distance and carry weight. | |
| 10 | Low priority for our build because we’re using Heavy Armour. | |
| 14 | Important: Increases HP and helps Concentration checks for spells. | |
| 8 | Not relevant for our build. | |
| 10 | Helps with some Saving Throws. Low importance for this build. | |
| 16 | Boosts Cantrips, Spells and dialogue checks. |
Important Tips:
- The “Even Number” Rule: In Baldur’s Gate 3, only even numbers (12, 14, 16) increase your ability modifier. This means an 11 is functionally the same as a 10, so we aim for even numbers to maximize efficiency.
- Concentration is Key: Many important Sorcerer and Paladin spells (like
 Hold Person or
  Haste) require Concentration. A high Constitution helps ensure you don’t lose your spell just because you took a hit.
Subclass – Oath of Vengeance
You must choose your Paladin subclass immediately. The recommended choice is Oath of Vengeance, because you’ll get automatic access to a couple of useful spells. You can also use the powerful Abjure Enemy feature to make a foe easier to hit.
However, the build will still work fine if you decide to use a different Paladin subclass.
Oath of Vengeance Features
 Inquisitor’s Might – You or an ally’s weapon deals bonus
  Radiant Damage equal to your Charisma Modifier for the next 2 turns. Costs a Channel Oath charge and a
  Bonus Action.
- More features will be unlocked as you level up.
BG3 Paladin Sorcerer Multiclass Build Levelling Guide (2-12)
Now, we are going to look at how to level up your Sorcadin Build for Baldur’s Gate 3.
Early-Game Levelling (2-4)
In this section, we’ll cover the first four levels.
Level 2

The Paladin class unlocks quite a lot of additional features at Level 2:
Paladin Actions
- Infuse your weapon attack with 2d8 Radiant Damage (3d8 against fiends and undead).
- While technically not a spell, using this still costs a Level 1 Spell Slot.
Fighting Style
You can choose one Fighting Style to boost your character.
For the time being, we’re using Great Weapon Fighting, which will automatically reroll damage dice that land on 1 or 2 when you have a two-handed weapon equipped.
Paladin Spells
You can now learn some Paladin spells and gain two Spell Slots to cast them with.
We recommend choosing the following spells:
- Your prayer empowers you with divine radiance. Your weapons deal an additional 1-4 Radiant Damage.
- Requires Concentration.
- This Spell only consumes a Bonus Action, so you can attack your opponent on the same turn after casting the spell.
- Attempt to force the target to carry out a command on their turn. Some useful options include telling them to stay put and do nothing, drop their weapon, or fall to the ground.
- While this only lasts for 1 turn, it doesn’t require Concentration, so it can be safely used in conjunction with any spell in the game.
- Infuses your weapon with extra
 Thunder Damage.
 - Pushes your target 3m away and possibly knocks them
 Prone.
 - If you miss, your spell slot and Bonus Action are not consumed.
- You can sometimes use this to knock enemies off ledges or cliffs for extra fall damage, potentially one-shotting them.
- Infuses your weapon with extra
 Psychic Damage, possibly
  Frightening your target.
 - Good for locking down an enemy for a while.
- If you miss, your spell slot and Bonus Action are not consumed.
- Your weapon is imbued with heat, dealing additional Fire Damage on impact.
Level 3
You get another generous helping of new features when you reach Paladin Level 3:
Paladin Features
- Gives your Paladin immunity to disease.
- Disease statuses are quite rare in BG3, but they do occasionally appear.
Oath of Vengeance Features
Your Oath of Vengeance subclass grants you two new features at Level 3:
- Frighten an enemy, giving them
 Disadvantage on Attack Rolls and Ability Checks, and preventing them from moving.
 - Very useful for locking down a dangerous or annoying enemy.
- Gain Advantage on Attack Rolls against an enemy.
- Makes your attacks much more accurate, which is especially useful against enemies with high armour.
Oath of Vengeance Spells
Your Oath of Vengeance subclass also gives you two spells, which are automatically learned and prepared (added to your action bar).
- Applies a 1d4 penalty on Attack Rolls and Saving Throws for the targets.
- They can resist the debuff with a Charisma Saving Throw.
- Place a mark on the target. The marked creature takes 1d6 extra damage from your attacks.
- If the target dies before the spell ends, you can reapply it to a new creature without spending another spell slot.
- Requires Concentration to maintain; casting another Concentration Spell will immediately remove the effect.
New Paladin Spell
You can choose one more Paladin spell to unlock. Best choice:
- A very situational spell that gives the target 5 Temporary HP per turn, and immunity to Frightened.
- Requires Concentration and lasts for up to 10 turns.
- Later on, you can upcast it to increase the number of beneficiaries.
- A good spell for fights with frightening enemies.
Level 4

At Level 4, you get one more spell and a Feat to boost your Sorcadin’s combat prowess.
New Paladin Spell
Choose one more Paladin spell to unlock. We already got the best options so we’re a bit short on choices at the moment. The best one is probably:
- Prevents Aberrations, Celestials, Elementals, Fiends, Fey or Undead from afflicting you with Charmed, Frightened or
 Possessed, and gives them Disadvantage when they attack you.
 - While there aren’t many opportunities to use this spell, it can make some fights ten times easier (like the Harpies in Act I), and protects your party from some forms of mind control.
New Feat
You can choose a Feat to make your Sorcadin better in combat.
For now, we are going to use Great Weapon Master, which gives you two bonuses:
- Landing a Critical Hit or fatal hit on an enemy with a two-handed weapon allows you to make an additional attack with your Bonus Action.
- You can toggle the All In feature on or off. When it is on, your two-handed weapon has a -5 Attack Roll penalty but +10 bonus damage. Good for quickly killing weaker enemies.
Later on, we will respec to replace this Feat. But for the time being, it’s going to give you lots of extra damage and momentum.
Mid-Game Levelling (5-8)
In this section, we’ll cover the mid-game. During these levels, the Sorcerer Paladin Multiclass Build will become much more powerful, accessing a wider array of spells.
Level 5
At Level 5, we get quite a few new features and can access second-level spells.
New Paladin Spell
You now have access to Second-Level spells, and can choose one to unlock. Our recommendation is:
- Adds extra Radiant Damage to your weapon attack.
- If successful, it prevents the enemy from turning Invisible, as long as you maintain Concentration.
Oath of Vengeance Spells
Your Oath of Vengeance subclass also gives you two spells, which are automatically learned and prepared (added to your action bar).
- Allows you to teleport to a visible and unoccupied space within 18 metres.
- Great for quickly jumping into melee or for escaping if things go wrong.
- Only uses a Bonus Action, so you can make an attack or cast another spell on the same turn that you use this.
- A powerful stun that completely paralyses the target. They will keep rolling Wisdom Saving Throws to try to break free.
- Melee attacks against the victim will be guaranteed critical hits.
- Can only be cast on humanoid targets.
Level 6
This is the final Paladin level we’ll add before switching to Sorcerer levels. You’ll get a strong new defensive feature and another spell.
New Paladin Spell
Choose one of these Paladin spells to unlock:
- Increases the maximum HP of all nearby allies by 5 HP per Spell Slot Level.
- Lasts until the next Long Rest. You should cast it immediately after every Long Rest.
- If you have a Cleric in your party, they should use it instead because they can upcast the spell to a higher level for more max HP.
- Cures a disease from a character, or removes the Poisoned, Paralysed or
 Blinded debuffs.
 - Get this if Aid is taken by a Cleric in your party.
Paladin Feature
- You and allies within 3m get a bonus to Saving Throws equal to your Charisma Modifier.
- Disappears if your Sorcadin is incapacitated.
Level 7

We will now switch to adding Sorcerer levels to the Sorcadin build. From this point onwards, all remaining levels will be Sorcerer ones. See the image above if you don’t know how to add a different class to your build.
You will gain the following Sorcerer features:
Sorcerer Spellcasting
Unlock two first-level Sorcerer spells to get started. We recommend these choices:
- A powerful linear AoE (Area of Effect) that deals Thunder Damage and knocks enemies back.
- Great at knocking enemies backwards or off cliffs.
- Deals Poison Damage and potentially poisons the target.
- Poisoned enemies have Disadvantage on Attack Rolls and Ability Checks.
Feel free to change these spells if you prefer other options. Neither of these are essential for the build.
Sorcerer Cantrips
You can choose four Cantrips to learn.
- Perform a weapon attack. Leaves a status on the enemy that deals Thunder Damage if they move on their next turn.
- This will be your go-to Cantrip most of the time.
- Deals Fire Damage from range.
- The best ranged cantrip available to us.
- Deals
 Necrotic Damage and prevents the target from healing.
 - Undead targets get Disadvantage on Attack Rolls.
- Cause a corpse to explode, dealing
 Piercing Damage in a small area
Subclass – Shadow Magic
You must choose your Sorcerer subclass immediately. We’re going with Shadow Magic because it will synergise well with our melee playstyle and a magical weapon that we’ll acquire later on. But you can safely use a different subclass if you want; all four are viable.
Shadow Magic Features
- You can see through non-magical darkness up to a distance of 24 metres.
- After reaching 0 HP, restore 1 HP instead of being Downed.
- You can do this once per Long Rest.
Level 8

At this level, you’ll unlock a new resource called Sorcery Points. These are spent to activate Metamagic powers, and can be replenished by Long Resting. You’ll also gain +1 Sorcery Point at every Sorcerer Level up.
Metamagic – Choose 2:
- Increases the range of the spell by 50%.
- Melee-only spells get a range of 9m.
- Spells that only target 1 creature can target an additional creature.
- Costs 1 Sorcery Point per Spell Slot level used. Cantrips also cost 1 Sorcery Point.
You can also unlock a new spell. We recommend:
New Sorcerer Spell
- Fires 3 projectiles. The projectiles cannot miss their target.
- Each projectile deals 2-5
 Force Damage.
 - Later on, you can upcast the spell for additional projectiles.
Late-Game Levelling (9-12)
As we move into the final few levels for the Sorcerer and Paladin Multiclass Build, you’ll continue to gain new spells and features that ramp up your character’s power.
Level 9

Here, you’ll get quite a lot of new features. It’s a very important level for us, because we’ll unlock a magical weapon and we need to respec our character to optimise it properly. See below for details.
Metamagic – Choose 1:
- Targets of spells that require Saving Throws have Disadvantage on their first Saving Throw.
- Costs 3 Sorcery Points per spell.
You can choose another Sorcerer spell to learn:
New Sorcerer Spell
- Summons an equippable Shortsword.
- It deals 2d8 Psychic Damage.
- You can upcast the spell to get more damage on the sword (highly recommended).
- From now on, this will be our primary weapon.
- Very Important: To properly utilise this weapon, respec your Sorcadin now and make the following changes:
- Change your Fighting Style to Duelling
- Change your first Feat from Great Weapon Master to Savage Attacker.
Shadow Magic Features:
- Create an area of magical darkness.
- Most creatures cannot see into or out of the darkness, and are Blinded while they are within it.
- Cast the
 Darkness spell with 2
  Sorcery Points instead of a Spell Slot.
 - Also allows you to see through magical darkness for 10 turns.
Attacks with the Shadow Blade have Advantage against lightly or heavily obscured targets, so you can combo this with Eyes of the Dark: Darkness, allowing you to create a cloud that blinds and obscures your enemies, but doesn’t affect your Sorcadin.
Level 10

At this level, you will get another Feat to improve your Sorcadin’s stats, and another new spell.
First, let’s choose a new spell:
New Sorcerer Spell
- Fire three bolts of fire in rapid succession.
- Each bolt does 2-12 Fire Damage.
- Later on, you can upcast the spell to fire more bolts.
Choose a Feat – You can choose one more Feat for your Sorcadin.
- I recommend choosing Ability Improvement and putting both of the points into Strength.
- This will boost your weapon accuracy and damage slightly.
Level 11
We’ll now add the fifth level of the Sorcerer class to our Sorcadin Build.
This is quite a simple level in terms of what you unlock. As usual, you get a new Sorcery Point. Besides that, you get one more spell.
New Sorcerer Spell
- Deal up to 48 Fire Damage.
- Large AoE.
- Upcast to increase the maximum damage.
Level 12
For the final level, we will add the sixth Sorcerer level to the Sorcadin Build.
We will get some new features from the Shadow Magic subclass, along with a new spell.
New Shadow Magic Features
- Summon Nimbus to help you in combat. You can control him directly.
- It costs 3 Sorcery Points, and can be summoned once per Short Rest.
- Can place an elemental Omen on an enemy. When the enemy takes the correct type of elemental damage, you restore 1 Sorcery Point.
- When taking any non-Radiant damage, Nimbus can spend his
 Reaction to spawn a weaker copy of himself.
 - The copies of Nimbus only last for a few turns and are AI-controlled, but they can also spawn further copies, potentially leading to a chain reaction of summoned dog minions.
New Sorcerer Spell
- Deals 8d6
 Lightning Damage in a large linear AoE.
 - Damage is doubled against Wet enemies.
- Enemies will attempt a Dexterity Saving Throw. The final damage is halved if they are successful.

BG3 Sorcadin Build Equipment
Now, let us take a look at some of the equipment choices you can make for your BG3 Sorcerer & Paladin Multiclass Build.
Don’t worry if you miss out on some of the items. Just enjoy your playthrough and try to view this as a wishlist rather than a precise blueprint. The names of the most essential, build-defining items are written in Bold Italic.
Early Game Equipment
This is the early-game gear setup that you can use for your Sorcerer/Paladin Multiclass Build. You don’t need to get all the items, but the build will perform better if you find most or all of them. You can find these items in Act 1 or early Act 2. Essential items are written in Bold Italic.
| Slot | Icon | Item | Effects | Location |
|---|---|---|---|---|
| Head |  |
Helmet of Smiting |
|
Found in the Selunite Outpost |
| Cloak | Any/None |
|
N/A | |
| Chest |  |
Adamantine Splint Armour |
|
Must be crafted at the Adamantine Forge. |
| Gloves | Gloves of the Growling Underdog |
|
In Dror Ragzlin’s treasure stash, behind the locked gate in Shattered Sanctum | |
| Boots |  |
Disintegrating Night Walkers |
|
Looted from True Soul Nere in Underdark – Grymforge |
| Necklace | Broodmother’s Revenge |
|
Looted from Kagha in the Druid Grove. | |
| Ring 1 |  |
Caustic Band |
|
Sold by Derryth Bonecloak in the Underdark |
| Ring 2 | Strange Conduit Ring |
|
In an elegant chest in the Inquisitor’s Chamber of Creche Y’llek | |
| Melee Weapon |  |
Blooded Greataxe |
|
Purchased from either Grat the Trader in the Goblin Camp or Roah Moonglow in Shattered Sanctum |
| Ranged Weapon | Any Ranged Weapon |
|
N/A |
Head: ![]() Helmet of Smiting
Helmet of Smiting
- +1 to Constitution Saving Throws
- Applying a condition with a Smite spell gives you THP equal to your Charisma Modifier
- Found in the Selunite Outpost
Cloak: Any/None
- No good options this early in the game
Chest: ![]() Adamantine Splint Armour
Adamantine Splint Armour
- Enemies cannot land Critical Hits on you
- Reduces all incoming damage by 2
- Melee attackers are sent
 Reeling, reducing their Attack Rolls by 1
 - Must be crafted at the Adamantine Forge.
Hands: ![]() Gloves of the Growling Underdog
Gloves of the Growling Underdog
- +1 to Strength Saving Throws
- Advantage on melee Attack Rolls when surrounded by 2 or more foes.
- In Dror Ragzlin’s treasure stash, behind the locked gate in Shattered Sanctum
Feet: ![]() Disintegrating Night Walkers
Disintegrating Night Walkers
- Cast
 Misty Step for free every Short Rest
 - Immune to
 Enweb,
  Entangle and
  Ensnare
 - Can’t slip on Grease or Ice
- Looted from True Soul Nere in Underdark – Grymforge
Necklace: ![]() Broodmother’s Revenge
Broodmother’s Revenge
- When you are healed, your next attack deals an extra 1d6 Poison Damage.
- Can be triggered once per turn.
- Looted from Kagha in the Druid Grove.
Ring 1: ![]() Caustic Band
Caustic Band
- Your weapon attacks deal an additional 2
 Acid Damage
 - Sold by Derryth Bonecloak in the Underdark
Ring 2: ![]() Strange Conduit Ring
Strange Conduit Ring
- When Concentrating on a spell, your weapon attacks deal an additional 1d4 Psychic Damage.
- In an elegant chest in the Inquisitor’s Chamber of Creche Y’llek
Melee Weapon: ![]() Blooded Greataxe
Blooded Greataxe
- One of the best melee weapons in Act I for pure damage output
- Deals 1d4 bonus damage if your HP is below 50%.
- Purchased from either Grat the Trader in the Goblin Camp or Roah Moonglow in Shattered Sanctum
While the most powerful items in BG3 are mostly found in late Act II and Act III, there are still some really good options to be found earlier in the game. We have focused on items that boost your attack damage and defenses.
Most notably, the ![]() Gloves of the Growling Underdog make your attacks much more accurate and will mostly negate the Attack Roll penalty from the Great Weapon Master Feat.
Gloves of the Growling Underdog make your attacks much more accurate and will mostly negate the Attack Roll penalty from the Great Weapon Master Feat.
This extra accuracy, combined with the additional damage from ![]() Caustic Band,
Caustic Band, ![]() Strange Conduit Ring, and
Strange Conduit Ring, and ![]() Broodmother’s Revenge, gives you excellent early-game damage. Just ensure you have a good weapon too, like the
Broodmother’s Revenge, gives you excellent early-game damage. Just ensure you have a good weapon too, like the ![]() Blooded Greataxe or something similar.
Blooded Greataxe or something similar.
The ![]() Adamantine Splint Armour and
Adamantine Splint Armour and ![]() Disintegrating Night Walkers work together to make your Sorcadin very tanky and mobile – these items are so good that they’ll remain viable for the whole game.
Disintegrating Night Walkers work together to make your Sorcadin very tanky and mobile – these items are so good that they’ll remain viable for the whole game.
One final note about the ![]() Broodmother’s Revenge – at this stage of the game, it is tricky to reliably activate the item’s bonus damage. You may want to temporarily replace it for that reason. But don’t sell it, because later in the game, we can combine it with another item that will activate it every turn.
Broodmother’s Revenge – at this stage of the game, it is tricky to reliably activate the item’s bonus damage. You may want to temporarily replace it for that reason. But don’t sell it, because later in the game, we can combine it with another item that will activate it every turn.
Endgame Equipment
The endgame gear for the Sorcadin can be obtained either in late Act 2 or Act 3 of Baldur’s Gate 3. If you manage to complete all the items below, you will be an unstoppable force of power. Essential items are written in Bold Italic.
| Slot | Icon | Item | Effects | Location |
|---|---|---|---|---|
| Head | Helmet of Arcane Acuity |
|
In a trapped and locked chest in the hidden basement of the Masons’ Guild in Act II. | |
| Cloak | Cloak of Displacement |
|
Sold at Danthelon’s Dancing Axe in Wyrm’s Crossing. | |
| Chest | |
Adamantine Splint Armour |
|
Must be crafted at the Adamantine Forge. |
| Gloves |  |
Gauntlets of Hill Giant Strength |
|
Taken from a pedestal in the archive of the House of Hope. |
| Boots |  |
Helldusk Boots |
|
Found in Gortash’s personal chest at the top of Wyrm’s Rock Fortress |
| Necklace | Broodmother’s Revenge |
|
Looted from Kagha in the Druid Grove. | |
| Ring 1 |  |
Ring of Regeneration |
|
Sold by either Rolan or Lorroakan’s Projection in Sorcerous Sundries |
| Ring 2 | Band of the Mystic Scoundrel |
|
In a backpack in the Jungle, accessed by beating Akabi’s game in the Rivington Circus. | |
| Melee Mainhand | Shadow Blade |
|
Summoned with the |
|
| Melee Offhand | Ketheric’s Shield |
|
Looted from Ketheric Thorm in the Mind Flayer Colony. | |
| Ranged Weapon | Any Ranged Weapon |
|
N/A |
Head: ![]() Helmet of Arcane Acuity
Helmet of Arcane Acuity
- +1 to Dexterity Saving Throws
- Dealing damage with a weapon attack grants
 Arcane Acuity for 2 turns.
 - Arcane Acuity gives +1 to Spell Attack Rolls and Spell Save DC for each remaining turn.
- Can stack up to 10 turns.
- In a trapped and locked chest in the hidden basement of the Masons’ Guild in Act II.
Cloak: ![]() Cloak of Displacement
Cloak of Displacement
- Every turn, enemies have Disadvantage on Attack Rolls against you.
- Effect ends when you take damage, but is renewed at the start of your next turn.
- Sold at Danthelon’s Dancing Axe in Wyrm’s Crossing.
Chest: ![]() Adamantine Splint Armour
Adamantine Splint Armour
- Enemies cannot land Critical Hits on you
- Reduces all incoming damage by 2
- Melee attackers are sent Reeling, reducing their Attack Rolls by 1
- Must be crafted at the Adamantine Forge.
Hands: ![]() Gauntlets of Hill Giant Strength
Gauntlets of Hill Giant Strength
- Increase your
 Strength to 23
 - +1 to Strength Saving Throws
- Once this is equipped, do a Respec and put all your Strength points into other Abilities
- Taken from a pedestal in the archive of the House of Hope.
Feet: ![]() Helldusk Boots
Helldusk Boots
- You are immune to Difficult Terrain
- You cannot be forcibly moved by enemy spells or actions
- You can use
 Hellcrawler to teleport and deal Fire Damage
 - Found in Gortash’s personal chest at the top of Wyrm’s Rock Fortress
Necklace: ![]() Broodmother’s Revenge
Broodmother’s Revenge
- When you are healed, your next attack deals an extra 1d6 Poison Damage.
- Can be triggered once per turn.
- Looted from Kagha in the Druid Grove.
Ring 1: ![]() Ring of Regeneration
Ring of Regeneration
- You heal 1d4 HP at the start of every turn.
- Activates Broodmother’s Revenge
- Sold by either Rolan or Lorroakan’s Projection in Sorcerous Sundries
Ring 2: ![]() Band of the Mystic Scoundrel
Band of the Mystic Scoundrel
- Hitting a creature with a weapon attack allows you to cast an Illusion or Enchantment spell with a Bonus Action.
- In a backpack in the Jungle, accessed by beating Akabi’s game in the Rivington Circus.
Melee Mainhand: ![]() Shadow Blade
Shadow Blade
- Deals heavy Psychic Damage
- Upcast the spell to the highest possible Spell Slot level for maximum damage.
- Advantage when attacking Obscured targets.
- Summoned with the
 Shadow Blade spell.
Melee Offhand: ![]() Ketheric’s Shield
Ketheric’s Shield
- +1 to Spell Save DC
- Advantage on Dexterity Saving Throws
- Looted from Ketheric Thorm in the Mind Flayer Colony.
Ranged Weapon: Any
- We aren’t focusing on ranged combat, so you can use whatever you find here.
- Heavy Crossbows and Longbows tend to be the highest damage options.
Here is a summary of how these items work together to boost this Sorcadin Build for Baldur’s Gate 3:
Attacking Items:
 Helmet of Arcane Acuity – Makes your spells much more likely to succeed once you’ve built up a few stacks of the Arcane Acuity buff.
- Gauntlets of Hill Giant Strength – Sets your Strength to 23, giving you a Strength Modifier of +6. This boosts your weapon attacks and accuracy as much as possible.
 Broodmother’s Revenge – Gives you extra Poison damage when you get healed. Once you have the Ring of Regeneration, this is automatically activated every turn.
 Shadow Blade – Deals a great amount of Psychic Damage and has Advantage when attacking obscured enemies. When possible, combine it with
  Eyes of the Dark: Darkness to turn the tables on enemies.
Defensive Items:
 Cloak of Displacement – Makes you much harder to hit with Attack Rolls.
- Adamantine Splint Armour – One of the best Heavy Armours in the game, reducing all incoming damage and making you immune to Critical Hits.
- Ring of Regeneration – Gives you a small amount of healing every turn.
 Ketheric’s Shield – Increases your Armour Class and Spell Save DC.
Mobility & Utility:
- Helldusk Boots – Protects you from Difficult Terrain and enemy actions that attempt to forcibly move you. You can teleport using Hellcrawler
 Band of the Mystic Scoundrel – Allows you to cast Enchantment and Illusion spells with a Bonus Action. Great for casting a debuff or stun spell like Hold Person after making your weapon attacks.
Sorcadin Build Extra Info
Here is some extra information that will help you to get the most out of this Sorcerer & Paladin Multiclass Build in Baldur’s Gate 3.
How to Play this Sorcadin Build
Early-Game Basics
In the early part of the game, the Sorcadin only has the Paladin class, so playing it is very simple because there are no multiclassing synergies to be aware of.
Be sure to use your Smite spells and subclass actions like Abjure Enemy to efficiently take down high-priority targets.
From level 4, you can use Great Weapon Master to get bonus damage against enemies at the cost of some Attack Roll accuracy. You can partially negate this penalty when you obtain the Gloves of the Growling Underdog.
Maximising the Build for Mid-Late Game

Remember to respec once you unlock the Shadow Blade – you won’t need Great Weapon Master anymore, so it’s important to swap it for something else like Savage Attacker. The Duelling Fighting Style gives you an extra 2 damage per hit with your Shadow Blade.
Remember to upcast the Shadow Blade up to Fifth Level to get the maximum amount of damage.
Keep an eye on how many stacks of Arcane Acuity you acquire from the Helmet of Arcane Acuity. The Band of the Mystic Scoundrel makes it much easier to make proper use of this buff, by allowing you to cast a spell with a Bonus Action after you make a weapon attack.
Once you’ve built up enough stacks of Arcane Acuity, you should be able to stun enemies with a very high success rate, using spells like ![]() Hold Person and
Hold Person and ![]() Command.
Command.
Sorcadin Build Illithid Powers (optional)

Illithid Powers are unlocked later in BG3 when you learn more about Mind Flayers and Tadpoles. By eating Jars of Mind Flayer Parasites you gain one point. This is another optional skill tree that you can get access to if you want. Here are some of the best Illithid Powers for the BG3 Sorcadin Build:
- Allows you to deal extra damage to a target when you are Concentrating on a spell, potentially also healing if the target is Concentrating too.
- When you reduce a creature’s hit points below a certain threshold, this power instantly kills it and deals 1-4 Psychic Damage to nearby enemies.
- This is particularly effective when engaging groups of weaker foes, enabling you to thin their numbers rapidly.
- This can be used to reach hard-to-get-to places or change positions in combat.
- Use this to keep your Sorcadin safe from enemy attacks, so your Concentration won’t get disrupted as easily.
- This power creates an area-based effect that pulls in and slows targets.
- It’s particularly useful for crowd control, allowing you to cluster enemies together for area-of-effect attacks or to isolate them from vulnerable allies.
Pro Tip: Try getting the Haste buff from a Potion of Speed or the Haste spell (lets you perform 2 Actions on one turn), then casting Black Hole and then Hunger of Hadar to cause a world of pain for a group of enemies.
- This is a top-tier reaction from the Illithid Powers skill tree in BG3.
- This allows you to deal psychic damage when a nearby enemy casts a spell.
- This is especially useful if the target is casting a Concentration Spell.
- The damage from Psionic Backlash can immediately break their Concentration, ending the spell’s effects.
Sorcadin Build FAQs
Here are some frequently asked questions related to the BG3 Lore Sorcerer & Paladin Multiclass Build. Most of these questions have already been answered in the guide itself.
- What’s the best race for a Sorcerer Paladin Multiclass Build?
- What roles can the Sorcadin fill in my party?
- What abilities are most important for the Sorcadin?
- Which Sorcerer and Paladin subclasses should I use?
FAQ: What’s the best race for a Sorcerer Paladin Multiclass Build?
While any race will work just fine for this build, the best options are:
- Half-Orc – Deals more damage when you land a Critical Hit, making the Half-Orc the best race in the game for a melee heavy-hitter.
- Wood Elf – Very high mobility, resistance to effects like magical sleep and Charm, innate Darkvision. The extra Movement Speed is an underrated bonus that allows you to outrun foes.
- Duergar – Gives you innate Superior Darkvision. Allows you to wear Medium Armour. Gives you Resistance to Poison Damage and Advantage against the Poisoned, Charmed and Paralysed effects. This wide range of bonuses makes the Duergar very tough.
For more info about the best races, see the Best Race section above.
FAQ: What roles can the Sorcadin fill in my party?
The Sorcadin is primarily a melee heavy-hitter who can also use spells to buff their own damage or lock down enemies with stuns and debuffs.
It can also do a decent job of healing allies when needed, but ideally, this job should be done by a Cleric or Druid.
FAQ: What Abilities are most important for the Sorcadin?
- Strength is the most important ability for the Sorcadin. It boosts the damage and accuracy of your melee weapon attacks.
- Charisma is also very important. It is used to determine the success rate of your spells and helps in dialogue checks.
- Constitution should always be at least 14 for any build in Baldur’s Gate 3, and this one is no different. This gives you a necessary baseline of HP, and helps you to resist a wide range of hostile effects with Constitution Saving Throws. It also helps you to keep Concentration on spells when you take damage.
FAQ: Which Sorcerer and Paladin subclasses should I use?
- For the Sorcerer, I recommend the Shadow Magic subclass for this build. The Hound of Ill Omen will help you out in melee by distracting enemies and can restore Sorcery Points to you. You can also see in all forms of darkness and summon clouds of magical darkness that give you a big advantage over enemies, especially when you get the Shadow Blade later in the game. However, all four Sorcerer subclasses work fine with this build.
- For the Paladin, I opted for the Oath of Vengeance because you get a couple of features that are particularly handy for a melee heavy hitter, such as Abjure Enemy which makes your attacks more accurate against a chosen target. But once more, all of the Paladin subclasses work okay. There is nothing essential rooted in either of these two subclasses.
Related Guides for Baldur’s Gate 3


The post Best BG3 Sorcadin Build – Sorcerer Paladin Mutliclass Build appeared first on AlcastHQ.


