Best Open Hand Monk BG3 Build Guide
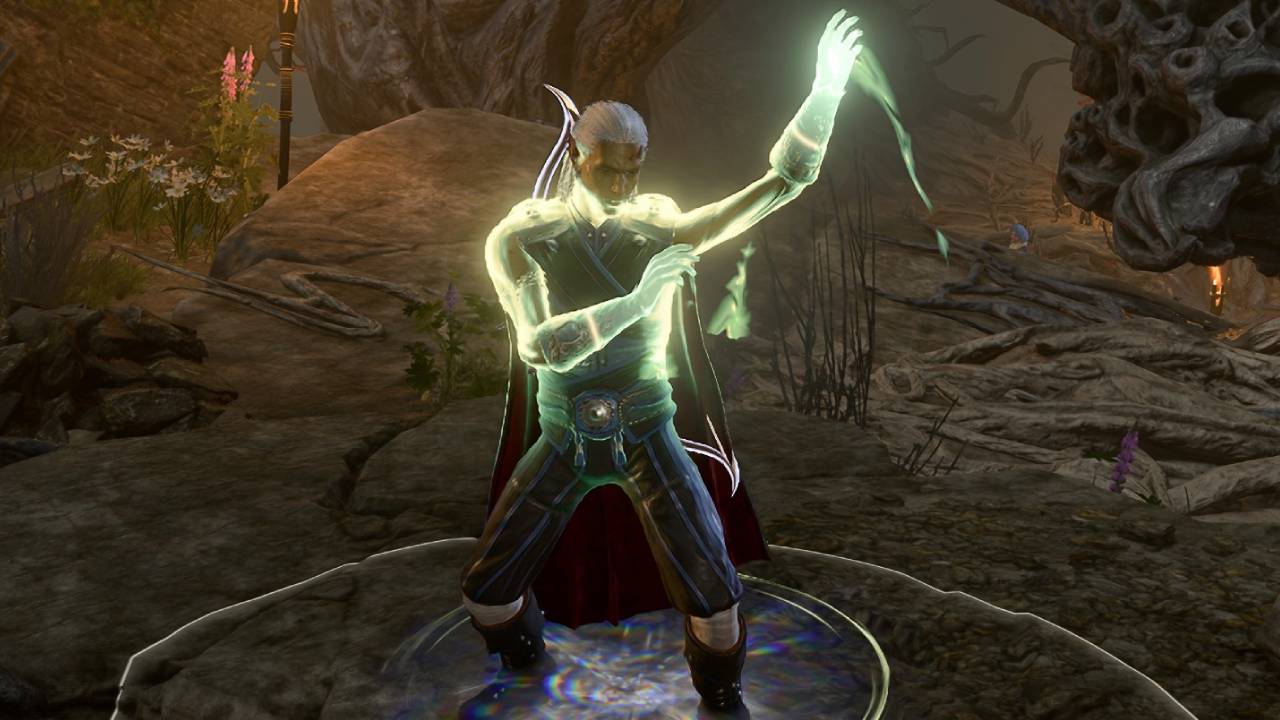
Welcome to the Way of the Open Hand Monk Build for Baldur’s Gate 3 (BG3). Monks have access to three subclasses, Way of the Open Hand, Way of the Shadow and Way of the Four Elements. This BG3 Monk Build was last updated in October 2025 and works for both PC and Console (PS5 and Xbox Series X/S).
Please visit our Best BG3 Builds overview page for more builds or our Best BG3 Monk Build.
Way of the Open Hand Monks specializes in unarmed combat, using your hands and control of Ki to heal or inflict grievous hurt.
The Monk class doesn’t have to equip any armour, but you don’t have to worry about it because we can still get a high Armour Class through other ways. You can still wear clothes and robes, anything that doesn’t hinder you.
Table of Contents:
- Open Hand Monk Build Overview
- Open Hand Monk Build Character Creation
- Open Hand Build Levelling Progression
- Open Hand Monk Equipment
- Open Hand Monk Build Extras
Way of the Open Hand Strengths
Way of the Open Hand Weaknesses


Monk Class Overview BG3
We will start with a quick overview of the Monk class and Way of the Drunken Master subclass, which we’ll be using for this BG3 Build. If you’re already familiar with how they work, please skip this section.
Monk Class Summary
The Monk has quite a lot of unique features, so we’ll only list the starting features here. The rest will be explained in the Levelling Up section.
 Ki Points – A special Monk resource that is spent to activate Monk Actions. You start the game with 2 Ki Points, and will earn more as you level up. All spent Ki Points are replenished when your party rests (both short and long rests).
 Martial Arts – A special set of passives that create the Monk’s unique combat style:
- Dextrous Attacks – If your Dexterity is higher than your Strength, your unarmed attacks will scale with Dexterity.
- Deft Strikes – Attacks with Monk Weapons and Unarmed Attacks deal 1d4
 Bludgeoning Damage, unless their existing damage is higher.
 - Bonus Unarmed Strike – After attacking with a Monk Weapon or while unarmed, you can make another unarmed attack as a
 Bonus Action.
 Unarmoured Defence– If you are not wearing any armour, you add your Wisdom Modifier to your Armour Class.
 Flurry of Blows – Punch twice in quick succession. Costs a Ki Point and a
  Bonus Action.
Way of the Open Hand Subclass
The Way of the Open Hand is the Monk subclass that is most focused on unarmed attacks.
Some of the most important effects of the Open Hand subclass in Baldur’s Gate 3 are:
 Flurry of Blows: Topple (Level 3) – An upgrade of the basic Monk Flurry of Blows. This version can also knock the target
  Prone, giving you
  Advantage on subsequent melee attacks against them.
 Manifestation of Body (Level 6) – Your unarmed attacks deal 1d4 additional
  Necrotic Damage.
 Wholeness of Body (Level 6) – You restore half of your Ki Points and heal yourself. For the next 3 turns, you restore another Ki Point every turn and have an additional Bonus Action.
 Ki Resonation: Punch (Level 9) – Punch an enemy and give them the Resonating condition.
 Ki Resonation: Blast (Level 9) – Detonate a Resonating enemy. Each explosion deals 3d6
  Force Damage to nearby creatures (except party members and summons).
 Tranquillity (Level 11) – After a Long Rest, you cannot be targeted by enemy attacks and spells until you perform an attack.
Monk Build Character Creation – Way of the Open Hand BG3 – PS5/PC
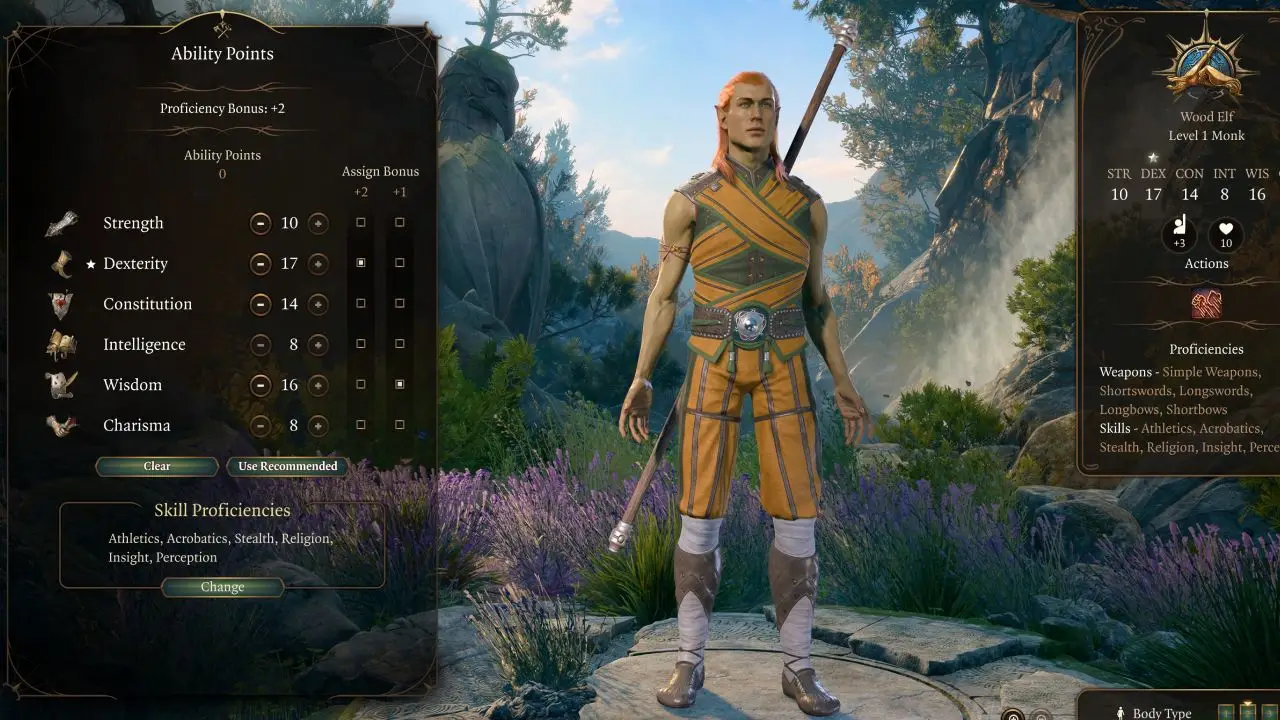
In this section, we will guide you through the best options in Character Creation for the Baldur’s Gate 3 Open Hand Monk Build. While you can deviate somewhat from this if you want, following these steps will result in the most powerful starting point for your Monk.
Race & Subraces
Baldur’s Gate 3 Races offer you plenty of choices. While the races in the table below are the best choices for this build, you can select any race you want, and it will still work fine.
Top 5 races for our BG3 Monk Build:
| Race | Strengths | Info |
|---|---|---|
Wood Elf |
|
Wood Elves are a great choice for most build types in BG3, thanks to their superior movement speed. Natural Proficiency in Perception is always useful, and immunity to magical Sleep will help you out a lot, especially in the early game, where enemy mages love to spam this spell. |
Githyanki |
|
Githyanki have excellent mobility thanks to Enhance Leap and Misty Step, allowing you to relentlessly pursue ranged enemies.
Additionally, Githyanki get the full benefits from equipping various Githyanki weapons, sometimes granting additional Psychic Damage or special features. |
|
Human |
|
Humans are useful for their unrestricted Skill choice. Used wisely, this allows your character to be proficient with a useful Skill that wouldn’t normally be available for your Class. The extra Carrying Capacity is useful, too. |
Duergar |
|
With their wide choice of armour and weapon proficiencies, and resistances to poison, charm, and paralysis, Duergar are one of the strongest races in BG3.
The only downside of Duergar is their small stature – this reduces their base Movement Speed to 7.5 metres per turn (most races get 9 metres). |
|
Dragonborn, Any |
|
Dragonborns get access to a special Breath attack they can use once per Short Rest, which deals elemental damage in a directional AoE. They also get 50% Resistance to the same element. The damage element in question depends on which Dragonborn variant you choose.
The Fire and Poison variants are slightly better because many enemies attack with these damage types, making resistance to them more valuable. But don’t let this stop you from using whichever type of Dragonborn you like the most. The Dragonborn’s breath attacks work well with the Monk’s melee playstyle. |
Background & Skills
This Monk Build will feature high investment into the Dexterity and Wisdom Skills. As a result, we’ll focus on DEX and WIS Skills.
Therefore, we recommend choosing Urchin as your background, granting the following Skill Proficiencies:
 Sleight of Hand (DEX) – Increases your chance to pick locks and pick pockets.
 Stealth (DEX) – Makes it harder for NPCs to spot you when you are sneaking.
In addition, you will receive two Monk Skill choices. We recommend:
 Acrobatics (DEX) – You are more resistant to enemy attempts to push you around, and you take less falling damage.
 Insight (WIS) – Successful Insight rolls can reveal extra information and open up hidden dialogue options.
If you’re a Human, you’ll get an extra unrestricted Skill choice. You can assign this to whatever you like, but it is best to use it on any Dexterity or Wisdom Skill that you don’t already have.
Ability Points
The Monk has no armour proficiencies, so it’s crucial to have high Dexterity to push up your Armour Class. This will also boost your attack accuracy. The Monk is unique in the sense that Wisdom also boosts your Armour Class (provided you don’t equip any armour). So even if you get Armour Proficiency from your chosen race, I still recommend doing an unarmoured setup.
Your Wisdom will also be used to roll some Ki abilities. Your Constitution is important for increasing your Max HP and resisting some status debuffs.
For the best results on our BG3 Monk Build, aim for an ability distribution that looks something like this:
 Strength – 10
 Dexterity – 17
 Constitution – 14
 Intelligence – 8
 Wisdom – 16
 Charisma – 8
While having odd ability scores doesn’t provide any immediate benefit (every second point increases your Ability Modifier, which is what buffs your dice rolls), we’re going with 17 DEX because it’ll be increased to 18 at level 4 once we get our first feat.
What Is a Monk Weapon?
Monk Actions and Passive Features often make a reference to “Monk Weapons”, but in my opinion, the game does a poor job of explaining what that means.
So, a Monk Weapon is:
- Any Weapon that your Monk has Proficiency with, except for:
- Heavy or Two-Handed Weapons.
Versatile Weapons that you choose to wield with both hands still count as Monk Weapons. Only weapons with the Two-Handed and Heavy properties are exempt from becoming Monk Weapons.
Thanks to their Dextrous Attacks feature, Monks can wield any Monk Weapon with Dexterity rather than Strength, even if the weapon does not have the Finesse property.
For example, a Dwarf Monk would have Battleaxe Proficiency from their Dwarf racial features. Since Battleaxes don’t have the Two-Handed or Heavy property, the Dwarf can use a Battleaxe as a Monk Weapon.
BG3 Way of the Open Hand Build Levelling Guide
In Baldur’s Gate 3, your character progresses from level 1 to level 12. In the first few levels, you get to choose your subclass and get a feel for the build, but not all of your class & subclass features will be unlocked until high level, along with some racial features which may also remain locked until level 5, depending on your chosen race.
The main mechanic that you need to keep an eye on is your Ki Points, which are used to power your special Monk actions. At lower levels, you won’t have many points available to spend until you do a short or long rest to recharge the Ki-Points. It might feel restrictive at the beginning of the game, but at each extra level you gain another Ki Point.
We will now walk you through the full levelling up process for this BG3 Way of the Open Hand Monk Build.
BG3 Open Hand Monk Build Levelling Guide – Levels 2-4
We’ll start with Levels 2 through 4.
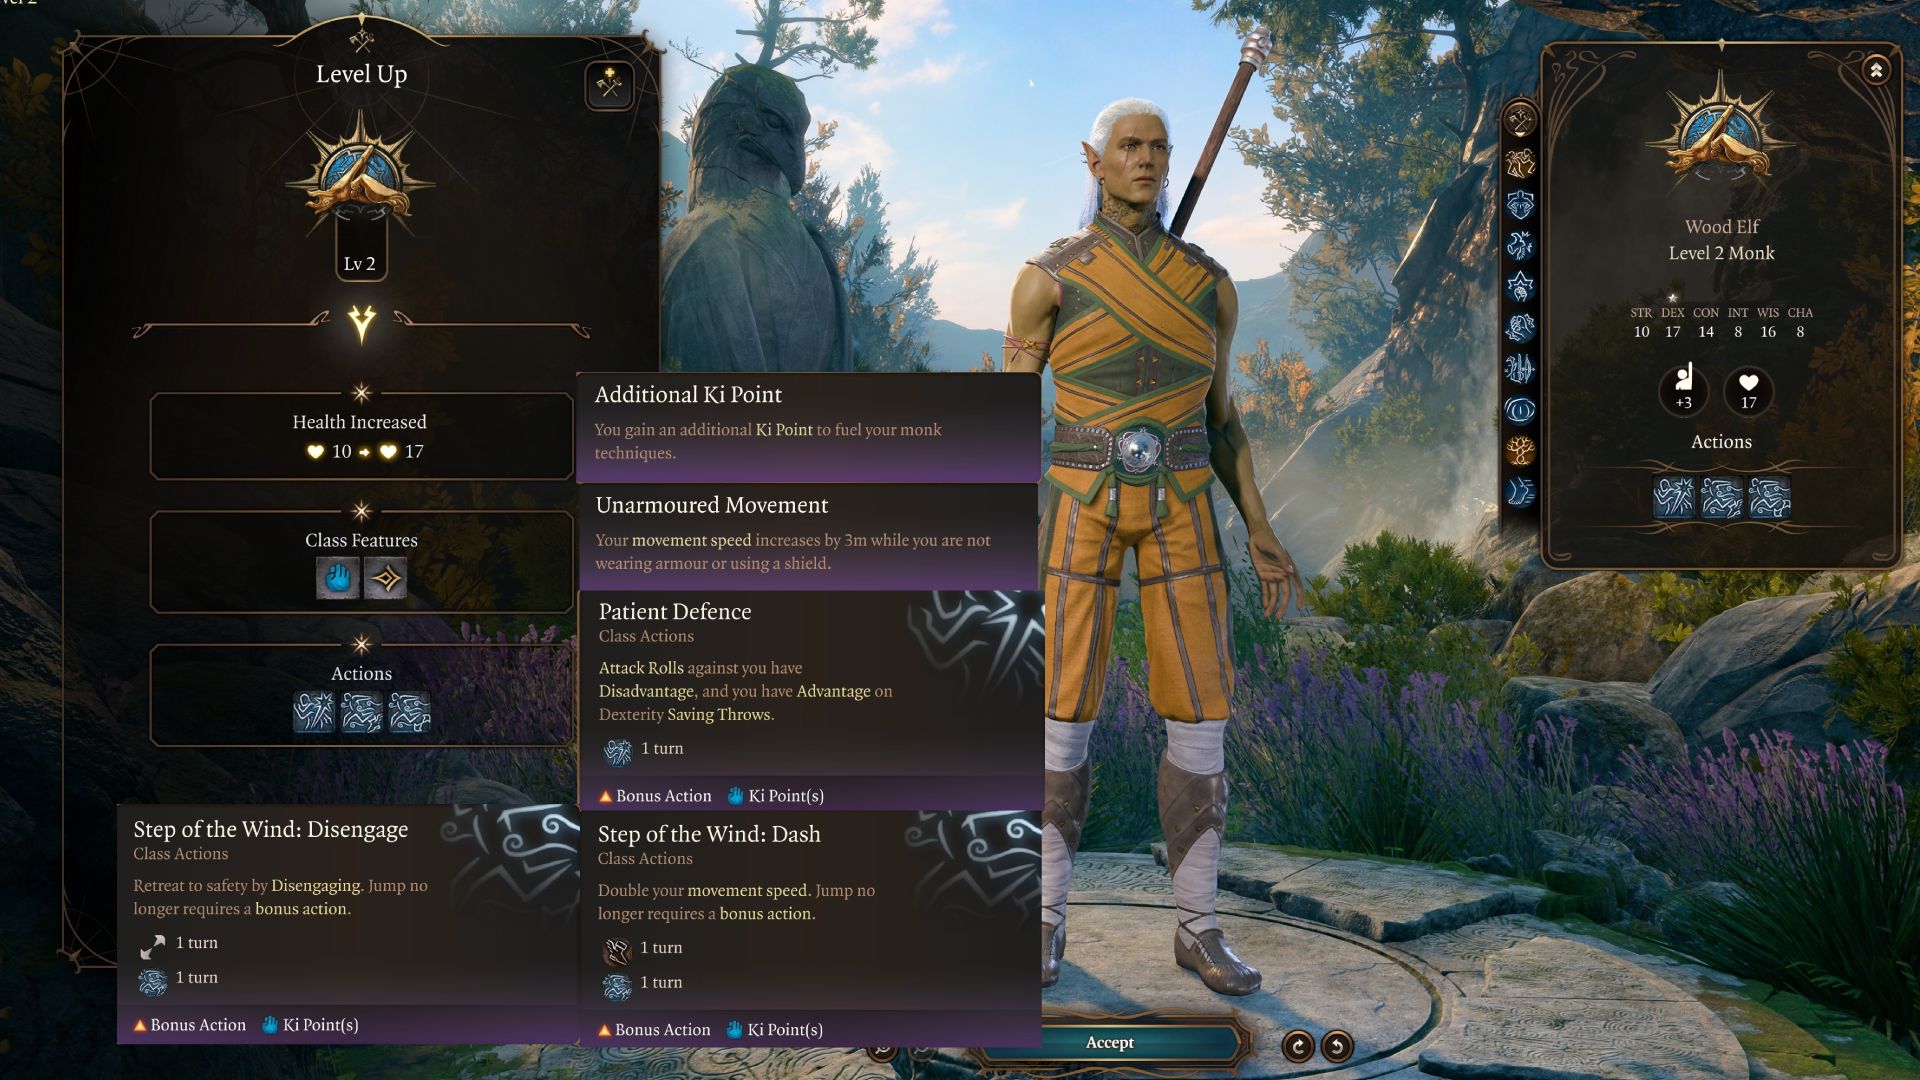
Level 2
Note: You also don’t have to pick anything here, you will get all the new features added to your character at level 2 automatically.
You get more health and new Class Features and Actions.
- Additional
 Ki Point – You’ll unlock one point at every level.
  Unarmoured Movement: 3m movement increase while not wearing armour or shield.
 Patient Defence: Attack Rolls against you have
  Disadvantage, and you have
  Advantage on Dexterity Saving Throws.
 Step of the Wind: Dash: Double your movement speed. Jump no longer requires a bonus action.
 Step of the Wind: Disengage: Retreat to safety by Disengaging. Jump no longer requires a bonus action.
Level 3 – Pick your Monk Subclass
At Level 3, you must select your Monk subclass. We are using the Way of the Open Hand.
You won’t have to select anything else at level 3; you are given three new class actions:
 Flurry of Blows: Topple – Punch twice in quick succession and possibly knock the target
  Prone.
 Flurry of Blows: Stagger – Punch twice in quick succession and Stagger the target, making it unable to take
  Reactions.
 Flurry of Blows: Push – Punch twice in quick succession and possibly push the target 5m away.
These new class actions are amazing in combat. Now you can knock enemies Prone, Stagger them or Push them off cliffs or building for maximum damage.

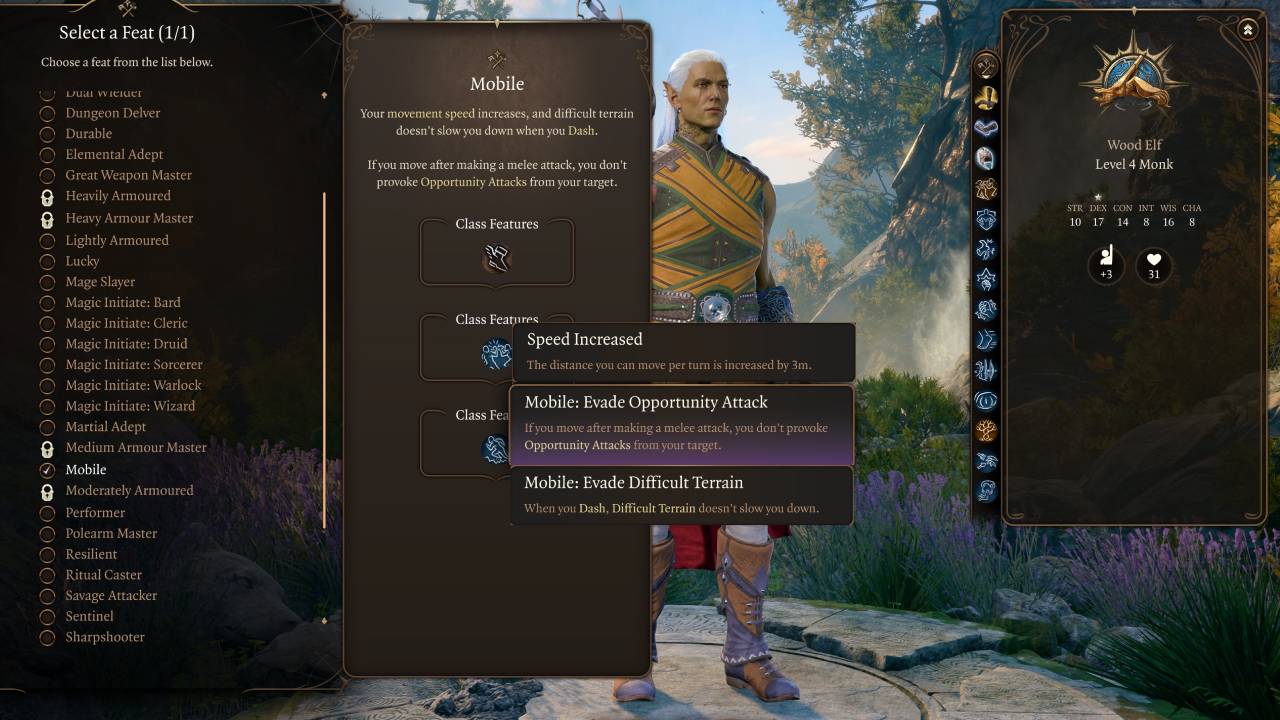
Level 4
At Level 4, you must choose a Feat to enhance your character. We’ll be choosing the Athlete Feat to boost the Monk’s Dexterity score and general mobility.
 Slow Fall: Reduces your fall damage by half
- New Feat: Choose Athlete
- Increases your Dexterity Score by 1
- When you are
 Prone, standing up requires less Movement
 - Your Jump distance is increased by 50%
BG3 Open Hand Monk Build Mid-Game Levelling (5-8)
We now move on to the mid-game levelling up section.
Level 5
At level five, you earn new Actions that allow you to stun enemies or make yourself Invisible.
Importantly, you can now make two weapon/unarmed attacks per Action.
 Extra Attack: Can make an additional free attack after making an unarmed or weapon attack.
 Stunning Strike (Melee) – Possibly Stuns the target. No damage.
 Stunning Strike (Unarmed) – Possibly Stuns the Target and deals damage.
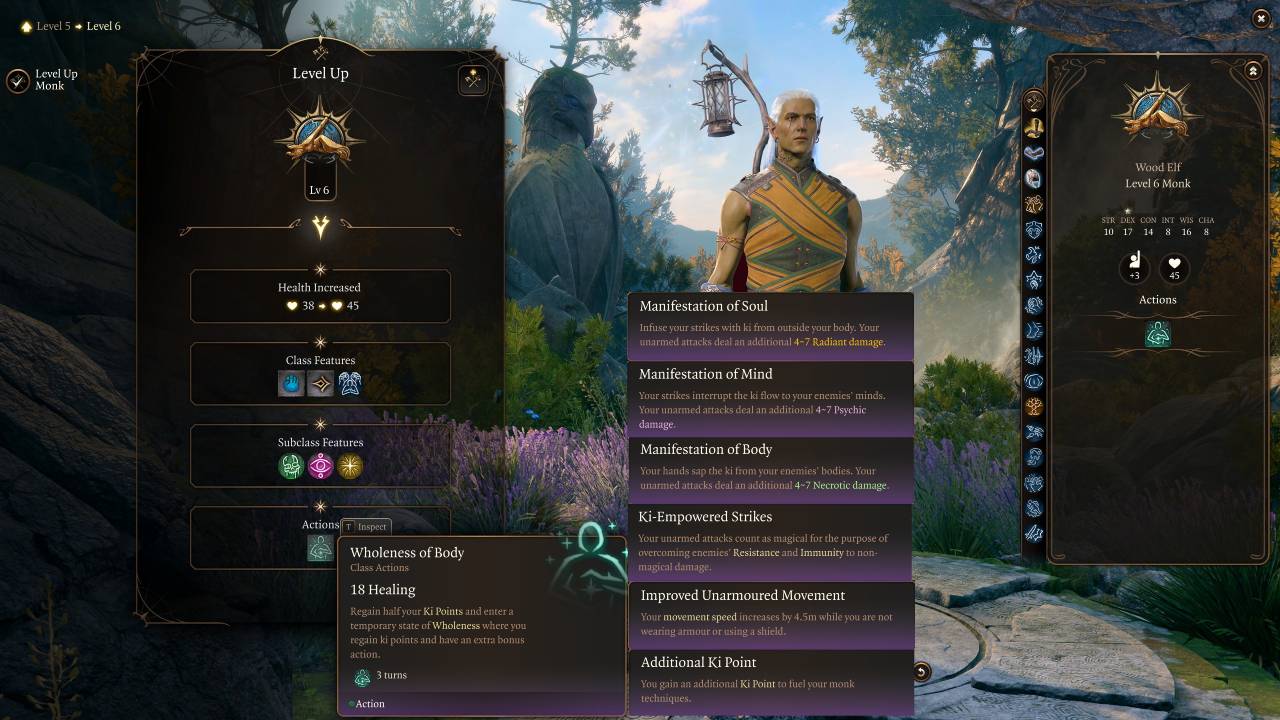
Level 6 Way of the Open Hand Monk – PS5/PC
At Level 6, your mobility is increased and your unarmed strikes become magical. You can now heal yourself once per Long Rest and infuse your unarmed attacks with Necrotic, Radiant or Psychic Damage.
 Improved Unarmoured Movement – Your movement speed increases by 4.5m while you are not wearing armour or using a shield.
 Ki-Empowered Strikes – Your unarmed attacks count as magical for the purpose of overcoming enemies’ Resistance and Immunity to non-magical damage.
 Manifestation of Body – Your hands sap the Ki from your enemies’ bodies. Your unarmed attacks deal an additional 1d4
  Necrotic Damage.
 Manifestation of Mind – Your strikes interrupt the Ki flow to your enemies’ minds. Your unarmed attacks deal an additional 1d4
  Psychic Damage.
 Manifestation of Soul – Infuse your strikes with Ki from outside your body. Your unarmed attacks deal an additional 1d4
  Radiant Damage.
 Wholeness of Body – Heal for triple your Monk level. Regain half your Ki Points and enter a temporary state of Wholeness where you regain Ki Points and have an extra bonus action for the next three turns.
The Body Mind Soul Manifestations will help deal you some extra damage to enemies from now on.
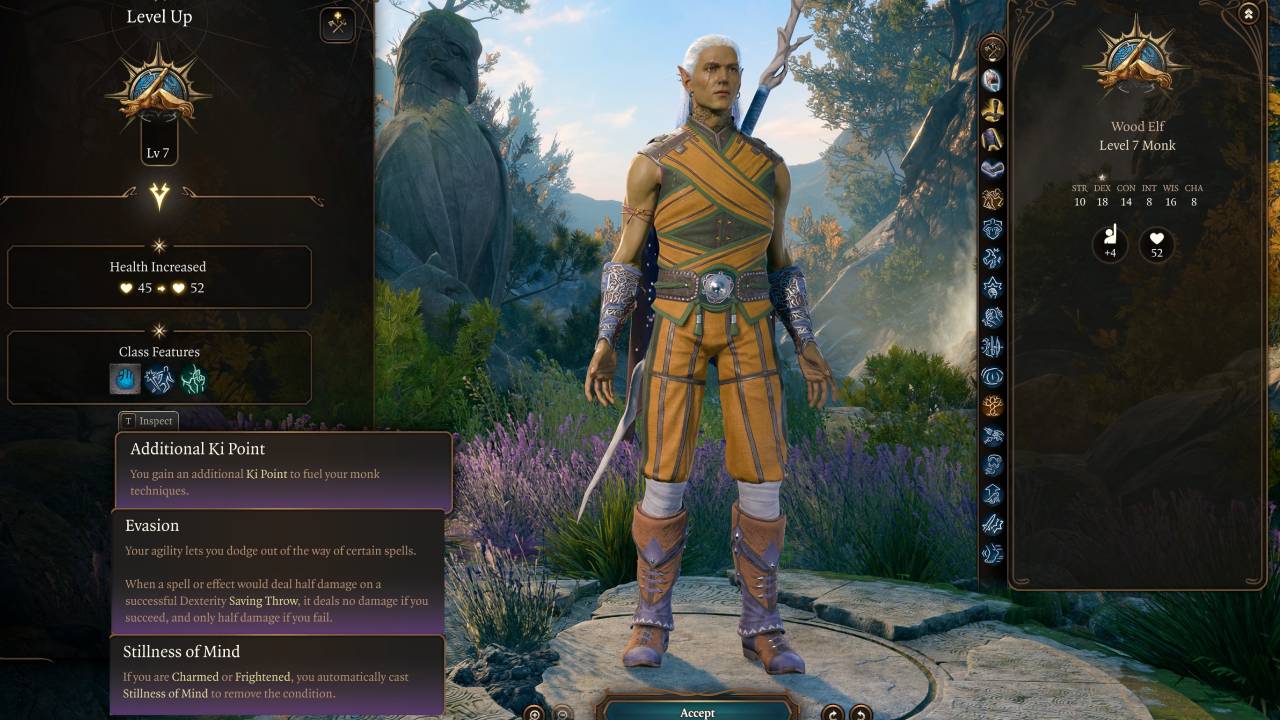
Level 7
At Level 7, you become more resistant to some hostile spells and to enemy attempts to Charm or Frighten your Monk.
 Evasion: Your agility lets you dodge out of the way of certain spells. When a spell or effect would deal half damage on a successful Dexterity Saving Throw, it deals no damage if you succeed, and only half damage if you fail.
 Stillness of Mind: If you are
  Charmed or
  Frightened, you automatically cast Stillness of Mind to remove the condition.
Level 8
At level 8, you must choose another Feat to boost your character.
- New Feat: Choose Ability Improvement (Dexterity)
- Put both of the Ability Improvement points into Dexterity, increasing it to 20. This will improve your attack accuracy and Armour class.
BG3 Open Hand Monk Build – Late Game Levelling (9-12)
We’ll now move on to the final few levels.
Level 9
At level 9, you get another increase in jumping distance. The class feature Advanced Unarmoured Movement allows you to jump 6m further than normal. Additionally, the Open Hand Monk also gets Ki Resonation class features at level 9.
 Advanced Unarmoured Movement: Difficult Terrain doesn’t slow you down, and you can Jump an additional 6m while you are not wearing armour or using a shield.
 Ki Resonation: Punch: Perform an Unarmed Attack. Debuff a target for 10 turns with Resonance.
 Ki Resonation: Punch (Bonus Action): Perform an Unarmed Attack. Debuff a target for 10 turns with Resonance.
 Ki Resonation: Blast: Detonate Resonance on an enemy, dealing 3d6
  Force Damage to the target and anyone within 5m of the target. The explosion detonates Resonance on nearby targets.
Level 10
At Level 10, your mobility is increased even more. You also get immunity to Poison, which is a great defensive buff because lots of enemies in BG3 have poison attacks.
 Improved Unarmoured Movement: Your movement speed increases by 6m while you are not wearing armour or using a shield.
 Purity of Body: You are Immune to Poison damage and can’t be
  Poisoned or affected by disease thanks to the purifying Ki flowing through your meridians.
Level 11
At level 11, you unlock a feature that protects your Monk from harm after a Long Rest.
 Tranquility: After a long rest, you gain the benefits of Sanctuary (can’t take damage from enemy attacks or spells).
Level 12
At level 12, you get to either pick Ability score improvement or another new Feat.
- Choose a Feat. Choose one of the following options:
- Alert – Gain +5 Initiative. You cannot be
 Surprised.
 - Tough – Gain 2 extra HP per level. 24 extra HP.
- Alert – Gain +5 Initiative. You cannot be
Best Equipment for the BG3 Open Hand Monk Build
Let us take a look at some of the best gear for the Way of the Open Hand Monk Build in Baldur’s Gate 3. The setup will easily work without any of the gear from below. However, you will of course be more powerful if you manage to get your hands on some of the gear that is presented below.
Early Game Open Hand Monk Equipment
There is plenty of gear to pick up throughout the early game. Most of the items listed below can be obtained in Act 1 or early Act 2.
| Slot | Icon | Item | Effects | Location |
|---|---|---|---|---|
| Head |  |
Haste Helm |
|
Can be found inside a Wooden chest, next to a cart, near the Blighted Village Waypoint. |
| Cloak |  |
Cloak of Protection |
|
Purchased from Quartermaster Talli in Last Light Inn |
| Chest |  |
The Graceful Cloth |
|
Buy from Lady Esther on the Rosymorn Monastery Trail |
| Gloves |  |
Bracers of Defence |
|
In the hidden Necromancer’s Lair in a gilded chest, beneath the Blighted Village |
| Boots |  |
Swiresy Shoes |
|
Purchase from Grat the Trader inside the Goblin Camp |
| Necklace |  |
Amulet of Misty Step |
|
Purchased from Omeluum in the Myconid Colony |
| Ring 1 |  |
Ring of Protection |
|
Steal the Sacred Idol in Druid Grove (quest) |
| Ring 2 |  |
Smuggler’s Ring |
|
On a Skeleton, hidden in a bush on the lower path following the river, near the broken bridge section of Risen Road |
| Main Weapon | Unarmed |
|
N/A | |
| Second Weapon |  |
Darkfire Shortbow |
|
From Dammon at Last Light Inn, Act II |
Headgear – Haste Helm
Here you can use the Haste Helm. This gives you the “Smooth Start”: At the start of combat, the wearer gains Momentum for 3 turns (extra 1.5m movement speed). The item can be found inside a Wooden chest, next to a cart, near the Blighted Village Waypoint.
Cloak of Protection
Once you reach Act 2 and reach the Last Light Inn (safe place from the Shadow Forest) you can get your hands on the Cloak of Protection. The cloak gives you 1+ Armour Class and 1+ Saving Throw, simple but very strong. You can buy it from Quartermaster Talli for 500 gold.
You can also read our in-depth guide on How to get the Cloak of Protection in BG3 which explains everything in detail.
Robe 1 The Graceful Cloth
The Graceful Cloth gives you access to Cat’s Grace, increasing your Dexterity score by 2 and giving you a +1 bonus on Dexterity Saving Throws. This will make your attacks stronger and increase your Armour Class by 1.
You can buy or steal it from Lady Esther on the Rosymorn Monastery Trail, near the end of Act I.
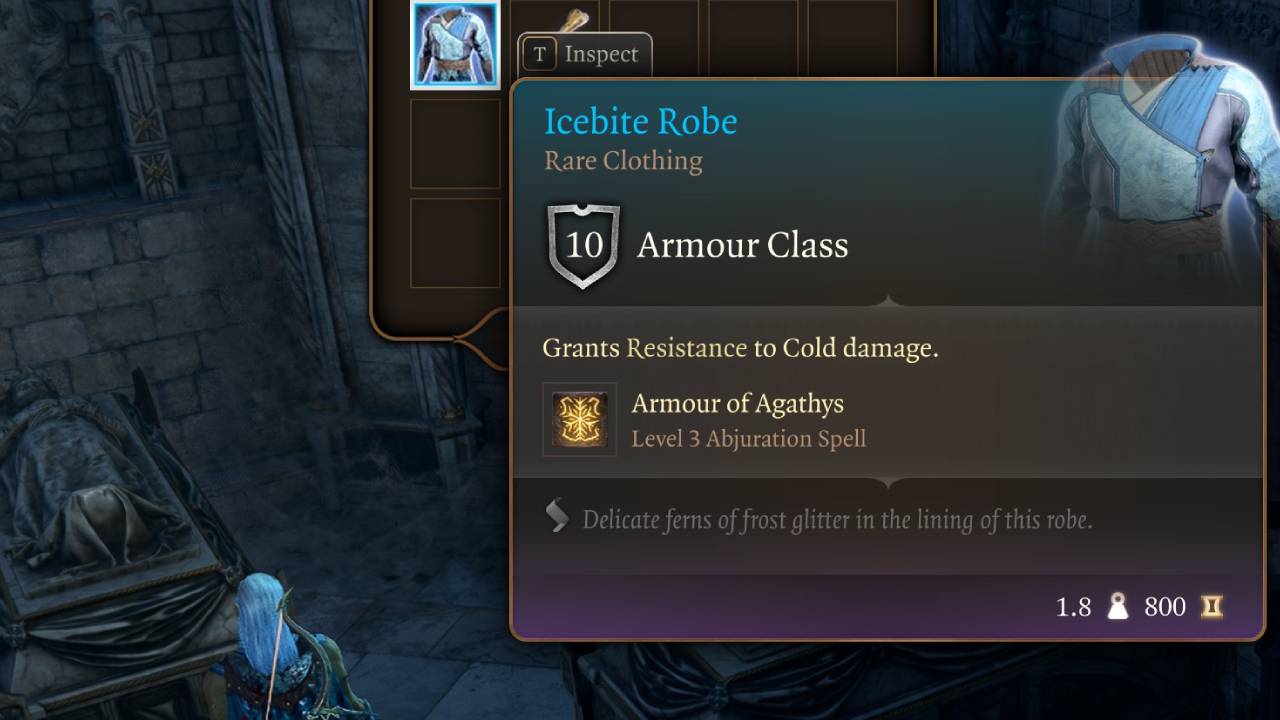
Robe 2 Icebite
The Icebite Robe can be found inside a Sarcophagus close to the Grand Mausoleum waypoint in Act 2 of Baldur’s Gate. You do get Cold damage Resistance. But more importantly, you get the Armour of Agathys spell that gives you extra health and damage.
Armour of Agathys (lv3 spell): Gain 15 temporary hit points and deal 15 Cold damage to any creature that hits you with a melee attack.
This robe is great, especially the extra hit points make a huge difference in tough fights. It also costs nothing since you can just loot it from the Sarcophagus.
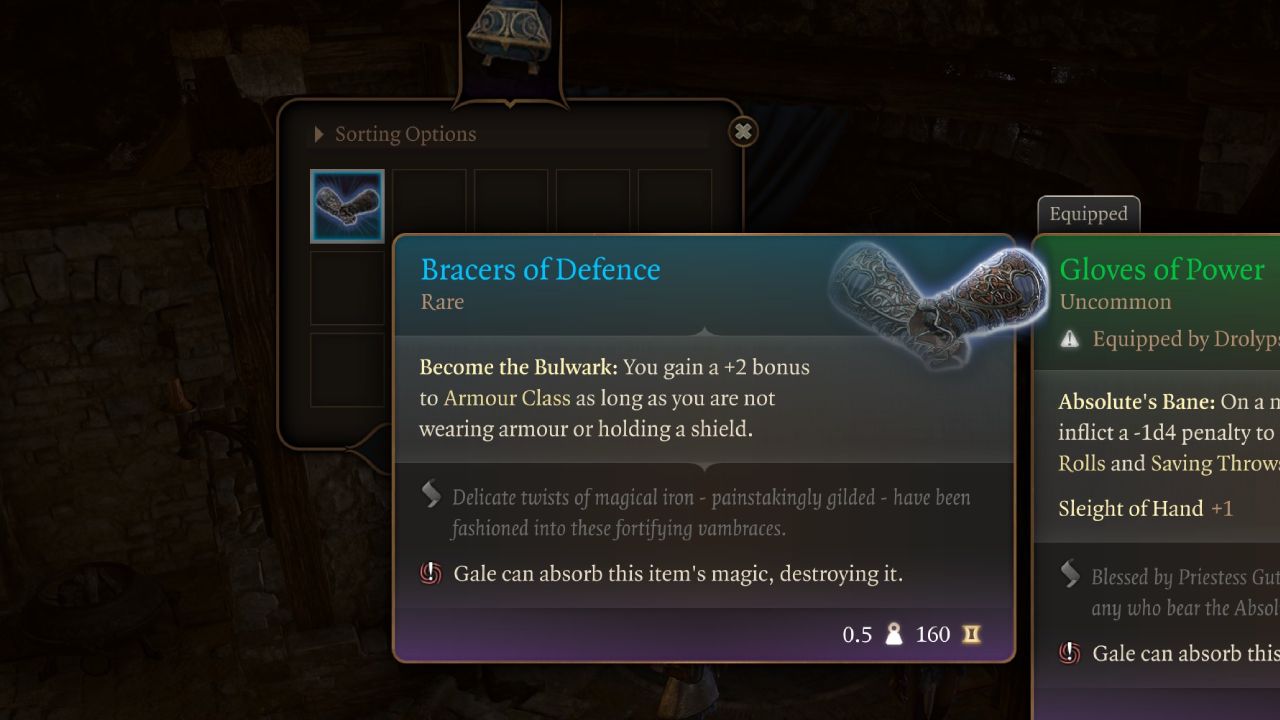
Gloves – Bracers of Defence
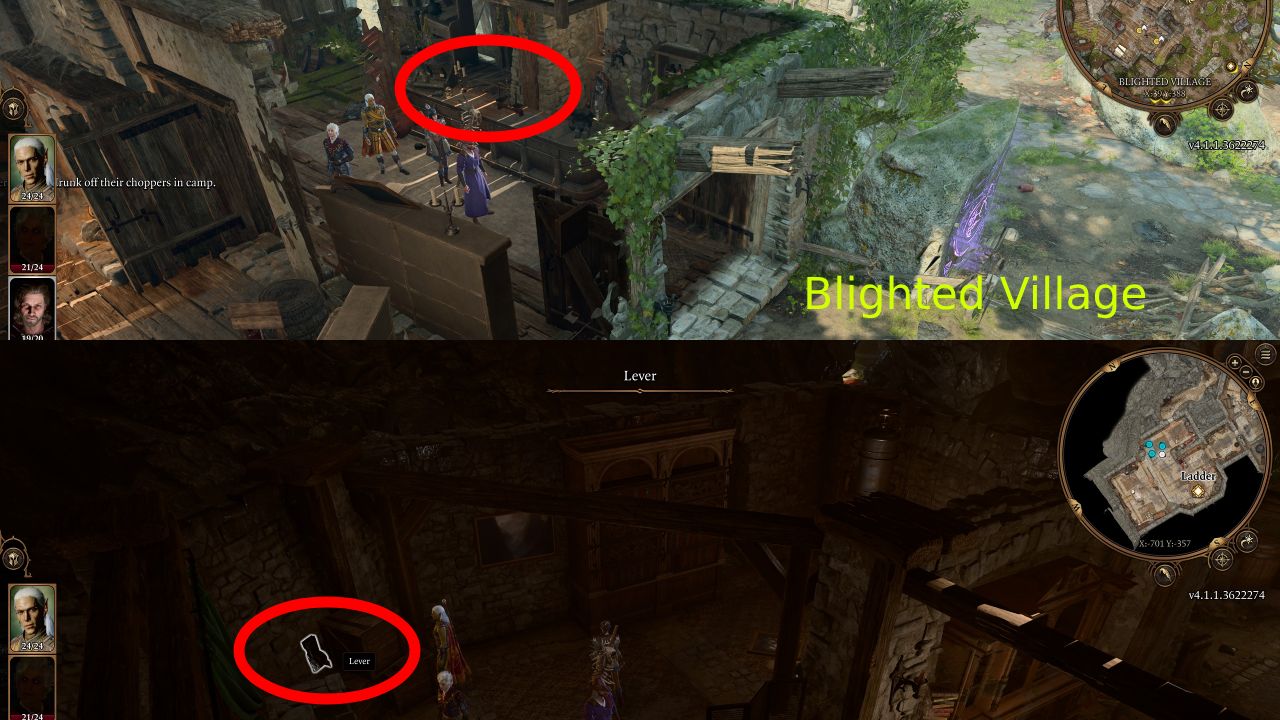
It is recommended to get the Bracers of Defence for the Monk Build in Baldur’s Gate 3. You can obtain this in the hidden Necromancer’s Lair in this gilded chest in the Blighted Village. You can enter the lair through a wooden hatch inside a building. Once inside, you have to find the lever and activate it to get to the second hidden part of the lair.
Gloves Alternative – The Sparkle Hands
The Sparkle Hands are also great gloves as a secondary option in early game. If you don’t need the extra Armour Class from Bracers of Defence that is. The Sparkle Hands drop in the Sunlit Wetlands (where the Hag Hut is). They can be found inside a Wooden Chest. In endgame the gloves become even better if you combine them with the Vest of Soul Rejuvenation Robe. The robe lets you do reaction attacks when someone misses you (which happens a lot) and the gloves will trigger again then.
Conductive Strikes: On a hit with an unarmed attack, the wearer gains 2 Lightning Charges. Lightning Charges: Lightning courses through you. You have +1 to Attack Rolls and deal an additional 1 Lightning damage. If you gain 5 charges, they are consumed the next time you deal damage, and you deal an additional 1-8 Lightning damage. You lose 1 charge per turn.
Effective Transmitter: While imbued with Lightning Charges, attacks against metal constructs and foes wearing metal armour gain Advantage.
Boots – Swiresy Shoes
Inside the Goblin Camp from the Grat the Trader you can get good boots, they are called “Swiresy Shoes“. They will increase your jump distance and give you +1 in Acrobatics too. The boots don’t cost that much.
Necklace – Amulet of Misty Step
For your Necklace, we recommend the Amulet of Misty Step. This grants you the Misty Step Spell, which lets you teleport to any visible location in range. This is great for quickly taking the high ground for Advantage, or for escaping a tricky situation where you’re getting melee enemies in your face. The Amulet of Misty Step can be purchased from Omeluum in the Myconid Colony, after completing his quest to investigate the parasite.
We also have an in-depth guide on How to get the Amulet of Misty Step in BG3.
Ring of Protection
When you are in the Druids Grove you eventually will find the Tiefling Hideout. Kids that steal stuff for a living. If you have the Urchin background you might feel right at home. Mol asks you to steal the Druid Idol and give it to her. If you do that she will award you with the Ring of Protection. This is another way to boost your Armour Class by +1 and make you tankier without having any actual armour active.
There are a few ways to get into the Tiefling Hideout. Make your way to the location and talk to the kids, one of them will steal something from you and trigger a quest. You can either convince them to let you in or crawl through if you have a small character with you.
Smuggler’s Ring
This ring will boost your Stealth and Sleight of Hand skills by +2, making your character much better at sneaking around and stealing things. However, it also removes 1 point of Charisma. If you don’t want to reduce your Charisma score, you can replace this with another ring.
It is found On a Skeleton, hidden in a bush on the lower path following the river, near the broken bridge section of Risen Road
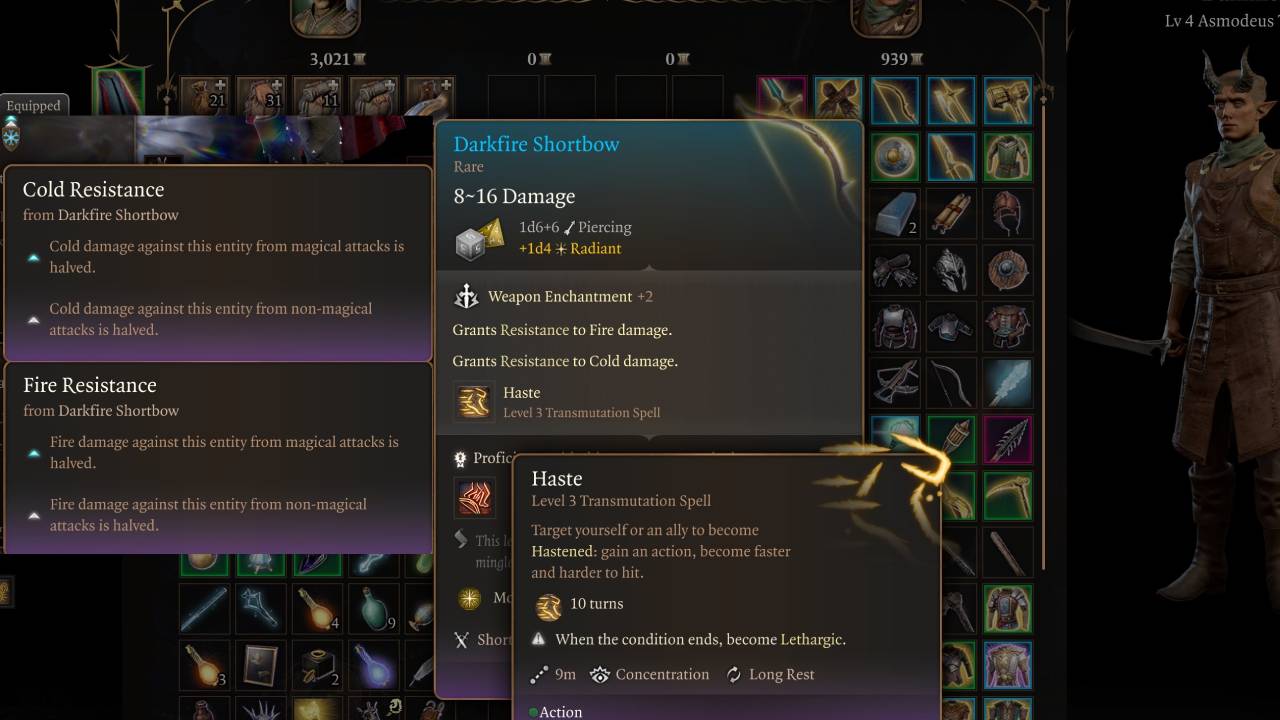
Darkfire Shortbow
In the Lights Inn at the blacksmith called “Dammon“, you can get a good bow called “Darkfire Shortbow“. Deals good overall damage and Radiant damage. It also grants Resistance to Fire and Cold damage, making your build more tanky. You can use the bow for ranged damage when needed, but we are primarily using it for the damage resistance and access to the Haste spell when this weapon is equipped.
Endgame Equipment for the Open Hand Monk
Below you can find the setup we used towards the end of the game. We also listed all endgame items below, what they do and where you can get them. In our setup below the most important item is the Markoheshkir Quarterstaff and the Vest of Soul Rejuvenation cloth.
| Slot | Icon | Item | Effects | Location |
|---|---|---|---|---|
| Head |  |
Scabby Pugilist Circlet |
|
Can be purchased from Mattis near the Requsitioned Barn in Rivington, if he survived to Act III.
If Mattis didn’t survive, you can keep using the Haste Helm instead. |
| Cloak |  |
Cloak of Protection |
|
Purchased from Quartermaster Talli in Last Light Inn |
| Chest |  |
Vest of Soul Rejuvenation |
|
Sold by either Rolan or Lorroakan’s Projection in Sorcerous Sundries. If Lorroakan is dead, pickpocket from Rolan in Ramazith’s Tower |
| Gloves |  |
Gloves of Soul Catching |
|
Reward for completing the quest Save Hope in the House of Hope |
| Boots |  |
Boots of Uninhibited Kushigo |
|
Dropped by Prelate Lir’i’c in the Astral Plane, in the transition sequence between Act II and Act III. |
| Necklace |  |
Amulet of Greater Health |
|
Steal from the left-most pedestal in the Archive in House of Hope |
| Ring 1 |  |
Ring of Protection |
|
Steal the Sacred Idol in Druid Grove (quest) |
| Ring 2 |  |
Smuggler’s Ring |
|
On a Skeleton, hidden in a bush on the lower path following the river, near the broken bridge section of Risen Road |
| Main Weapon | Unarmed |
|
N/A | |
| Second Weapon | Any with Proficiency |
|
N/A |
Now, let’s also take a look at where you can find these items.
Scabby Pugilist Circlet
The Scabby Pugilist Circlet is a good piece of headgear for the Monk build. It gives you +2 damage to your melee attacks (both armed and unarmed) when you’re surrounded by 2 or more nearby foes. This won’t be active all the time, but in some situations you’ll get some extra damage.
The trouble with this item is that it is only purchasable from Mattis in Act III. He is one of the Tiefling children from the Druid Grove way back in Act I, and if the player neglected this questline or chose the “wrong” path, it’s possible that they won’t make it to Act III at all, perishing in either Act I or Act II. If that’s the case, you can keep using the Haste Helm from the early-game list instead.
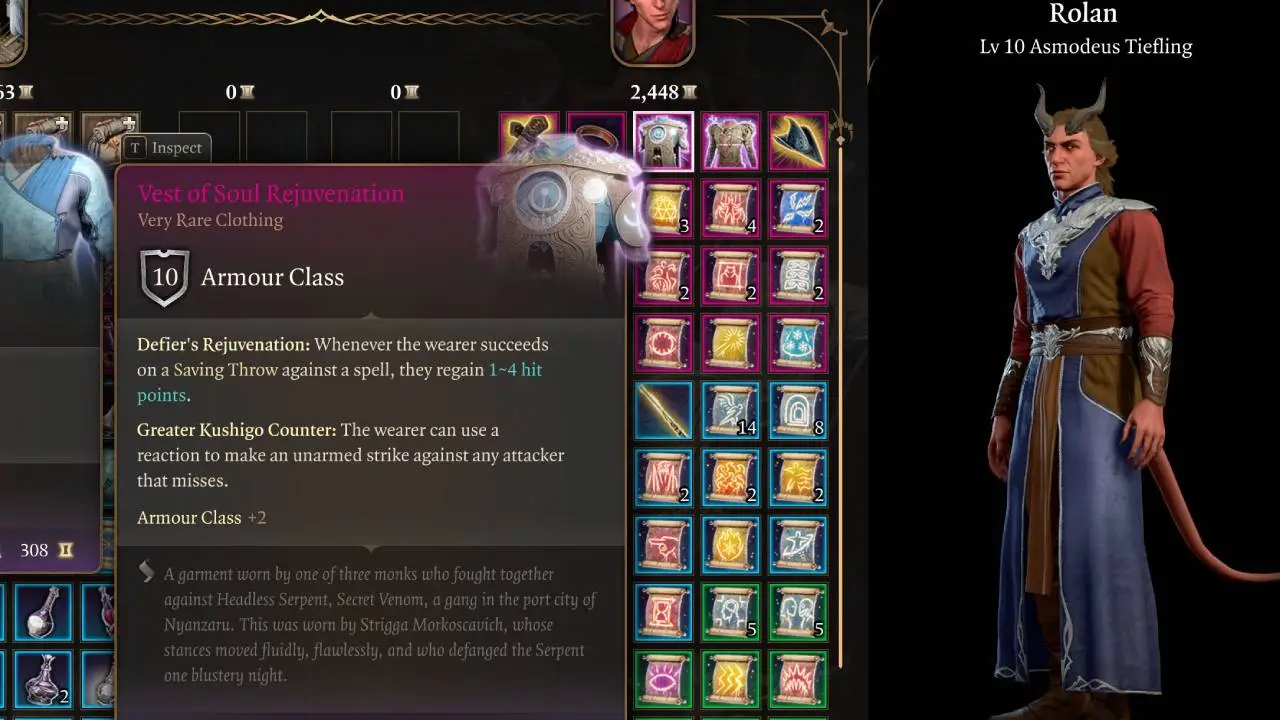
Vest of Soul Rejuvenation
The Vest of Soul Rejuvenation robe can also be purchased at the trader Rolan inside Sorcerous Sundries, in Baldur’s Gate in Act 3. The robe has Defier’s Rejuvenation: Whenever the wearer succeeds on a Saving Throw against a spell, they regain 1-4 hit points. Greater Kushigo Counter: The wearer can use a reaction to make an unarmed strike against any attacker that misses. Armour Class +2.
This robe is perfect for our Monk Build, it auto heals and we can make auto-unarmed attacks, plus it also gives extra Armour Class. The Robe costs a lot though, 4160 gold.
Gloves of Soul Catching
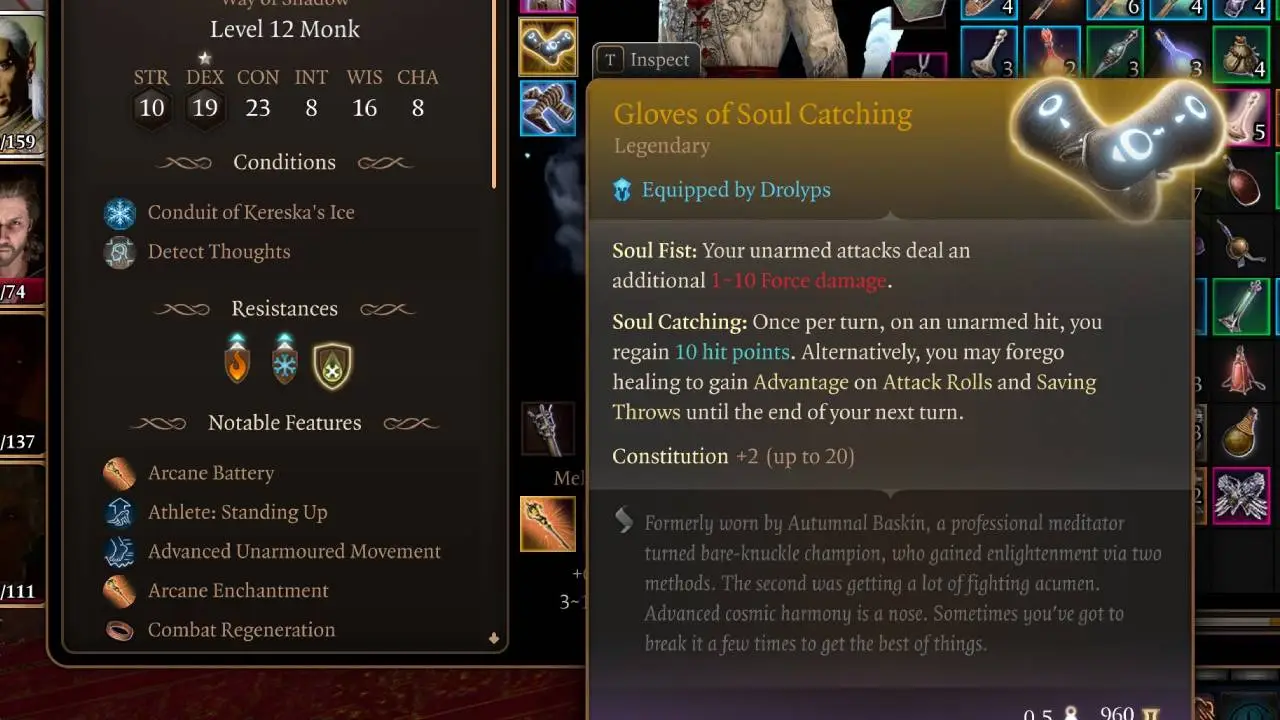
The Gloves of Soul Catching is a legendary item. You can obtain this in the House of Hope (Devil Raphael’s realm). You need to defeat him, which is extremely tough to do. You reach the House of Hope via Devil’s Fee in the Lower City of Baldur’s Gate. You have to speak to Helsik to start the process because you have to complete a ritual upstairs for the portal to open.
Boots of Uninhibited Kushigo
The Boots of Uninhibited Kushigo add extra damage equal to your Wisdom Mofidier to all your Unarmed Attacks. For this build, this will be 3 extra damage on each Unarmed Attack. While you’re using a Quarterstaff or other melee weapon, there’s little point in wearing these boots. However, you should hold onto them – once you collect the Gloves of Soul Catching your Unarmed Attacks become very powerful, and then it’s worth wearing these boots to boost your attacks even more.
The Boots of Uninhibited Kushigo are looted from Prelate Lir’i’c, one of the attackers in the Astral Plane at the beginning of Act III.
Amulet of Greater Health
The Amulet of Greater Health will boost your Constitution score to an insane 23. You can obtain this in the House of Hope (Devil Raphael’s realm). We also have an in-depth guide on How to obtain the Amulet of Greater Health in BG3.
Open Hand Monk Build Extra Info
Here is some additional information that will help you get the most out of this Baldur’s Gate 3 Way of the Open Hand Monk Build.
Tips & Tricks for the Open Hand Monk Build in BG3
Let us take a look at a few things that you want to know about the Monk. These Tips and Tricks will make it easier to enjoy a playthrough as Monk.
- Monks gain 1 Ki Point for every level. That means you will get to spend more Ki points before you have to rest at higher levels.
- Monks are best played without armour. They have Unarmored Defense with Wisdom and Dexterity affecting the Armour Class.
- You can get a very high Armour Class with the right gear and Unarmored Defense, even higher than some classes with Armour.
- You can still wear clothes, just nothing that has the tag Light/Medium/Heavy Armor. Clothes and Robes are okay.
- Monk might feel weak at the start, but after level 5 and 6, the class gets a lot more powerful.
Strongest Potions for the Open Hand Monk Build in BG3

The ![]() Potion of Speed is arguably the most powerful potion in Baldur’s Gate 3. It doubles your Movement Speed and gives you an
Potion of Speed is arguably the most powerful potion in Baldur’s Gate 3. It doubles your Movement Speed and gives you an ![]() extra Action each turn.
extra Action each turn.
One drawback of this potion is that when it expires, your character will be ![]() Lethargic for one turn, unable to move or take any
Lethargic for one turn, unable to move or take any ![]() Actions. So you should be careful not to have your character stranded in a dangerous position when the potion runs out!
Actions. So you should be careful not to have your character stranded in a dangerous position when the potion runs out!
You can craft the Potion of Speed in the alchemy menu by combining ![]() Ashes of Hyena Ear with any Salt. Create ashes, salts and other alchemy concentrates by combining three of the same ingredients together – for example, combining three
Ashes of Hyena Ear with any Salt. Create ashes, salts and other alchemy concentrates by combining three of the same ingredients together – for example, combining three ![]() Hyena Ears will create
Hyena Ears will create ![]() Ashes of Hyena Ear.
Ashes of Hyena Ear.
Hyena Ears can normally be looted from either Hyenas or Gnolls – you can find a lot of them around the Risen Road in Act I, for a good supply of them, which should last you a while.
You can combine this with the ![]() Elixir of Bloodlust. Elixirs and Potions can be stacked with each other, but you can only have one Elixir active at a time. Potions tend to expire after a few turns, whereas Elixirs last until your next Long Rest, unless you drink a different Elixir in the meantime.
Elixir of Bloodlust. Elixirs and Potions can be stacked with each other, but you can only have one Elixir active at a time. Potions tend to expire after a few turns, whereas Elixirs last until your next Long Rest, unless you drink a different Elixir in the meantime.
The ![]() Elixir of Bloodlust grants your character another
Elixir of Bloodlust grants your character another ![]() Action when you kill an enemy. This effect can only trigger once per turn. Combined with the
Action when you kill an enemy. This effect can only trigger once per turn. Combined with the ![]() Potion of Speed, this gives you two additional attacks if you defeat an enemy on your turn.
Potion of Speed, this gives you two additional attacks if you defeat an enemy on your turn.
It can be crafted by combining ![]() Ashes of Worg Fang with any Salt.
Ashes of Worg Fang with any Salt. ![]() Worg Fangs are looted from Worgs, the beasts usually kept by Goblins.
Worg Fangs are looted from Worgs, the beasts usually kept by Goblins.
This is an OP alchemy combo that you can use to turbocharge the Open Hand Monk’s damage output in tough fights!
Monk Build Illithid Powers (optional)

Illithid Powers are unlocked later in BG3 when you learn more about Mind Flayers and Tadpoles. By eating Jars of Mind Flayer Parasites you gain one point. This is another optional skill tree that you can get access to if you want. Here are some of the best Illithid Powers for the BG3 Monk Build with the Way of the Open Hand subclass:
-
 Mind Blast: A conal blast of
  Psychic Damage that can also stun several targets at once. If you are outnumbered by several advancing enemies, then Mind Blast can help to swing things back in your favour.
 Cull the Weak: When you reduce a creature’s hit points below a certain threshold, this power instantly kills it and deals 1-4
  Psychic Damage to nearby enemies. This is particularly effective when engaging groups of weaker foes, enabling you to thin their numbers rapidly.
 Fly: This can be used to reach hard to get to places or change positions in combat.
 Mind Sanctuary: This creates an area that allows all within to use
  Actions and
  Bonus Actions interchangeably. This typically means you can deal more damage, since you can use your Bonus Action as a normal Action. However, enemies who are inside the area will also enjoy its benefits. Be careful with your placement so that your party gets buffed by the Mind Sanctuary and not the enemies!
 Psionic Backlash: This is a top-tier
  Reaction from the Illithid Powers skill tree in BG3. It allows you to deal
  Psychic Damage when a nearby enemy casts a spell. This is especially useful if the target is casting a Concentration Spell. The damage from Psionic Backlash can immediately break their Concentration, ending the spell’s effects.
Other Baldur’s Gate 3 Builds
- Druid Build – Circle of the Moon
- Bard Build – College of Lore
- Ranger Build – Hunter
- Monk Build – Way of Shadow
- Monk Build – Way of the Open Hand
- Necromancer Build – Necromancy
- Fighter Build – Battle Master
- Barbarian Build – Berserker
- Cleric Build – Light Domain
- Rogue Build – Thief
- Sorcerer Build – Wild Magic
- Wizard Build – Evocation School
- Paladin – Oath of Ancients
- More Baldur’s Gate Guides & Builds
If you want to check out the map of Baldur’s Gate 3, please visit the Baldur’s Gate 3 Interactive Map.
The post Best Open Hand Monk BG3 Build Guide appeared first on AlcastHQ.


