
Best Wildheart Barbarian BG3 Build – Maximum Power!
Welcome to the Best Wildheart Barbarian Build for Baldur’s Gate 3. For this BG3 Barbarian Build we will be making use of the Wildheart subclass, a powerful melee fighter who takes on a “wild heart”, gaining special abilities derived from the animal world.
Please visit our Best BG3 Builds overview page for more builds or check out our Best BG3 Barbarian Build or our BG3 Karlach Build. To get an overview of all classes please visit the BG3 Classes overview page.
The BG3 Wildheart Barbarian Build quickly grows in power as it levels up, and makes for one of the most powerful melee classes in the game. This Wildheart Barbarian Build was last updated in September 2025. It works for both PC and Console (PS5 and Xbox Series X/S).
Table of Contents:
- Wildheart Barbarian Build Overview
- Wildheart Barbarian Character Creation
- Wildheart Barbarian Build Levelling Progression
- Wildheart Barbarian Equipment
- Wildheart Barbarian Build Extra Info
Wildheart Strengths
Wildheart Weaknesses
BG3 Wildheart Barbarian Build Overview
Here is a quick overview of the most important parts of the Barbarian class and Wildheart subclass. If you’re already familiar with how they work, please skip this section.
Barbarian Class Summary
The Barbarian is the most aggressive melee damage dealer in Baldur’s Gate 3. It focuses on brute strength, enhanced by the Barbarian’s deadly rage.
 Rage – Deal 2 extra damage with melee weapons, and by throwing. You gain Resistance to Physical Damage and
  Advantage on
  Strength Checks and
  Saving Throws.
- Using Rage expends a Rage Charge. Rage Charges are replenished by Long Rests. As you level up, you can store more Rage Charges.
 Reckless Attack (Unlocked at Level 2) – Throw all caution to the wind. You gain Advantage on all melee
  Attack Rolls until the start of your next turn, but enemies will also have Advantage on their Attack Rolls against you!
 Danger Sense (Unlocked at Level 2) – You have Advantage on
  Dexterity Saving Throws, unless you are
  Blinded or
  Incapacitated.
 Extra Attack (Unlocked at Level 5) – Each
  Action now yields two weapon attacks, instead of one.
 Brutal Critical (Unlocked at Level 9) – When you land a Critical Hit, roll an extra damage die (in addition to the extra dice that are always rolled when you land a Critical Hit).
Wildheart Subclass Summary
Wildheart Barbarians can choose a Bestial Heart to enhance their Rage with new features.
 Speak with Animals (Level 3) – You can cast Speak with Animals once per Long Rest.
- Bestial Heart (Level 3) – You must choose a Bestial Heart. It modifies your Rage with new passive effects. Each Bestial rage also comes with a special Action.
- Animal Aspect (Levels 6 & 10) – You must choose an Animal Aspect. These are permanent passive effects that apply even when you are not enraged.
 Land’s Stride (Level 8)
- Difficult Terrain – You are no longer slowed down by Difficult Terrain.
- Advantage – You have Advantage on Saving Throws against plants that were magically created to slow you down.
- Plants – Plant-based surfaces with thorns, spines or similar hazards do not damage you.
Level 1 – Wildheart Barbarian Build Character Creation in BG3
In this section, we will go over the basic Character Creation options for our Best Wildheart Barbarian Build in BG3, namely Background, Race, Skills and Abilities.
Top 5 Races for the BG3 Wildheart Barbarian
While you can use any race you want for this build, a handful will perform a little better due to features that synergise nicely. For best results, choose one of these top five Wildheart Barbarian races.
| Race | Strengths | Info |
|---|---|---|
Half Orc |
|
Half-Orcs are some of the best melee damage dealers in BG3, thanks to the Savage Attacks passive feature. This passive doubles up with the Barbarian’s innate Brutal Critical Passive, resulting in devastating Critical Hits. |
Duergar |
|
With their wide choice of armour and weapon proficiencies, and resistances to poison, charm, and paralysis, Duergar are one of the strongest races in BG3.
The only downside of Duergar is their small stature – this reduces their base Movement Speed to 7.5 metres per turn (most races get 9 metres). |
Wood Elf |
|
Wood Elves are a great choice for most build types in BG3, thanks to their superior movement speed. Natural Proficency in Perception is always useful, and immunity to magical Sleep will help you out a lot, especially in the early game where enemy mages love to spam this spell. |
Githyanki |
|
While their additional weapon and armour Proficiencies are made redundant by the Barbarian class’ innate Proficiencies, the Githyanki is still an excellent choice for the Barbarian, thanks to its access to Enhance Leap and Misty Step, which give you excellent mobility. However, remember that you cannot use these spells when Enraged; always plan your moves!
Additionally, Githyanki get the full benefits from equipping various Githyanki weapons, sometimes granting additional Psychic Damage or special features. |
|
Human |
|
Humans are useful for their unrestricted Skill choice. Used wisely, this allows your character to be proficient with a useful Skill that wouldn’t normally be available for your Class. The extra Carrying Capacity is useful, too. |
Background & Skills
This Wildheart Barbarian Build will focus on the Strength, Constitution and Dexterity Abilities, so we want to choose skills that align with those. There are no Constitution Skills in BG3, so we’ll be looking out for Strength and Dexterity.
Our chosen Background for the Wildheart Barbarian is the Soldier, which gives you the following two Skill Proficiencies:
 Athletics (STR) – Makes you better at pushing and throwing enemies or objects and standing your ground when they try to push you.
 Intimidation (CHA) – While it doesn’t fit with the criteria we mentioned above, no Background in BG3 lines up perfectly with a focus on Strength and Dexterity. Intimidation Proficiency will still help you in some dialogue checks, even though we’re not focusing on Charisma.
Alternatively, you can choose Outlander to get ![]() Athletics and
Athletics and ![]() Survival Proficiency. Or, if you want to use your Barbarian for lockpicking without needing to switch to another character, you can use the Urchin Background, which will give you a boost to
Survival Proficiency. Or, if you want to use your Barbarian for lockpicking without needing to switch to another character, you can use the Urchin Background, which will give you a boost to ![]() Stealth and
Stealth and ![]() Sleight of Hand.
Sleight of Hand.
For your manual skill choices, you can pick what you want. Just ensure you have the ![]() Athletics Skill covered by either your Background or your manual Skill choice, as it’s by far the most important one for us.
Athletics Skill covered by either your Background or your manual Skill choice, as it’s by far the most important one for us.
Abilities
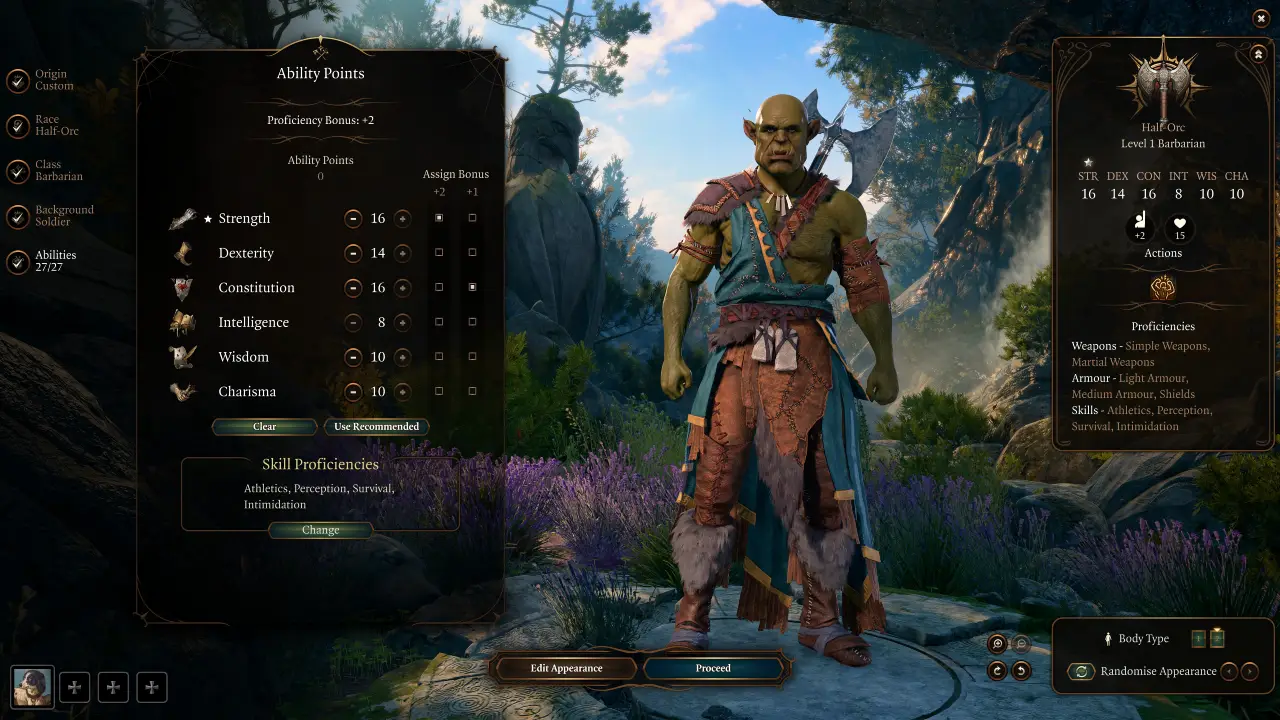
It’s important for the efficacy of the BG3 Barbarian Build that you have Strength and Constitution as high as possible at Level, and putting 14 points into Dexterity to improve your Armour Class and Initiative. Therefore, I recommend putting your +2 bonus in Strength and the +1 bonus in Constitution.
With the remaining points, allocate them based on the Skills you chose to have Proficiency in. For example, we chose Animal Handling and Perception, which are both Wisdom skills, so we put the last couple of points into Wisdom to further play into those skills. This is only a minor detail, but it makes sense to do this rather than splitting them randomly between the remaining Abilities.
Go for an Ability allocation that looks something like:
- Strength – 16
- Dexterity – 14
 Constitution – 16
 Intelligence – 8
 Wisdom – 10
 Charisma – 10
Barbarian Rage
Before you get into the game, it’s good to understand how the Barbarian’s Rage mechanic works at this point.
From the beginning of the game, the Barbarian is able to go into a Rage by using a ![]() Bonus Action in combat. Rage adds an extra 2 points of damage to your attacks with melee weapons (including weapon throws), 50% Resistance to Physical Damage, and an
Bonus Action in combat. Rage adds an extra 2 points of damage to your attacks with melee weapons (including weapon throws), 50% Resistance to Physical Damage, and an ![]() Advantage on Strength Checks and Saving Throws.
Advantage on Strength Checks and Saving Throws.
Rage can last for up to 10 turns, but it will end early if you go for a turn without attacking or taking damage. Note that while the Barbarian isn’t a class associated with Spellcasting, it’s still worth mentioning that you cannot cast or concentrate on Spells while Raging.
You start with 2 charges of Rage, which must be replenished by taking a Long Rest.

Wildheart Barbarian Levelling Guide
In this section, we will walk you through the levelling up process for this BG3 Wildheart Barbarian Build.
Wildheart Barbarian Early-Game Levelling Guide BG3
We’ll start with the early-game levels, 2 through 4.
Level 2 – Barbarian Build for Baldur’s Gate 3
At Level 2, your Barbarian gains a couple of new abilities that are great for combat in Baldur’s Gate 3.
First of all, you unlock a new Action called ![]() Reckless Attack. This is a melee attack that will also give you
Reckless Attack. This is a melee attack that will also give you ![]() Advantage on all subsequent attacks on the same turn. This isn’t an amazing ability right now, but as you level up and unlock the ability to make multiple attacks per turn, you’re going to get increasingly high value out of it because your hit chance will stay higher for the rest of your turn. Please note the following important details about Reckless Attack:
Advantage on all subsequent attacks on the same turn. This isn’t an amazing ability right now, but as you level up and unlock the ability to make multiple attacks per turn, you’re going to get increasingly high value out of it because your hit chance will stay higher for the rest of your turn. Please note the following important details about Reckless Attack:
- When your attack is about to miss, the game will ask you if you want to activate Reckless Attack and roll another die to attempt to land a hit (assuming you have default Reaction settings).
- Once activated, you will have Advantage on all attacks for the rest of your turn. However, enemies will also have Advantage when they attack you, until the start of your next turn. So while this is very useful, try not to abandon all caution if you are severely outnumbered or near a strong enemy.
![]() Danger Sense is a passive ability gained by Level 2 Barbarians. It gives you an
Danger Sense is a passive ability gained by Level 2 Barbarians. It gives you an ![]() Advantage on Dexterity Saving Throws against traps, spells and surfaces. Since we put 14 points into Dexterity, this will be particularly useful for us. You should find yourself reliably succeeding on Dexterity Saving Throws. Note that Danger Sense will not work if your senses are impaired, i.e. you are Blinded or Incapacitated.
Advantage on Dexterity Saving Throws against traps, spells and surfaces. Since we put 14 points into Dexterity, this will be particularly useful for us. You should find yourself reliably succeeding on Dexterity Saving Throws. Note that Danger Sense will not work if your senses are impaired, i.e. you are Blinded or Incapacitated.
Level 3
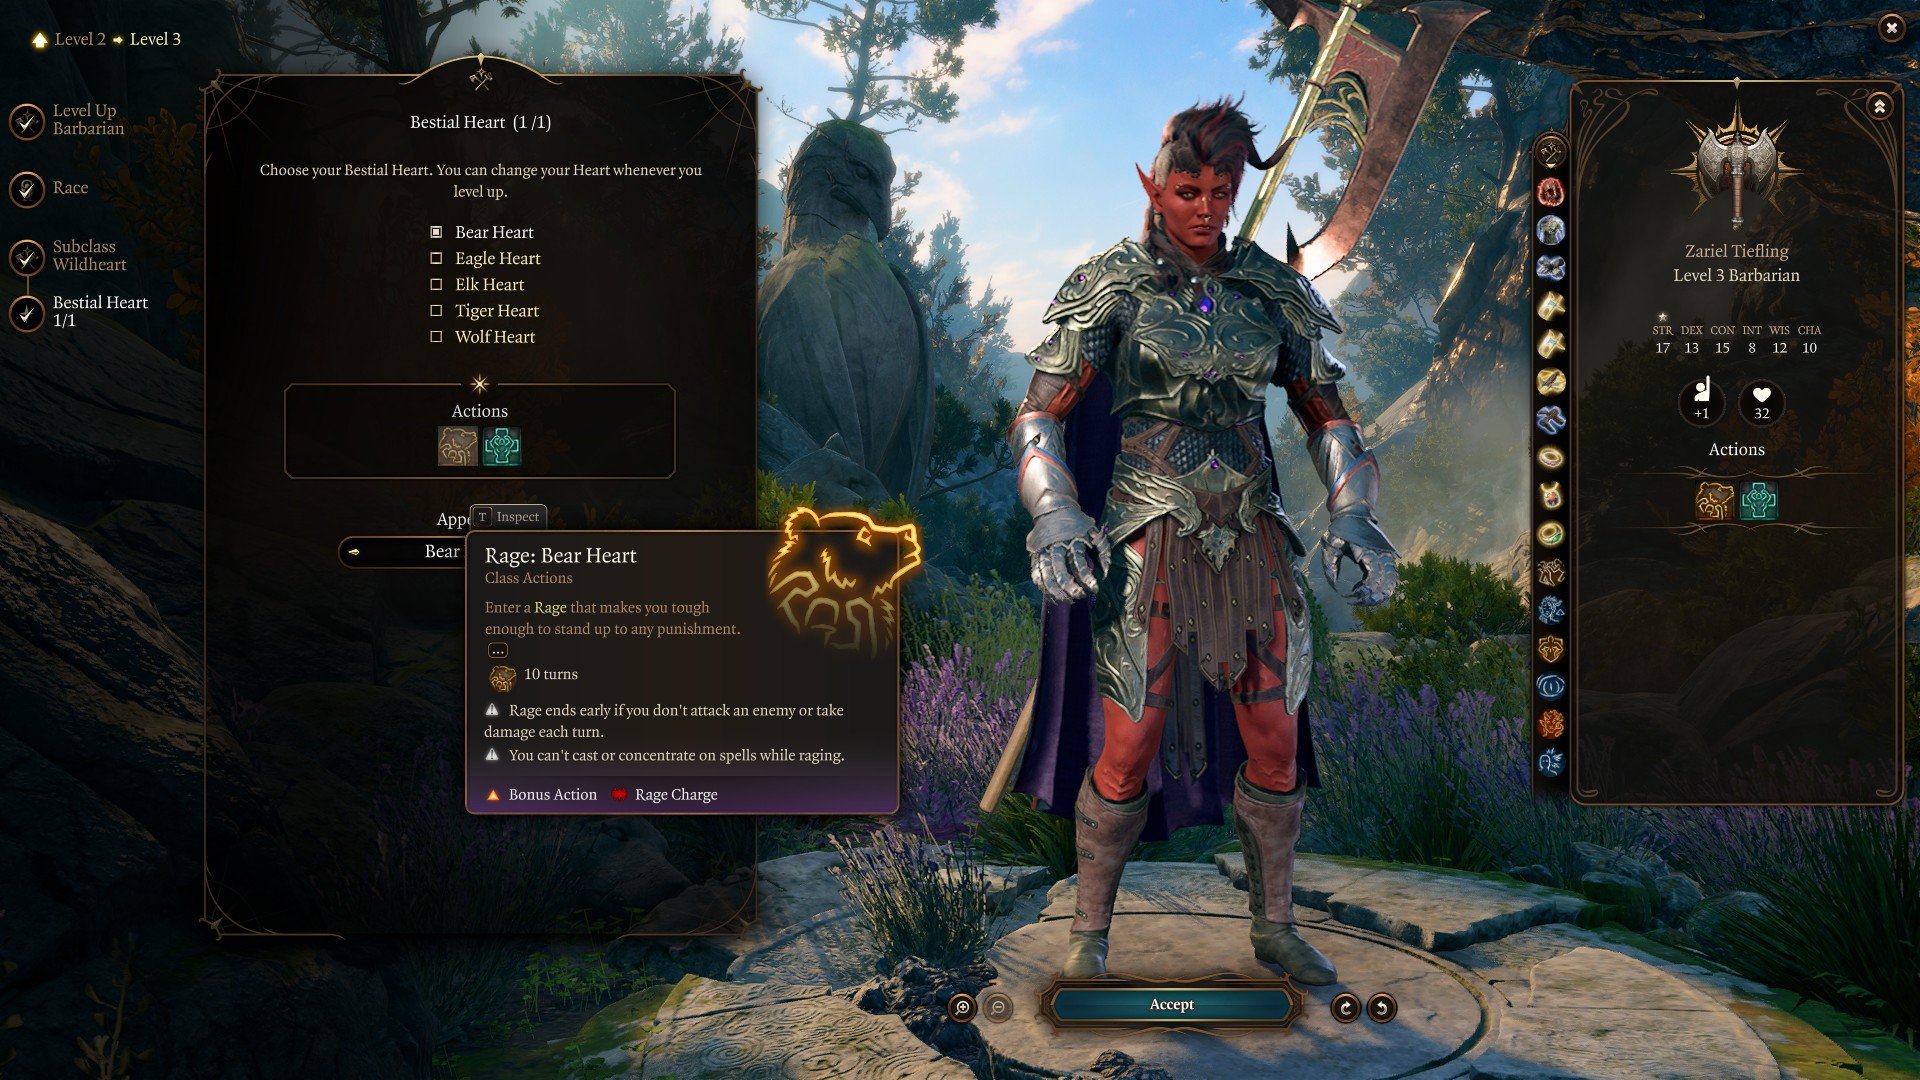
At Level 3, it is time to choose your Barbarian Subclass. As mentioned above, we’ll be going with Wildheart for this build. The Wildheart Barbarian gains more variety with its rage mechanic, with a choice of special rage abilities based on an animal. You have the option to change your chosen bestial heart rage each time you level up.
- Speak with Animals – You can cast Speak with Animals once per Long Rest.
- Bestial Heart – You must choose a Bestial Heart. It modifies your Rage with new passive effects. Each Bestial rage also comes with a special Action. I recommend choosing either the Wolf or the Bear Heart:
- Bear Heart – While Raging, you have Resistance to all damage except
 Psychic Damage. You can use Unrelenting Ferocity to heal yourself.
 - Wolf Heart – While you are Raging, you and your allies have Advantage on Attack Rolls against enemies within 2 metres of you. You can use Inciting Howl, increasing the Movement Speed of nearby allies for one turn.
- Bear Heart – While Raging, you have Resistance to all damage except
Bear Heart is the safer choice, thanks to the Resistance to all damage types except for Psychic, meaning you will usually take half damage when Raging.
However, I tend to prefer Wolf Heart because it is the strongest in terms of damage output, since you get ![]() Advantage on all of your melee attacks. The Wolf Heart is still quite durable, since all Barbarian Rages have Resistance to physical damage (
Advantage on all of your melee attacks. The Wolf Heart is still quite durable, since all Barbarian Rages have Resistance to physical damage (![]() Bludgeoning,
Bludgeoning, ![]() Piercing and
Piercing and ![]() Slashing).
Slashing).
Level 4 for the Wildheart Build BG3 for PC/PS5
As with all other classes in Baldur’s Gate 3, at Level 4, it’s time to choose a Feat for the Barbarian Build.
Feats are extra passive buffs for your character, which can help to make your build more defined or simply push up your Ability Stats.
Here we’ll be going with the Ability Improvement Feat, which gives you 2 extra points to distribute between your Abilities. We recommend putting both points into Strength. This should give you 18 Strength in total, improving your weapon Attack Rolls.
There’s not much else to say here; the Barbarian doesn’t gain anything else at Level 4 besides standard stuff like an increase to HP.
Mid-Game Wildheart Barbarian Build Levelling Guide BG3
Here is the mid-game levelling guide for our Baldur’s Gate 3 Wildheart Barbarian Build. This contains levels 5-8.
Level 5 – BG3 Wildheart Build
At Level 5, our BG3 Barbarian Build gets another huge step up in terms of how powerful it is. While there aren’t any options to choose from at this level, you do gain a bunch of new abilities that ramp up your power:
You will now get a +3 bonus to Skills you are Proficient at, rather than +2. Not huge, but a nice all-around buff.
You can now make an ![]() Extra Attack with each
Extra Attack with each ![]() Action, pretty much doubling your damage potential. Combine it with a
Action, pretty much doubling your damage potential. Combine it with a ![]() Potion of Speed (combine
Potion of Speed (combine ![]() Ashes of Hyena Ear with any Salt) for mega bursts of damage!
Ashes of Hyena Ear with any Salt) for mega bursts of damage!
As another bonus, you also gain an extra 1.5 metres per turn of Movement Speed. If you chose the Dwarf (or another race with small stature), you’ll now be able to keep up with taller friends and foes.

Level 6
At Level 6, you’ll gain an extra Rage charge, giving you four in total.
The Wildheart Barbarian can now choose an Animal Aspect to further improve their combat ability. You may choose from the following options:
- Bear Aspect – Carrying Capacity is doubled, and you have Advantage on Strength checks.
- Chimpanzee Aspect – You gain 50% Resistance to Fall Damage, and can throw Camp Supplies to Blind enemies.
- Crocodile Aspect – Your Movement Speed is increased by 3m while standing in water-based surfaces. On slippery surfaces, you have Advantage on Saving Throws against falling
 Prone.
 - Eagle Aspect – You can see in the dark up to 12m, and gain Advantage on Perception Checks.
- Elk Aspect – Grant yourself and allies within 18m 1.5m of extra Movement Speed.
- Honey Badger Aspect – If you are
 Poisoned,
  Frightened or
  Charmed at the start of your turn, you have a 50% chance of entering a Rage without using a Rage charge.
 - Stallion Aspect – Dashing grants you Temporary HP equal to twice your current Barbarian level.
- Tiger Aspect – You add an additional Strength modifier to Attack Rolls against
 Bleeding or Poisoned targets, and gain Proficiency in Survival.
 - Wolf Aspect – You and allies within 18m add your Dexterity Modifier as a bonus to Stealth checks.
- Wolverine Aspect – When you attack a Bleeding or Poisoned target, you inflict
 Maim on them, reducing their Movement Speed to 0 and causing
  Disadvantage on Dexterity Saving Throws.
Again, the choice you should make here depends mainly on your party composition and playstyle. For example, if your party has a lot of sources of Bleeding or Poisoned, then Tiger or Wolverine Aspects are great options, while Wolf Aspect is good for a stealth-based party. Pretty much all of these options are useful except for Chimpanzee Aspect.
If you still can’t decide which one to choose, then go with Elk Aspect, since the extra Movement Speed boost for your whole party is a really useful boost.
Level 7
Barbarians at Level 7 can no longer be ![]() Surprised by enemy ambushes, and will gain a +3 bonus to their Initiative, meaning they’ll get to take their turn before most enemies.
Surprised by enemy ambushes, and will gain a +3 bonus to their Initiative, meaning they’ll get to take their turn before most enemies.
Level 8
At Level 8, you must select another Feat for your Barbarian Build.
Choose Ability Improvement again and increase your Strength to 20.
The Wildheart Barbarian also unlocks Land’s Stride, giving you three new passive benefits:
- Difficult Terrain – You are no longer slowed down by Difficult Terrain.
- Advantage – You have Advantage on Saving Throws against plants that were magically created to slow you down.
- Plants – Plant-based surfaces with thorns, spines or similar hazards do not damage you.
Late-Game Wildheart Barbarian Build Levelling Guide BG3
Here is the late-game section of our Wildheart Barbarian Build for Baldur’s Gate 3. This contains levels 9-12.
Level 9
At Level 9, your Proficiency bonus is improved to +4, meaning you’ll now get a +4 bonus to all dice rolls with skills and weapons that you are Proficient with.
You also unlock the ![]() Brutal Critical passive, which will roll an extra damage dice when you score a Critical Hit. This will stack with the bonus granted by the Half-Orc Race that already does the same thing. So if you chose to be a Half-Orc, you’ll have very powerful Critical Hits from this point onwards.
Brutal Critical passive, which will roll an extra damage dice when you score a Critical Hit. This will stack with the bonus granted by the Half-Orc Race that already does the same thing. So if you chose to be a Half-Orc, you’ll have very powerful Critical Hits from this point onwards.
Level 10
At Level 10, you can choose another Animal Aspect from the list above. As mentioned before, try to choose one that suits your party composition and playstyle.
If you’re completely unsure which option to choose, then the Bear and Honey Badger Aspects are both useful options – Bear Aspect makes you much more likely to succeed in Strength checks, while Honey Badger gives you a counter to debuffs that can otherwise ruin your combat plans.
Level 11
At Level 11 of your BG3 Wildheart Barbarian Build, you’ll unlock the ![]() Relentless Rage feature, which makes your Barbarian harder to bring down.
Relentless Rage feature, which makes your Barbarian harder to bring down.
Upon reaching 0 HP, you’ll heal to 1 HP instead of being ![]() Downed. This can only happen once per Short Rest.
Downed. This can only happen once per Short Rest.
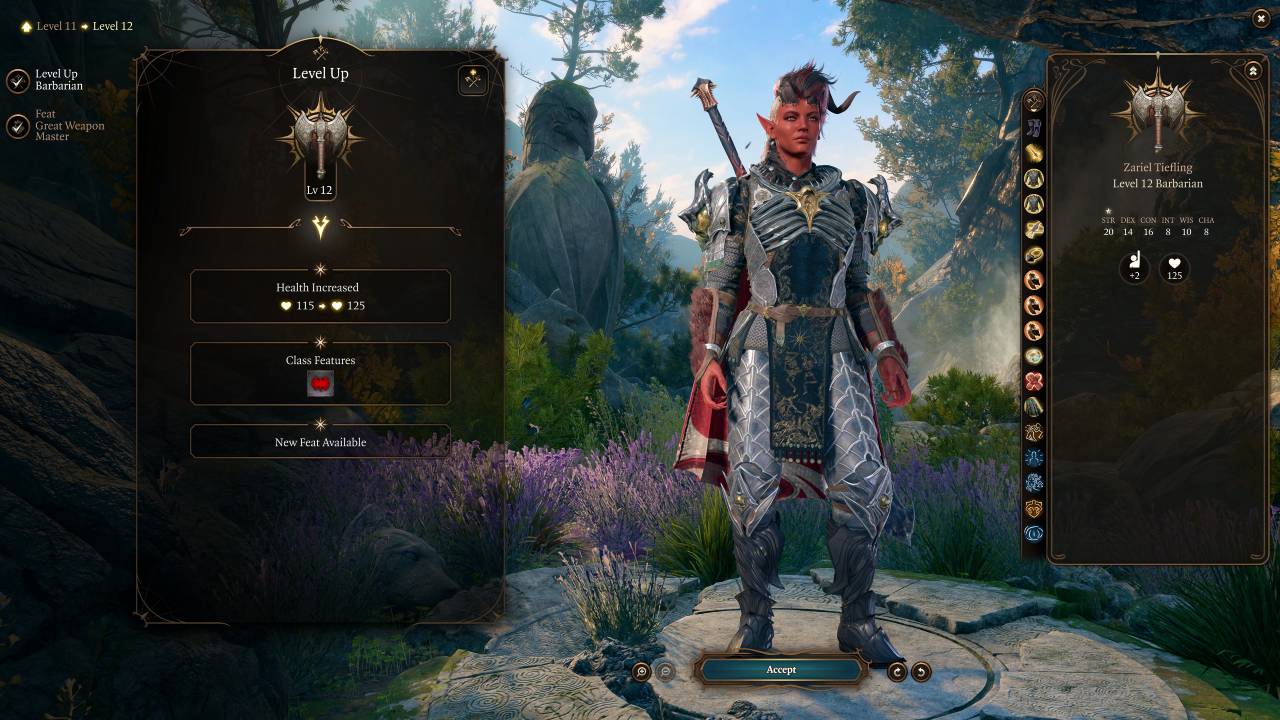
Level 12
If you reached this point, then you have finished levelling up your Best Berserker Barbarian Build. Congratulations!
At Level 12, you’ll need to choose one more Feat for your character.
I recommend the Savage Attacker Feat. This basically works in the same way as the Advantage mechanic, but for Damage Rolls instead. Every time you Attack, all of your Damage dice roll twice, and you’ll use the highest result for all of them. This makes you much less likely to get poor damage rolls and should help ensure that your Barbarian is a consistent damage dealer in the endgame in Baldur’s Gate 3.
Equipment for the Wildheart Barbarian
In this section, we will list the best equipment for the build. We have provided both an early-game and a late-game version of the list, so you can begin using the build early in the game instead of having to wait until Act III.
We have also included information about each item below the tables, such as how to obtain the item and any other notable information.
Don’t worry if your setup is not exactly the same as one of those outlined below – the build will still work fine if you’re missing some of the items. Also, don’t be afraid to experiment with new items if you find something else that you like.
Early Game Equipment
Early-game equipment is found in either Act I or the earlier parts of Act II.
| Slot | Icon | Item | Effects | Location |
|---|---|---|---|---|
| Head |  |
Cap of Wrath |
|
Dropped by Thudd in the Grymforge |
| Cloak |  |
Cloak of Protection |
|
Purchased from Quartermaster Talli in Last Light Inn |
| Chest |  |
Adamantine Scale Mail |
|
Must be crafted at the Adamantine Forge. |
| Gloves | Gloves of the Growling Underdog |
|
Looted from Dror Ragzlin’s treasure crates in the Shattered Sanctum. | |
| Boots |  |
Boots of Genial Striding |
|
Purchased from Blurg in the Myconid Colony, in the Underdark |
| Necklace |  |
Amulet of Misty Step |
|
Located in a chest in the Defiled Temple, near the Ogre called Polma. |
| Ring 1 |  |
Ring of Protection |
|
Steal the Sacred Idol in Druid Grove (quest) |
| Ring 2 |  |
Crusher’s Ring |
|
Looted from Crusher in the Goblin Camp. |
| Main Weapon |  |
Blooded Greataxe |
|
Purchased from either Grat the Trader in the Goblin Camp or Roah Moonglow in Shattered Sanctum |
| Second Weapon | Any Ranged Weapon |
|
N/A |
Cap of Wrath
When you start your turn with less than 50% HP remaining, you gain 2 turns of Wrath. Each remaining turn of Wrath increases your weapon damage by 1. Maximum 7 turns. The Cap of Wrath is dropped by Thudd in the Grymforge.
Cloak of Protection
The Cloak of Protection is one of the earliest cloaks available in the game, and provides a modest defensive buff – you gain a +1 bonus to your Armour Class and Saving Throws when wearing it. It can be purchased from Quartermaster Talli in Last Light Inn.
Adamantine Scale Mail
The Adamantine Scale Mail is a powerful piece of medium armour that can be obtained fairly early in the game. It reduces all incoming damage by 1 point, makes you immune to critical hits and inflicts an Attack Roll penalty to any enemies who hit you.
It is crafted in the Adamantine Forge in the Grymforge area of Act I. You need to find the Scale Mail Mould and some Mithral Ore in the vicinity of the forge in order to craft the Adamantine Scale Mail.
Gloves of the Growling Underdog
The Gloves of the Growling Underdog give you Advantage on your Attack Rolls when you are surrounded by 2 or more foes. Advantage means that you will roll 2 dice for your Attack Roll and use the one that rolled with the highest number, considerably improving your chances of a good roll. You also get a +1 bonus to Strength Saving Throws. These gloves can be looted from Dror Ragzlin’s treasure crates in the Shattered Sanctum.
Boots of Genial Striding
The Boots of Genial Striding prevent difficult terrain (such as spikes, mud and grease) from reducing your Movement Speed. However, beware that these boots will not negate any other harmful effects from a surface, such as damage from spikes or the chance to slip over when walking on ice. They can be purchased from Blurg in the Myconid Colony, in the Underdark (Act I).
Amulet of Misty Step
The Amulet of Misty Step grants you access to the Misty Step spell, which allows you to teleport to a visible location within 18 metres, for a Bonus Action. This is great for quickly closing the gap to an enemy so you can get into melee where this build is at its strongest, or for escaping from a bad situation. The Amulet is located in a chest in the Defiled Temple, near the Ogre called Polma.
Crusher’s Ring
Crusher’s Ring simply increases your Movement Speed by 3 metres per turn. This is another useful item for closing the gap to enemies quickly so that you can spend your turns dealing melee damage instead of running between targets. The ring is looted from Crusher in the Goblin Camp.
Ring of Protection
The Ring of Protection has the same effect as the Cloak of Protection – it improves your Armour Class and Saving Throws by +1. It is awarded to you by Mol for completing the quest to steal the Sacred Idol in the Druid’s Grove.
Blooded Greataxe
We recommend the Blooded Greataxe because it is a highly damaging weapon that can be obtained very early in the game. Greataxes in general are excellent DPS weapons since they come with a 1d12 die, the largest damage die in the game for weapons. The Blooded Greataxe grants your melee weapon attacks an extra 1d4 Slashing Damage whenever you are below 50% Health. In the hands of a strong melee class like the Barbarian, this weapon will carry you well into Act II even if you’re a complete beginner at the game.
This weapon can be purchased from either Grat the Trader in the Goblin Camp or Roah Moonglow in Shattered Sanctum. If the weapon does not appear in their wares, try Long Resting which will reshuffle the vendor items. You don’t need to spend any camp supplies on a Long Rest for this purpose.
Late Game Equipment
Late Game equipment can be found in the latter parts of Act II, and Act III. This is the most powerful version of the build, with access to the best items in the game.
| Slot | Icon | Item | Effects | Location |
|---|---|---|---|---|
| Head |  |
Helm of Balduran |
|
Defeat Ansur the dragon below Wyrm’s Crossing. See below for more details. |
| Cloak |  |
Cloak of Elemental Absorption |
|
Looted from an Opulent Chest inside Ketheric Thorm’s Chambers |
| Chest | |
Adamantine Scale Mail |
|
Must be crafted at the Adamantine Forge. |
| Gloves |  |
Gauntlets of Hill Giant Strength |
|
Taken from a pedestal in the archive of the House of Hope. |
| Boots |  |
Boots of Persistence |
|
Buy from Dammon in the Forge of the Nine |
| Necklace |  |
Amulet of Greater Health |
|
Can be taken from a pedestal in the archive of the House of Hope. |
| Ring 1 | |
Ring of Protection |
|
Steal the Sacred Idol in Druid Grove (quest) |
| Ring 2 |  |
Killer’s Sweetheart |
|
Found inside the Self-Same Trial in the Gauntlet of Shar. |
| Main Weapon |  |
Balduran’s Giantslayer |
|
Looted from Ansur in the Dragon’s Sanctum |
| Second Weapon | Any Ranged Weapon |
|
N/A |
Helm of Balduran
The strongest helmet in BG3, the Helm of Balduran prevents enemies from landing Critical Hits on you, prevents you from being Stunned, heals you for 2 HP per turn, and gives a +1 bonus to Armour Class and Saving Throws. Obtaining this item is a multi-stage process – we wrote a detailed guide on how to find it.
Cloak of Elemental Absorption
Once per Short Rest, the Cloak of Elemental Absorption will absorb elemental damage, and infuse your next attack with 1d6 of that damage type. This is a fairly minor effect, but it can still generate a nice damage boost. It can be looted from an Opulent Chest inside Ketheric Thorm’s Chambers in Moonrise Towers.
Gauntlets of Hill Giant Strength
The Gauntlets of Hill Giant Strength increase your Strength to 23, and give you a +1 bonus to Strength Saving Throws. This will increase your damage and accuracy with Strength-based attacks, most notably your melee weapon. The gloves can be taken from a pedestal in the archive of the House of Hope.
Boots of Persistence
The Boots of Persistence permanently grant the wearer Freedom of Movement and Longstrider, improving your movement speed and preventing you from being slowed by difficult terrain, entangled, paralysed or magically restrained. This reduces the amount of ways that enemies can try to stun or immobilise your Barbarian. These boots can be purchased from Dammon in the Forge of the Nine in the Lower City, Act III.
Amulet of Greater Health
The Amulet of Greater Health sets your Constitution to 23 and gives Advantage on Constitution Saving Throws. A higher Constitution means more HP. Can be taken from a pedestal in the archive of the House of Hope.
Killer’s Sweetheart
With the Killer’s Sweetheart ring equipped, once per Long Rest, you gain a guaranteed Critical Hit on your next attack after killing an enemy. This item would be better if it could be triggered more frequently, but it’s still a useful effect. It is found inside the Self-Same Trial in the Gauntlet of Shar.
Balduran’s Giantslayer
A Legendary Greatsword, Balduran’s Giantslayer is arguably the strongest melee weapon in the game. It doubles the damage bonus from your Strength Modifier when attacking (if you have the Gauntlets of Hill Giant Strength, this improves a +6 modifier to +12). It grants you Advantage when attacking large, huge or gargantuan enemies, and once per Short Rest allows you to enlarge yourself, gaining extra damage, Temporary HP and Advantage on Strength checks.
Balduran’s Giantslayer is looted from Ansur in the Dragon’s Sanctum. To find out how to access the Dragon’s Sanctum, follow this guide on How to find the Helm of Balduran – both items are located in the same room.
Wildheart Barbarian Extra Info
Finally, here is some info that will help you to play and get the most out of this Baldur’s Gate 3 Wildheart Barbarian Build.
How to Play the BG3 Barbarian Build
In this section, we will explain how to get the most out of this Barbarian Build.
Managing Rage and Frenzy
- Your Rage/Frenzy boosts your damage output and Physical Resistance, so you should activate it in most combat scenarios. But keep the following limitations in mind:
- When Enraged, your Barbarian cannot activate any Spells (including spells that come from your Race or equipped items). If you plan to cast a Spell during combat, you should not use your Rage.
- Rage is cancelled if you do not take or deal damage for a full turn. Don’t activate it if you have no enemies nearby, because the Rage Charge will probably be wasted. Always enrage and attack on the same turn.
- If you forget to activate Rage at the start of the turn, it’s normally better to wait until the beginning of the next turn before activating it, just in case you get stunned or immobilised in the meantime.
This takes us to the next important consideration you should have when playing a Barbarian.
Plan Your Moves!
Once you know how Rage works and have a basic grasp of the combat rules of Baldur’s Gate 3, the next most important thing to learn about the Barbarian is that you need to plan your moves before you make them. In truth, this applies to any class in the game, but it’s especially important for Barbarians because of the aforementioned Rage/Frenzy limitations.
At the beginning of combat, decide if you will use your Barbarian’s Rage immediately or if you want them to cast a spell first. Have an idea of which enemy your Barbarian will attack first, and decide when you will activate your Rage. You may need to change your plan because of how combat evolves, but making a quick mental plan for all four of your party members will make battles significantly less challenging. You’ll get better at this with experience, but you can begin doing it even as a beginner.
Don’t Be Careless
The Barbarian’s physical damage resistance when enraged makes them one of the most durable classes in the game, and their huge melee damage potential and aggressive nature make it easy to get carried away and charge straight into the fray.
While it is ideal for the Barbarian to choose a target and close to melee range as fast as possible, you should still exercise a bit of caution. No matter how good your build is and how much endgame equipment you give a character, they will be rapidly cut down if you carelessly get them surrounded by multiple enemies, particularly if one of them is a boss (this is doubly true if you play on Tactician or Honour mode). This ties into the planning mentioned above: always try to gauge the strength of each enemy, and don’t send your Barbarian to fight four guys at the same time without any help.
In short, the Barbarian should be aggressive but not foolhardy.
Strongest Potions for the Wildheart Barbarian Build in BG3

The ![]() Potion of Speed is arguably the most powerful potion in Baldur’s Gate 3. It doubles your Movement Speed and gives you an
Potion of Speed is arguably the most powerful potion in Baldur’s Gate 3. It doubles your Movement Speed and gives you an ![]() extra Action each turn.
extra Action each turn.
One drawback of this potion is that when it expires, your character will be ![]() Lethargic for one turn, unable to move or take any
Lethargic for one turn, unable to move or take any ![]() Actions. So you should be careful not to have your character stranded in a dangerous position when the potion runs out!
Actions. So you should be careful not to have your character stranded in a dangerous position when the potion runs out!
You can craft the Potion of Speed in the alchemy menu by combining ![]() Ashes of Hyena Ear with any Salt. Create ashes, salts and other alchemy concentrates by combining three of the same ingredients together – for example, combining three
Ashes of Hyena Ear with any Salt. Create ashes, salts and other alchemy concentrates by combining three of the same ingredients together – for example, combining three ![]() Hyena Ears will create
Hyena Ears will create ![]() Ashes of Hyena Ear.
Ashes of Hyena Ear.
Hyena Ears can normally be looted from either Hyenas or Gnolls – you can find a lot of them around the Risen Road in Act I, for a good supply of them, which should last you a while.
You can combine this with the ![]() Elixir of Bloodlust. Elixirs and Potions can be stacked with each other, but you can only have one Elixir active at a time. Potions tend to expire after a few turns, whereas Elixirs last until your next Long Rest, unless you drink a different Elixir in the meantime.
Elixir of Bloodlust. Elixirs and Potions can be stacked with each other, but you can only have one Elixir active at a time. Potions tend to expire after a few turns, whereas Elixirs last until your next Long Rest, unless you drink a different Elixir in the meantime.
The ![]() Elixir of Bloodlust grants your character another
Elixir of Bloodlust grants your character another ![]() Action when you kill an enemy. This effect can only trigger once per turn. Combined with the
Action when you kill an enemy. This effect can only trigger once per turn. Combined with the ![]() Potion of Speed, this gives you two additional attacks if you defeat an enemy on your turn.
Potion of Speed, this gives you two additional attacks if you defeat an enemy on your turn.
It can be crafted by combining ![]() Ashes of Worg Fang with any Salt.
Ashes of Worg Fang with any Salt. ![]() Worg Fangs are looted from Worgs, the beasts usually kept by Goblins.
Worg Fangs are looted from Worgs, the beasts usually kept by Goblins.
This is an OP alchemy combo that you can use to turbocharge the Barbarian’s damage output in tough fights!
Wildheart Barbarian Build Illithid Powers (optional)

Illithid Powers are unlocked later in BG3 when you learn more about Mind Flayers and Tadpoles. By eating Jars of Mind Flayer Parasites you gain one point. This is another optional skill tree that you can get access to if you want. Here are some of the best Illithid Powers for the BG3 Barbarian Build with the Wildheart subclass:
 Mind Blast: A conal blast of Psychic Damage that can also stun several targets at once. If you are outnumbered by several advancing enemies, then Mind Blast can help to swing things back in your favour.
 Cull the Weak: When you reduce a creature’s hit points below a certain threshold, this power instantly kills it and deals 1-4 Psychic Damage to nearby enemies. This is particularly effective when engaging groups of weaker foes, enabling you to thin their numbers rapidly.
 Fly: This can be used to reach hard to get to places or change positions in combat.
 Mind Sanctuary: This creates an area that allows all within to use Actions and
  Bonus Actions interchangeably. This typically means you can deal more damage, since you can use your Bonus Action as a normal Action. However, enemies who are inside the area will also enjoy its benefits. Be careful with your placement so that your party gets buffed by the Mind Sanctuary and not the enemies!
 Psionic Backlash: This is a top-tier
  Reaction from the Illithid Powers skill tree in BG3. It allows you to deal Psychic Damage when a nearby enemy casts a spell. This is especially useful if the target is casting a Concentration Spell. The damage from Psionic Backlash can immediately break their Concentration, ending the spell’s effects.
Other Baldur’s Gate 3 Builds
- Druid Build – Circle of the Moon
- Bard Build – College of Lore
- Ranger Build – Hunter
- Monk Build – Way of Shadow
- Monk Build – Way of the Four Elements
- Monk Build – Way of the Open Hand
- Necromancer Build – Necromancy
- Fighter Build – Battle Master
- Warlock Build – Great Old One
- Cleric Build – Light Domain
- Rogue Build – Thief
- Sorcerer Build – Wild Magic
- Wizard Build – Evocation School
- Paladin – Oath of Ancients
- More Baldur’s Gate Guides & Builds
If you want to check out the map of Baldur’s Gate 3, please visit the Baldur’s Gate 3 Interactive Map.
The post Best Wildheart Barbarian BG3 Build – Maximum Power! appeared first on AlcastHQ.


