The First Descendant: Dia Build & Best Loadout

Welcome to The First Descendant Dia Build Guide for Season 2 Void Chaser.
This is a template, Work in progress.
Table of Contents for the Dia Build:
- How to play Dia: A Deep Dive
- Dia Builds Overview
- Ultimate Dia Build: N/A
- Dia Equipment Overview
- Dia Basics
- Dia’s Story
In this guide, we’ll show you how to unleash the full potential of Dia, the first character with a lance in The First Descendant. The build will include the perfect weapons, stats, and modules, this guide covers everything you need to create a truly devastating build for Dia. Whether you’re looking to dominate enemies in AoE farming, boss fights, or with a budget-friendly setup, we’ve got you covered.
For builds on other Descendants, visit our The First Descendant Builds Database or check out The First Descendant Tier List – Best Characters. All Dia Build Setups are compatible with each other.
Here is a quick list of the strengths and weaknesses of the Dia Build for The First Descendant.
Dia’s Strengths
Dia Weaknesses
How to Play Dia in the First Descendant

In this section we are going to take a look at how Dia works in The First Descendant. Dia is an X. Learn about her skills in detail in Dia’s Skill Explanation section. Dia’s Transcendent Modules are X!
Dia’s AoE Capabilities: X
Dia’s role is described as an X
XXX
– For more challenging dungeons or content, the Dia Dungeon Build balances AoE damage power with survivability.
Dia’s Single Target Damage: X
While DiaX
XXX
- The Dia Bossing Build offers solid survivability, sustain and great damage with a short cooldown on Dia’s skills.
Dia’s Equipment: Make Or Break It!
To unlock Dia’s full potential, you need the right Weapons, Reactors, and External Components:
- Weapons: Focus on two general damage-dealing weapons and one weapon tailored to whatever you need for utility or special mechanics. See the Best Weapons for Dia section.
- Reactors: Selecting the right reactor can drastically boost your damage. Check out the Best Reactors for Dia section.
- External Components: These are critical for survivability. Properly configured, they double or tripple your HP or DEF. Learn more in the Best External Components for Dia section.
Building a top-tier The First Descendant Dia Build requires not only the right modules but also optimized weapons, reactors, and components.
Best Dia Builds Overview for The First Descendant

In this section, we are going to look at the different best Dia Build Setups for The First Descendant. The optimized setups require a lot of Crystallization Catalysts. We have a full guide on how to farm Crystallization Catalysts in The First Descendant. The Budget setup requires no Crystallization Catalysts.
All Dia build setups require an Energy Activator to increase the Module Capacity. We also have an in-depth guide on how to farm Energy Activators in The First Descendant. Additionally, you will need plenty of Kuiper Shards and Gold to increase Module Levels. Here are the Top 3 Kuiper Shard farm spots!
Equipment: I will cover Weapons, Reactors, and External Components in the Dia Equipment section. To maximize the power of any build, you must get the correct items!
- How to get Modules: Read the Module Farming section.
- 85 Module Capacity How? Read the basics Module section.
| Name | Description |
|---|---|
| Dia Farming Build | Used for maximum efficiency farming. |
| Dia Dungeon Build | Used in 250-400% difficulty Dungeons, Void Erosion Purge or generally harder content. |
| Dia Bossing Build | Used against Colossus fights. |
| Dia Budget Build | Easy starter setup to begin developing her. |
| Ultimate Dia Bossing Build | Not yet released |
Note: These Dia Builds are built with each other in mind to save you Crystallization Catalysts. Only in a few slots it may require you to have two different Crystallization types.
Dia Dungeon Build
Dia Bossing Build for The First Descendant
Dia Budget Build for The First Descendant
X
Best Ultimate Dia Build – The First Descendant
- Ultimate Bossing Build Type: N/A
- Ultimate Bossing Build Focus: N/A
Note: Ultimate Dia has not been released yet. Once Ultimate Dia is available, I will update this section of the guide.
Dia Equipment Overview in The First Descendant
Equipment is the cornerstone of any successful The First Descendant Build. For Dia, having the right setup can mean the difference between dominating a dungeon and falling short. This section breaks down the essential equipment types—Weapons, Reactors, External Components, and Transcendent Modules—and explains how they maximize her power.
| Equipment Type | Importance | Key Benefits |
|---|---|---|
| Weapons |
|
|
| Reactors |
|
|
| External Components |
|
|
| Transcendent Modules |
|
|
Best Weapon for the Dia Build in The First Descendant
Here, you will find the Top 3 Weapons for Dia in The First Descendant that I love to run, among some alternative weapons that you can also test out if you want.
Don’t forget to have the needed Reactor Optimization Condition with the correct weapon types, otherwise, your skills will deal much less damage!
| Weapon | Category | Key Features | Why It’s Great for Dia |
|---|---|---|---|
| Enduring Legacy | Machine Gun |
|
|
| Voltia | Beam Rifle |
|
|
| X | X |
|
|
Additionally, I want to present you a few alternative weapon options that you can use for our The First Descendant Dia Build!
| Weapon | Category | Key Features | Why It’s Great for Dia |
|---|---|---|---|
| Smithereens | Shotgun |
|
|
| Thunder Cage | Submachine Gun |
|
|
Enduring Legacy Weapon Build Setup
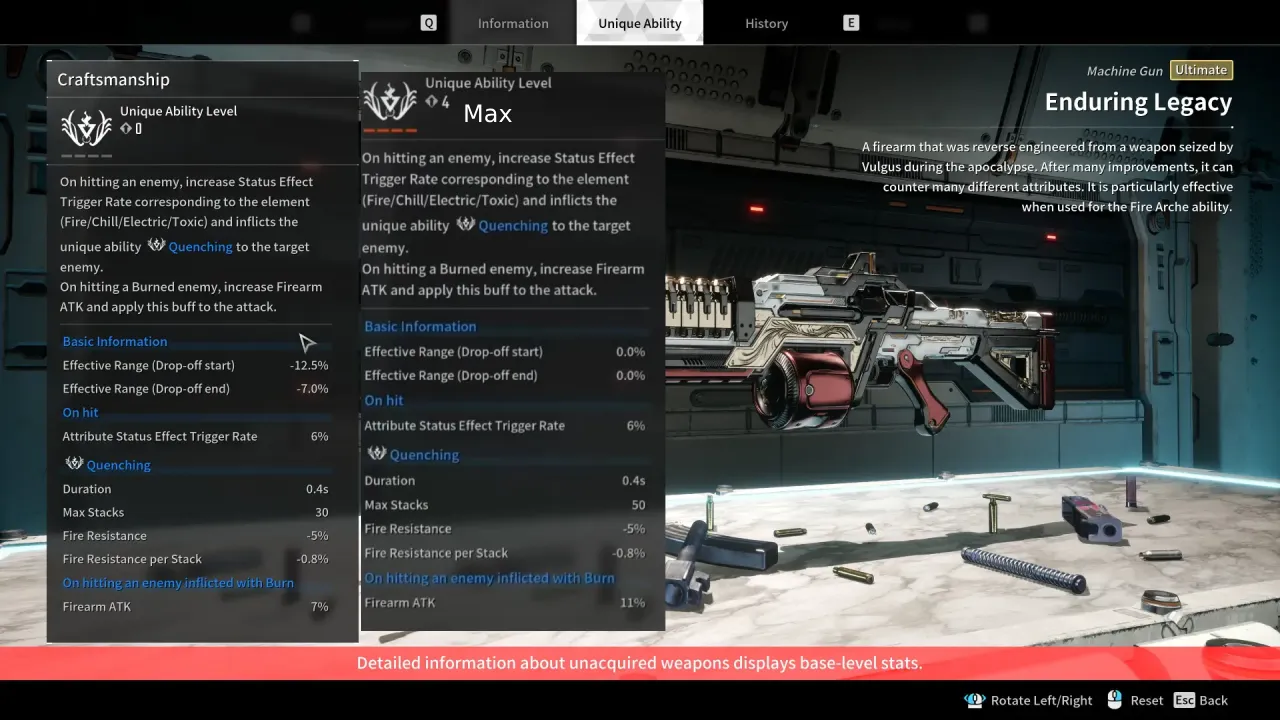
Enduring Legacy is one of the most powerful weapons in The First Descendant. It is best built with a high crit rate and crit damage as well as a focus on Fire ATK due to its unique ability that lowers the enemy’s Fire Resistance. It is recommended to get the unique ability to max stacks. That means you will have to farm 5 copies of this weapon (1x + 4x to absorb).
Recommended Weapon Rolls:
- Firearm ATK
- Firearm Critical Hit Rate
- Firearm Critical Hit Damage
- Bonus Firearm ATK (vs Colossus)
How to get Enduring Legacy in The First Descendant.
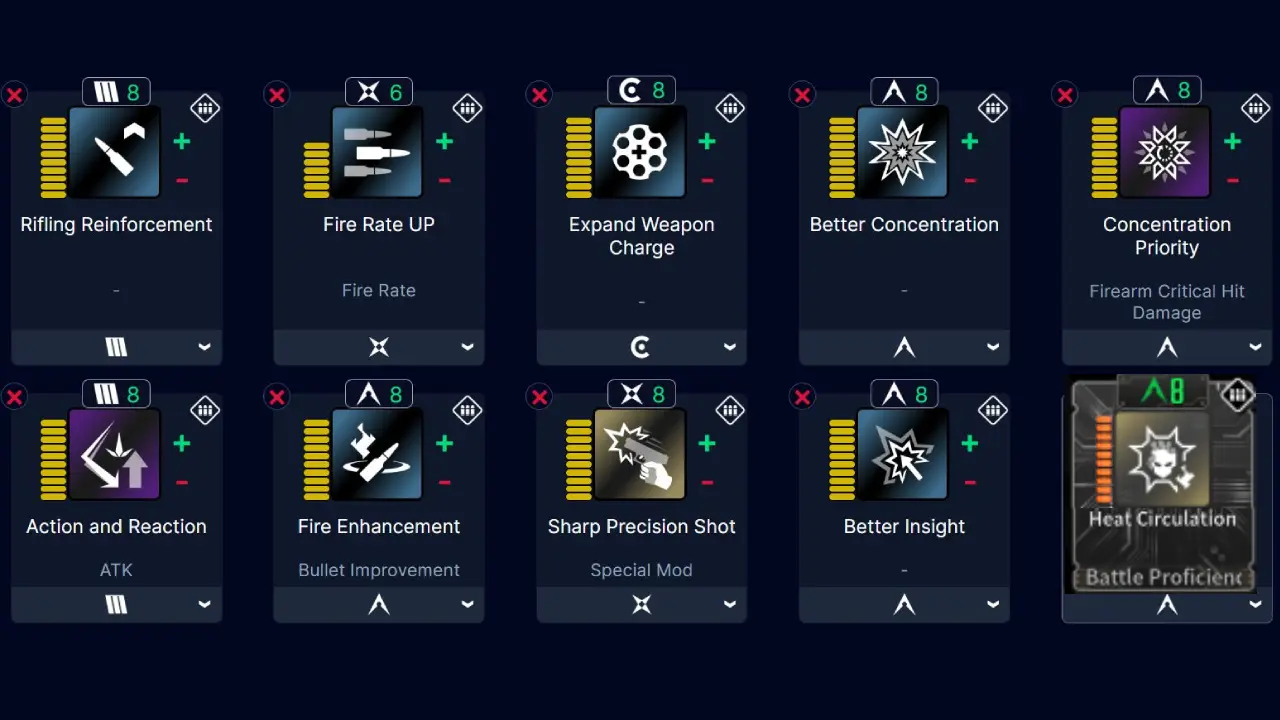
Enduring Legacy Modules Explanation:
- Rifling Reinforcement: + Firearm ATK
- Fire Rate UP: + Fire Rate
- Expand Weapon Charge: + Rounds per Magazine
- Better Concentration: + Firearm Critical Hit Damage
- Concentration Priority: + Firearm Critical Hit Damage, – Reload Time Modifier
- Action and Reaction: + Firearm ATK, + Recoil
- Fire Enhancement: Adds Fire ATK equal to 30% of Firearm ATK
- Sharp Precision Shot: – Fire Rate. While pulling the trigger, + Fire Rare, – Recoil and Firearm ATK +6% every 0.5s, max 10 stacks.
- Better Insight: + Firearm Critical Hit Rate
- Heat Circulation: Upon inflicting Burn Effect, increases Firearm ATK by 90% for 5 seconds (20s cooldown).
| Slot | Module | Mod Level | Socket Type | Crystallized |
|---|---|---|---|---|
| 1 | Rifling Reinforcement | Max | Yes | |
| 2 | Fire Rate UP | Max | Yes | |
| 3 | Expand Weapon Charge | Max | Yes | |
| 4 | Better Concentration | Max | Yes | |
| 5 | Concentration Priority | Max | Yes | |
| 6 | Action and Reaction | Max | Yes | |
| 7 | Fire Enhancement | Max | Yes | |
| 8 | Sharp Precision Shot | Max | Yes | |
| 9 | Better Insight | Max | Yes | |
| 10 | Heat Circulation | Max | Yes |
Voltia Weapon Build Setup
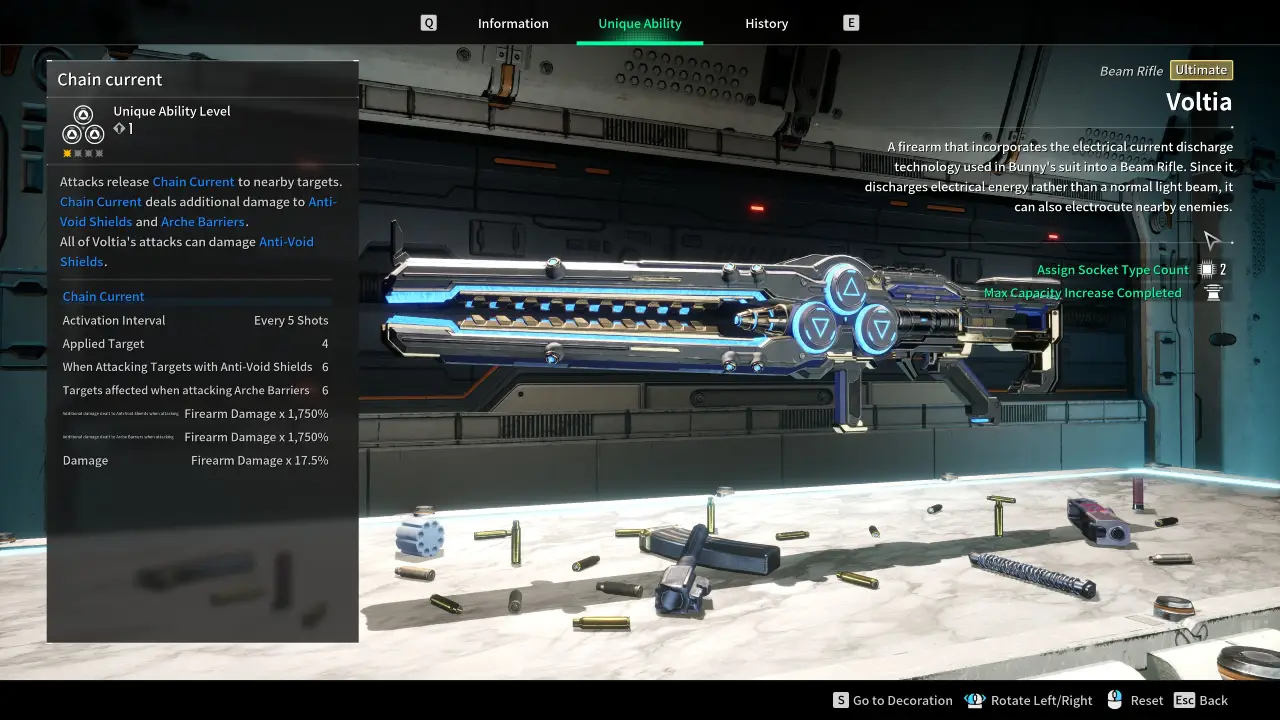
Voltia is a strong beam rifle that shreads through Anti-Void Shields and Arche Barriers. This is the main usage of the weapon, to get rid of the enemy shields that are otherwise extremely hard to destroy.
Recommended Weapon Rolls:
- Firearm ATK
- Firearm Critical Hit Rate
- Firearm Critical Hit Damage
- Elemental ATK (Chill/Fire)
How to get Voltia in The First Descendant.
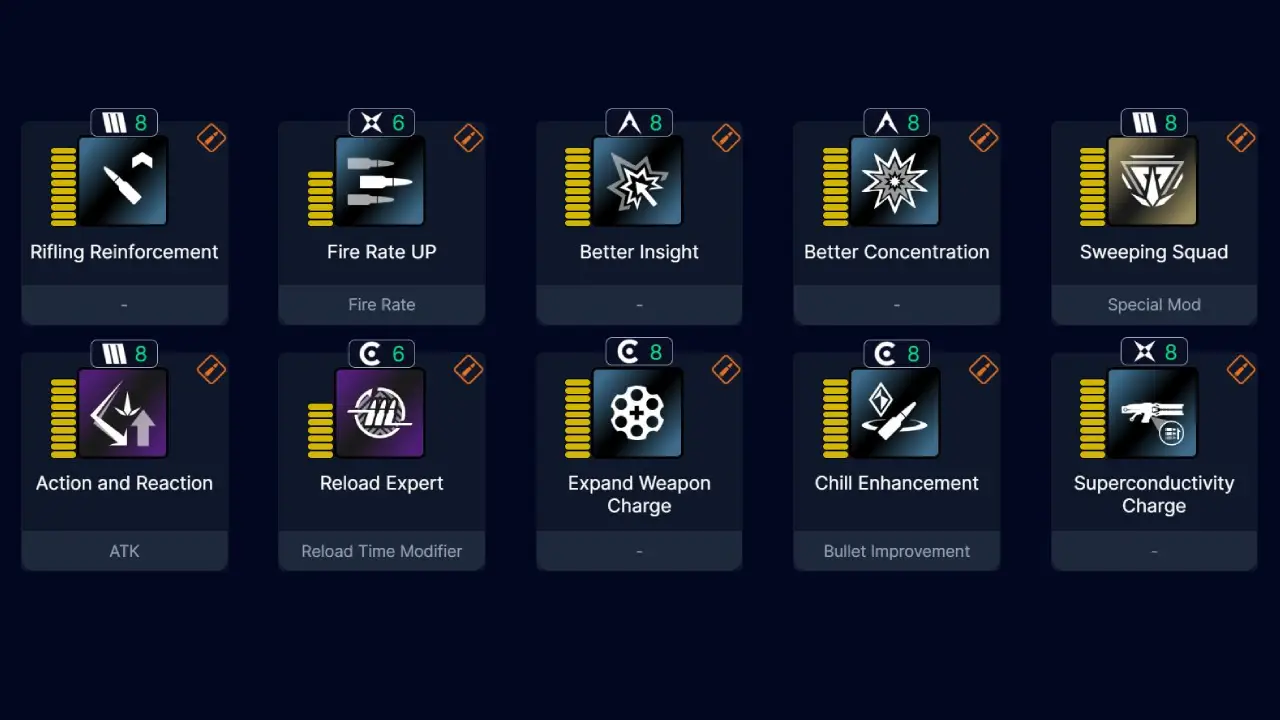
Voltia Modules Explanation:
- Rifling Reinforcement: + Firearm ATK
- Fire Rate UP: + Fire Rate
- Better Insight: + Firearm Critical Hit Rate
- Better Concentration: + Firearm Critical Hit Damage
- Sweeping Squad: + Firearm ATK when defeating an enemy, stacks 3 times.
- Action and Reaction: + Firearm ATK, + Recoil
- Reload Expert: + Reload Time Modifier, + Firearm ATK
- Expand Weapon Charge: + Rounds per Magazine
- Chill Enhancement: Adds Chill ATK equal to 30% of Firearm ATK
- Superconductivity Charge: Beam Rifle Charging Speed +40%
| Slot | Module | Mod Level | Socket Type | Crystallized |
|---|---|---|---|---|
| 1 | Rifling Reinforcement | Max | Yes | |
| 2 | Fire Rate UP | Max | Yes | |
| 3 | Better Insight | Max | Yes | |
| 4 | Better Concentration | Max | Yes | |
| 5 | Sweeping Squad | Max | Yes | |
| 6 | Action and Reaction | Max | Yes | |
| 7 | Reload Expert | Max | Yes | |
| 8 | Expand Weapon Charge | Max | Yes | |
| 9 | Chill Enhancement | Max | Yes | |
| 10 | Superconductivity Charge | Max | Yes |
Smithereens Build – Maximize the Pump
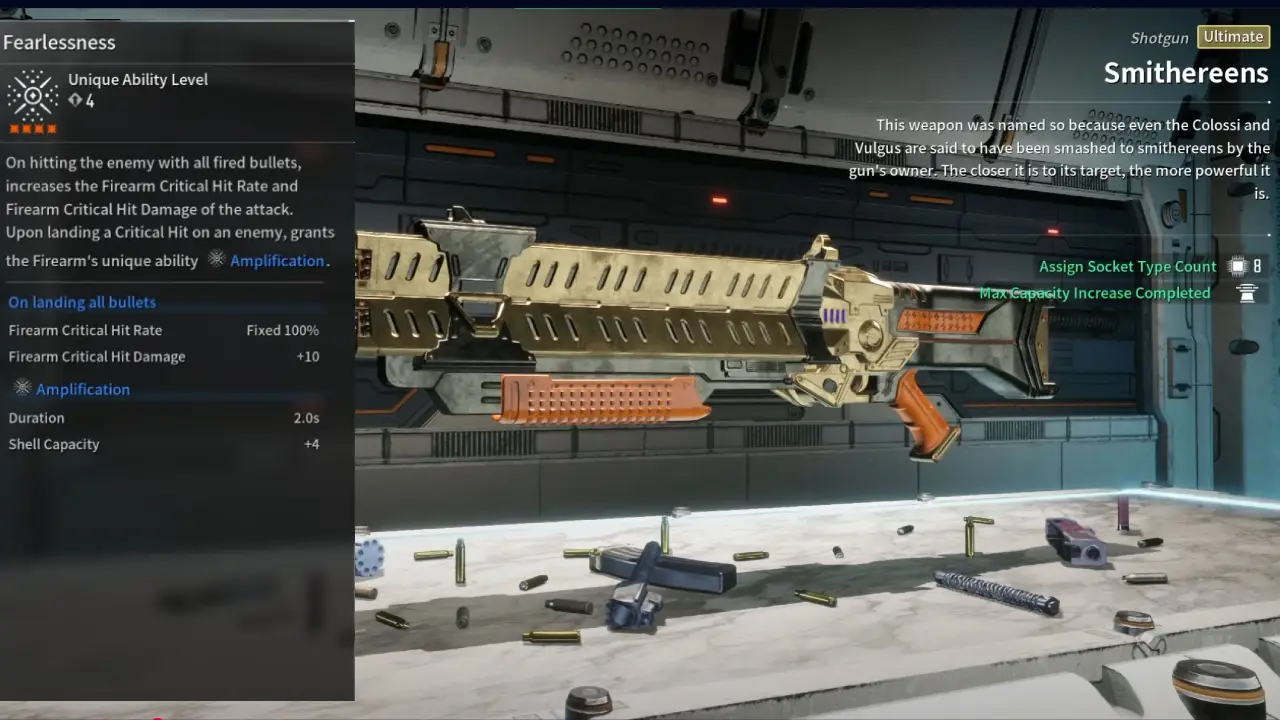
The Smithereens Shotgun can be used against high-health elites. You can unload a full clip into the enemy with insane damage. Make sure to hit the weak point of the enemy because we have weak point mods active. Additionally, if you want to use another element, make sure to swap out the chill elemental mods. You will get the most damage out of this shotgun in the first few seconds.
Recommended Weapon Rolls:
- Firearm ATK
- Weak Point Damage
- Firearm Critical Hit Damage
- Rounds per Magazine
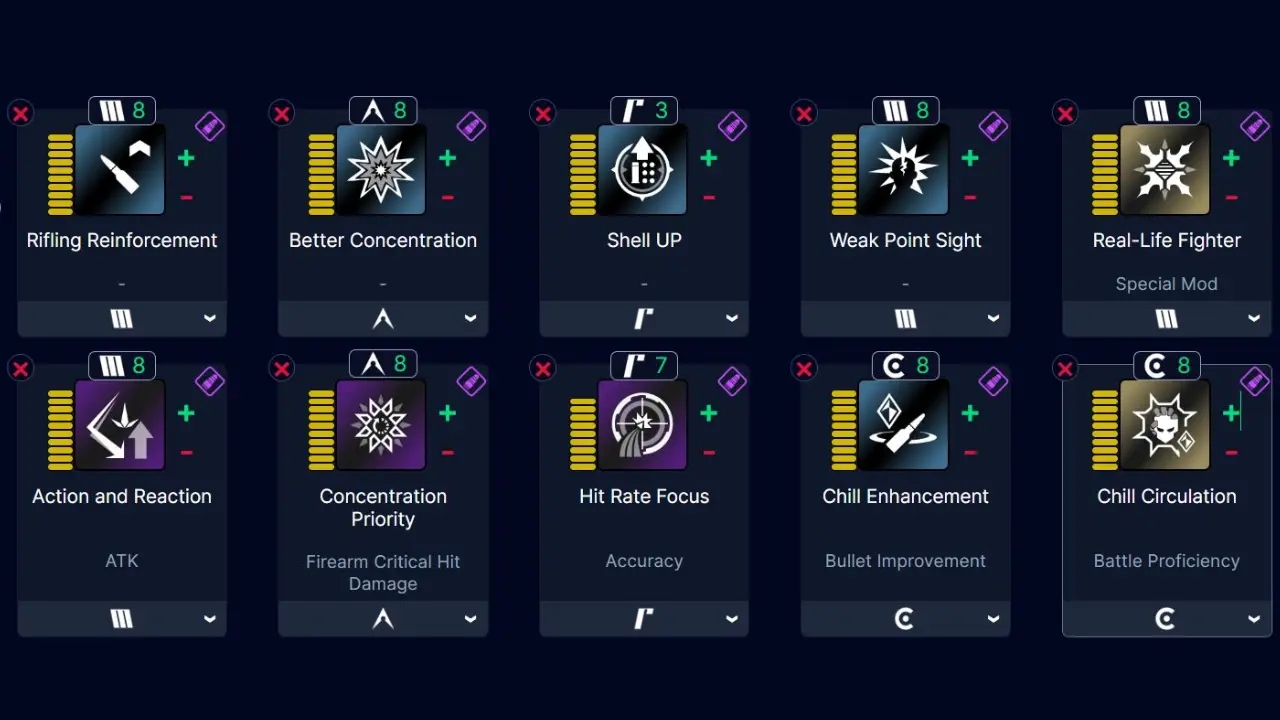
Smithereens Modules Explanation:
- Rifling Reinforcement: + Firearm ATK
- Better Concentration: + Firearm Critical Hit Damage
- Shell UP: + Shell Capacity
- Weak Point Sight: + Weak Point Damage
- Real-Life Fighter: Upon hitting Weak Point, + Firearm ATK, 10 stacks.
- Action and Reaction: + Firearm ATK, + Recoil
- Concentration Priority: + Firearm Critical Hit Damage, – Reload Time Modifier
- Hit Rate Focus: b+ Firearm Critical Hit Damage, + Accuracy
- Chill Enhancement: Adds Chill ATK equal to 30% of Firearm ATK
- Chill Circulation: + Upon inflicting Freeze effect, increases Frost ATK for 5 seconds.
| Slot | Module | Mod Level | Socket Type | Crystallized |
|---|---|---|---|---|
| 1 | Rifling Reinforcement | Max | Yes | |
| 2 | Fire Rate UP | Max | Yes | |
| 3 | Expand Weapon Charge | Max | Yes | |
| 4 | Better Concentration | Max | Yes | |
| 5 | Concentration Priority | Max | Yes | |
| 6 | Action and Reaction | Max | Yes | |
| 7 | Insight Focus | Max | Yes | |
| 8 | Weak Point Sight | Max | Yes | |
| 9 | Better Insight | Max | Yes | |
| 10 | Sweeping Squad | Max | Yes |
Thunder Cage Build – Everyone has it
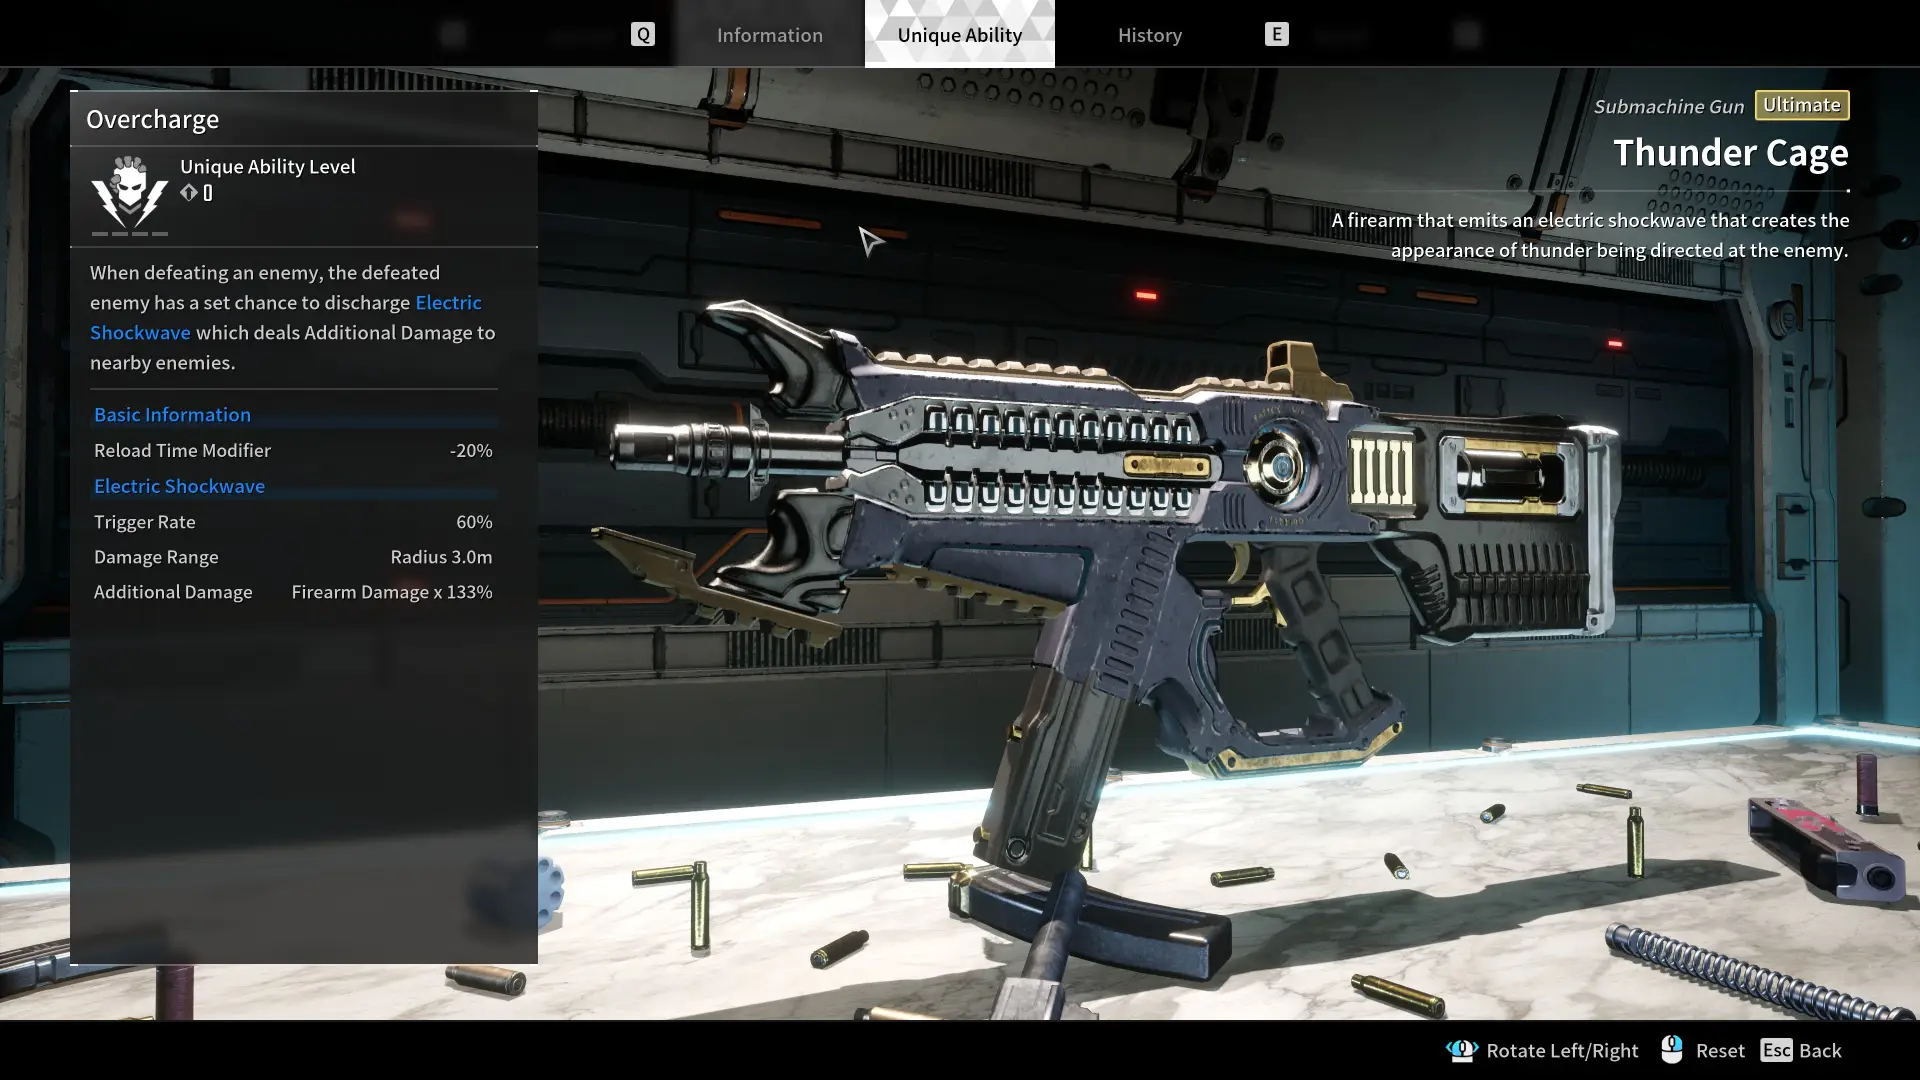
Thunder Cage is a weapon everyone owns because it is part of the main storyline. The Thunder Cage Submachine Gun excels at AoE damage because of its unique Overcharge ability that causes Electric Shockwaves. However, you can also spec it for Single-Target. This makes mostly sense if you don’t have any other weapon yet. Enduring Legacy deals way more Single-Target. Obviously, we don’t need an AoE weapon on Dia because her skills already obliterate anything. But like I said, if you don’t have anything else you should give this alternative option for the Dia Build a try.
Recommended Weapon Rolls:
- Firearm ATK
- Firearm Critical Hit Rate
- Cirearm Critical Hit Damage
- Electric ATK
How to get Thunder Cage in The First Descendant.
Here is an allrounder Thunder Cage setup that you can use.
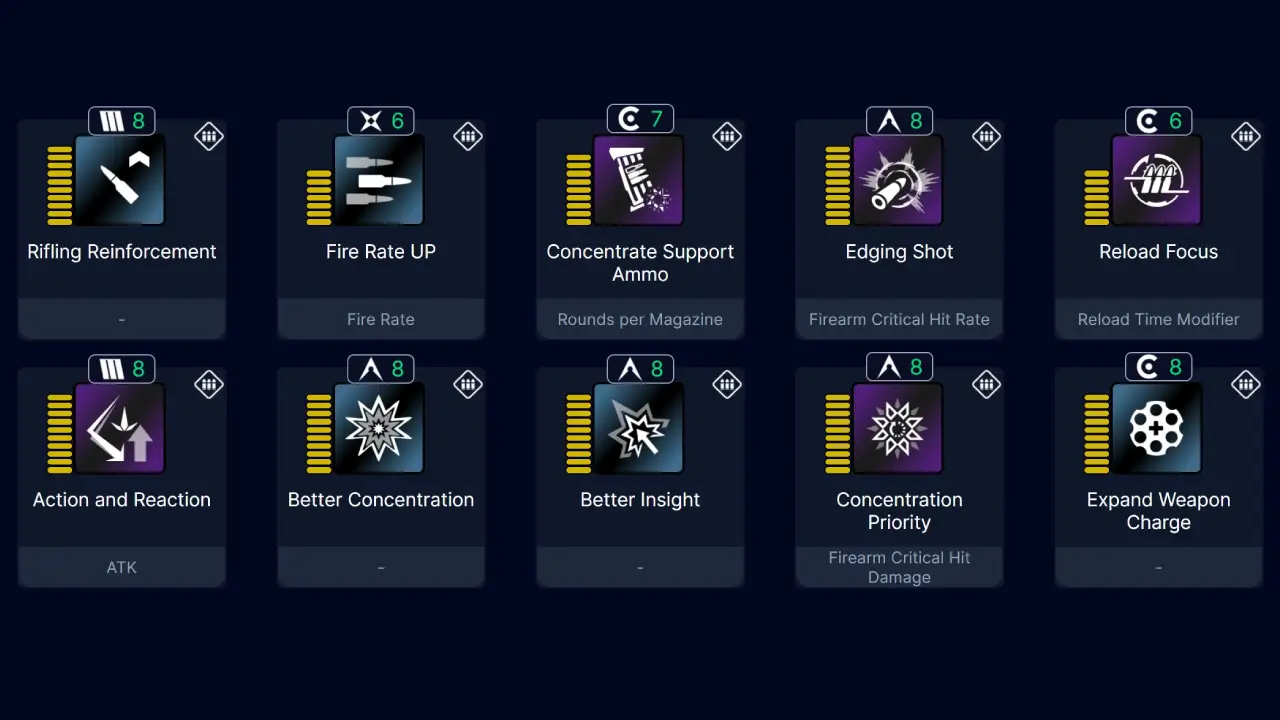
Allrounder Thunder Cage Modules Explanation:
- Rifling Reinforcement: + Firearm ATK
- Fire Rate UP: + Fire Rate
- Concentrated Support Ammo: + Rounds per magazine, + Firearm Critical Hit Damage
- Edging Shot: + Firearm Critical Hit Rate, – Firearm ATK
- Reload Focus: + Reload Time Modifier, + Firearm Critical Hit Damage
- Action and Reaction: + Firearm ATK, + Recoil
- Better Concentration: + Firearm Critical Hit Damage
- Better Insight: + Firearm Critical Hit Rate
- Concentration Priority: + Firearm Critical Hit Damage, – Reload Time Modifier
- Expand Weapon Charge: + Rounds per Magazine
| Slot | Module | Mod Level | Socket Type | Crystallized |
|---|---|---|---|---|
| 1 | Rifling Reinforcement | Max | Yes | |
| 2 | Fire Rate UP | Max | Yes | |
| 3 | Concentrated Support Ammo | Max | Yes | |
| 4 | Edging Shot | Max | Yes | |
| 5 | Reload Focus | Max | No | |
| 6 | Action and Reaction | Max | Yes | |
| 7 | Better Concentration | Max | Yes | |
| 8 | Better Insight | Max | Yes | |
| 9 | Concentration Priority | Max | Yes | |
| 10 | Expand Weapon Charge | Max | Yes |
Best Reactor for Dia in The First Descendant
Selecting the best reactor for Dia in The First Descendant can significantly enhance her abilities, allowing you to maximize her effectiveness in various scenarios. Not only does the reactor determine your skill damage, but it also gives additional secondary benefits through modifiers. These are often hard to get and take time to grind out!
All of Dia’s skills are X. Additionally, you want to get the correct mounting (Optimization Condition) to benefit from the 160% boost.
It is hard to get a Reactor with two best in-slot specs. However, you should be able to get a Reactor with at least one good spec. I will highlight the more important spec in bold in the table below.
| Best Reactor | Specs | Key Benefits | Best Builds |
|---|---|---|---|
| X Reactor |
|
Maximizing Colossus Damage. | |
| X Reactor |
|
Overall best damage for Farming/Dungeons.. | |
| X Reactor |
|
Increased skill range and bounces but slightly lower damage. |
Dia Reactor Optimization Condition
To get the 160% boost, it is important to have the correct mounting type (Optimization Condition) on your Reactor for Dia. You can add up to three different mounting types! This is important, so when you swap your weapon you don’t lose the 160% boost!
Here is one example of a powerful X Reactor for the Dia Build.
How to find the Location of Reactors
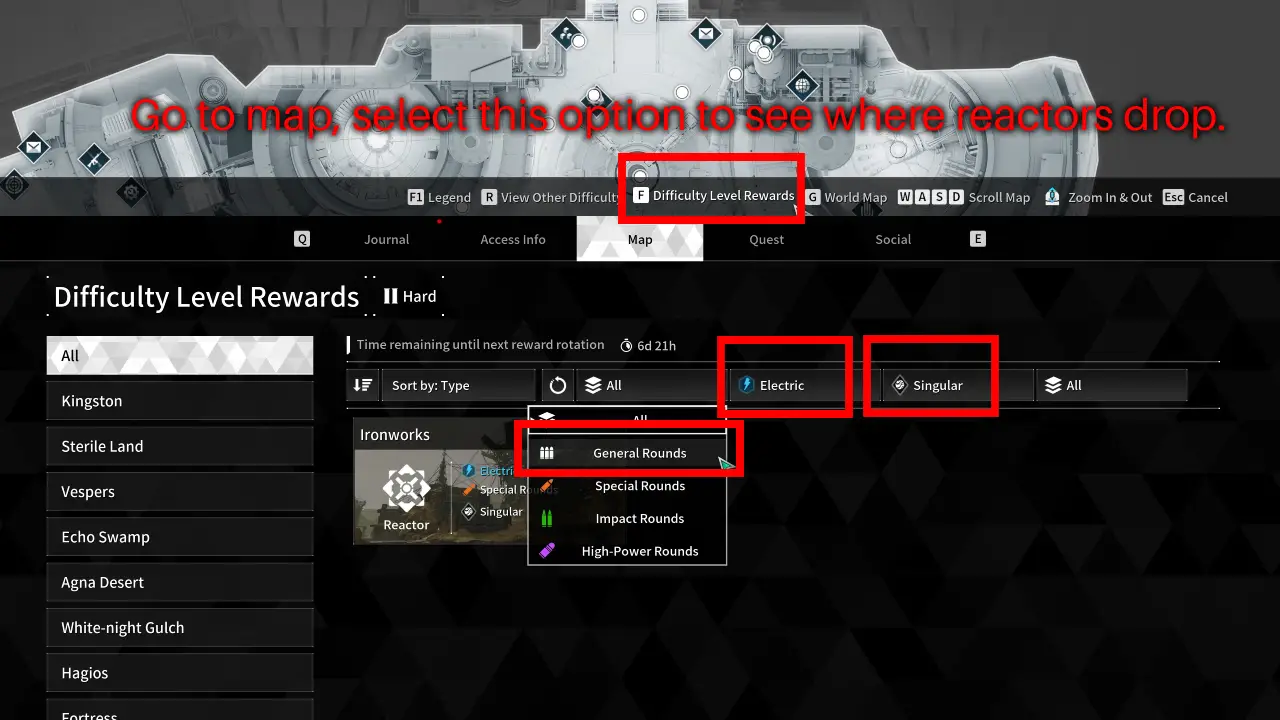
Reactor drop locations change every day. Not many players know this. Now there is a reactor search function in-game. Go to the map and press on Difficulty Level Rewards. In here you can see where currently all the reactors drop.
Note: It is possible that no such reactors drop currently. Come back here every day and check if one drops.
If our specified reactor drops in an area, you go there and farm missions and monsters. There will be plenty of reactors dropping from monsters all over the place, any monster works. It will take a while to get a good reactor!
Best External Components for the Dia Build
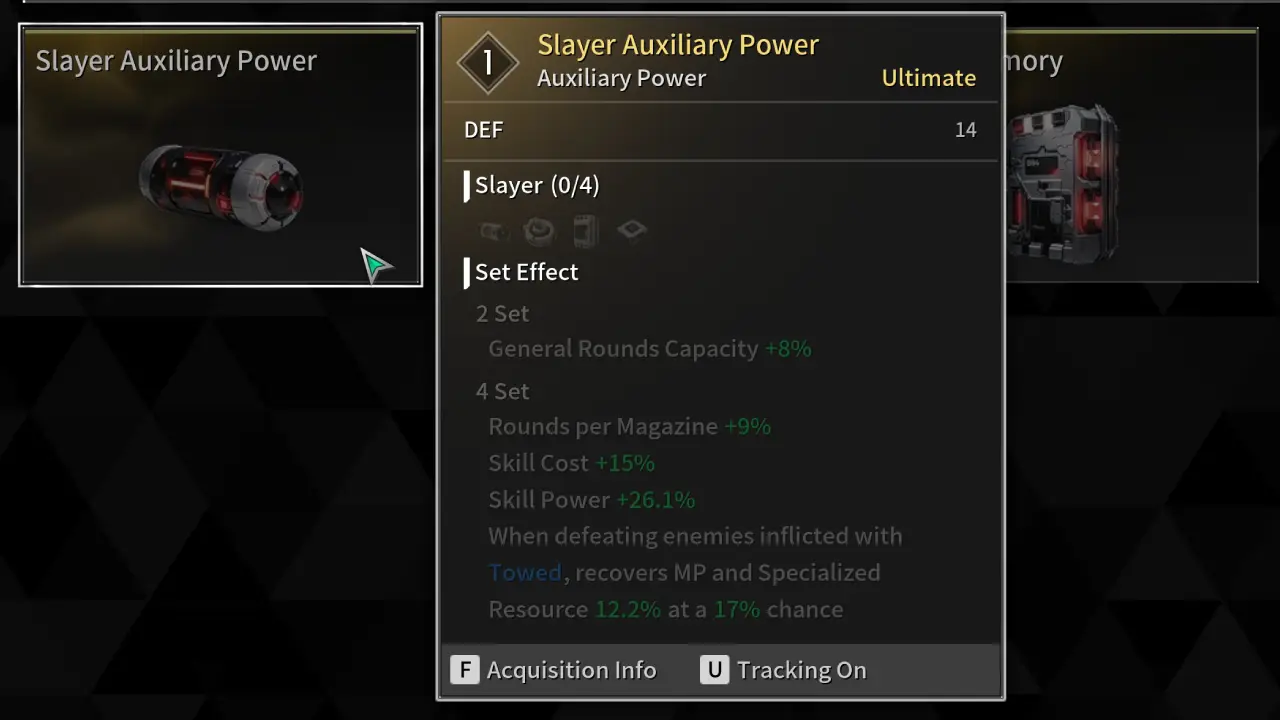
The best External Components set that works with the Dia Build is called the Slayer Set. It drops only Pyromaniac Colossus on hard difficulty in The First Descendant.
Slayer Set Bonuses:
- 2 Set Bonus:
- General Rounds Capacity +8%
- 4 Set Bonus:
- Rounds per Magazine +9%
- Skill Cost +15%
- Skill Power 26.1%
- When defeating enemies inflicted with Towed, recovers MP and Specialized Resource by 12.2% at a 17% chance.
| External Component Part | Base Stats | Selective Best Stats |
|---|---|---|
| Slayer Auxiliary Power | DEF |
|
| Slayer Sensor | Max Shield |
|
| Slayer Memory | Max Shield |
|
| Slayer Processor | Max HP |
|
Alternative External Components for Dia
If you don’t have access to the Slayer Set yet, it is best to focus on any External Components you find with HP or DEF as base stats. This will make your gameplay a lot easier, especially if you are still new to The First Descendant. The secondary selective stats don’t really matter. Of course it would be great to get more HP and DEF, but if you can’t find any don’t worry too much about it. The HP and DEF from the base stats already does help more than enough.
| External Component Part | Base Stats | Selective Best Stats |
|---|---|---|
| Any Auxiliary Power | HP |
|
| Any Sensor | HP |
|
| Any Memory | DEF |
|
| Any Processor | DEF |
|
All Dia Transcendent Modules Explained
First, let us look at the full list of all Transcendent Modules for Dia in The First Descendant. It is important to note that not all of the modules will be used. Some are more effective than others!
X Transcendent Module
- X
- X is an Dia-exclusive Transcendent Module.
How to get Dia’s X Module:
- Kingston: Slumber Valley (Hard Difficulty)
- Obstructor (Hard Difficulty)
- Module Combine.
X Transcendent Module
X is a Dia-exclusive Transcendent Module.
How to get Dia’s X Module:
- Hagios: The Haven (Hard Difficulty)
- Frost Walker (Hard Difficulty)
- Module Combine.
Dia Basics in The First Descendant
If it is your first time playing Dia in The First Descendant, here are some useful things you should know.
- How to unlock Dia
- Dia Skills Explanation – Master Dia’s Abilities
- Module Basics Explained!
- Best Grapple Hook for Dia
How to Unlock Dia in The First Descendant
Let’s take a quick look at how to unlock Dia in the First Descendant. To unlock Dia, you have to purchase her from the store, or research her. You need the following items to research Dia:
- 1x Dia Enhanced Cells
- Location: X
- 1xDia Stabilizer
- Location: X
- 1x Dia Spiral Catalyst
- Location: X
- 1x Dia Code
- Location: X
- 400k Credits
When you visit Magisters Anais at the Research Institute you can hover over each item. Then click on Acquisition Info and it will tell you where this specific item drops.
The First Descendant Dia Skills Explained
In this section, we will explain the skills available to our Dia Build in the First Descendant, how each skill works, and the best ways for you to use them.
Dia’s skill loadout is themed around electric, applying electric damage to many enemies at once in a big radius.
| Skill Name | Type | Effect | Best Use Case |
|---|---|---|---|
 X X |
AoE | AoE Damage | |
 X X |
AoE | Utility | |
 X X |
AoE | Utility | |
 X X |
AoE, Snare | Snare & AoE Damage | |
 X (Passive) X (Passive) |
Passive | Is always active |
X Skill 1

X
X Skill Description:
- X
X Skill 2

X
X Description:
X
X Skill 3

X
X Description:
- X
X Skill 4

X
X Description:
- X
X (Passive)

X
X Passive Description:
- X
How Modules Work in The First Descendant
Modules are the bread and butter of all The First Descendant Builds. There are a few important things to remember about modules. This is for both Descendant and Weapon Modules.
While most builds require you to increase Module Capacity with an Energy Activator (you get two for free), they won’t require you to reduce the Module cost with Crystallization Catalyst. However, if you want to truly min-max a build, you will need plenty of these Catalysts.
- How to increase your Module Capacity
- Module Levels and Cost
- Reduce the cost of Modules
- How to farm Modules
How to Increase Module Capacity
You get a base of 45 Modules for every Descendant character. And you can increase this up to 85 currently. First off, always slot a Sub Attack Module (Slot 7). When you increase this to the max level you will get an additional 10 Module Capacity. if you use a Crystallization Catalyst on the Sub Attack Module, you even get 15 extra slots. You will see this in the setup below.
Additionally, you can use an Energy Activator to increase your Module Capacity by another 20. However, these are fairly hard to farm, only use them on your best Descendants.
Lastly, increasing your Mastery Rank will also increase Module Capacity. Rank 1 gives you 25 Module Capacity, Rank 20 gives you 50 Module Capacity. That is how we reach the 80 Module Capacity that you see on most builds.
- Slot a Sub Attack Module (and max it out to get +10 capacity, crystallize it for +15)
- Use an Energy Activator (2o extra capacity)
- Increase Mastery Rank (25 base capacity, max 50)
Weapons: Basically the same, but because you don’t have Subattack Modules, the Energy Activator gives you 30 instead of just 20 extra capacity.
You can also read my in-depth guide on how to increase Module Capacity in The First Descendant if you need more information. Or my Best Energy Activator Farm Spots and our Best Crystallization Catalyst Farm Spots. I tested all of the grind spots by myself and have already farmed plenty of these items with this method.
Module Levels and Cost
Modules can be enhanced (leveled up) with Kuiper Shards in The First Descendant. Enhancing Modules increases their power. At higher levels, the power will increase way more than at lower levels. Therefore it is always recommended to max out the most important Module first.
Here is an example of a must-have Module called Increased HP for our Descendant. You will notice that we start at 22%, but at the max level, we get a whopping 218.5% increase in health!
| Level | Capacity Cost | Power |
|---|---|---|
| 0 – Base | 6 | 22% |
| 1 | 7 | 31.2% |
| 2 | 8 | 41.4% |
| 3 | 9 | 54.4% |
| 4 | 10 | 69.8% |
| 5 | 11 | 87.2% |
| 6 | 12 | 108.2% |
| 7 | 13 | 130.2% |
| 8 | 14 | 155.2% |
| 9 | 15 | 184.5% |
| 10 | 16 | 218.5% |
Transcendent Modules are the exception; they decrease Capacity Cost with higher levels!
For an in-depth overview, please visit our How to Level Up Modules in The First Descendant guide.
How to Farm Kuiper Shards
Kuiper Shards are used to level up Modules. We have a guide on the Top 3 Kuiper Shard Farming Locations in the First Descendant. We explain how to most efficiently farm Kuiper Shards (300-500k/hour) and show the amount you need to level up mods. As a summary, to max out a Module you need:
- Normal Modules: 103’100 Kuiper Shards
- Rare Modules: 206’200 Kuiper Shards
- Ultimate Modules: 309’300 Kuiper Shards
- Transcendent Modules: 515’500 Kuiper Shards
Always max out the most important Modules first, we will showcase the order below.
How to Reduce the Cost of Modules
To reduce the cost of Modules you need Crystallization Catalysts in The First Descendant. These require a lot of time investment, most builds won’t require you to get many if any at all (Budget Setup). But if you want to completely min-max you need to get plenty of them as technically, every slot can have a specific socket type to half the cost.
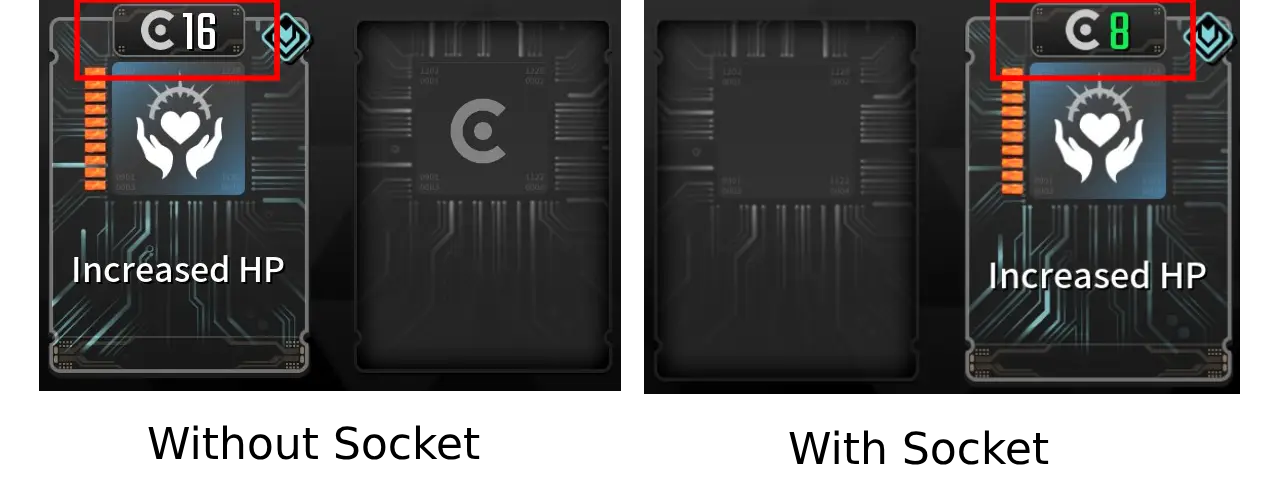
Modules have Socket Types. Our Increased HP Module has the Cerulean Socket Type.
- Module: Increased HP
- Socket Type: Cerulean
This is important because if we place our Increased HP Module in the fitting Socket Type, it will half the cost of the Module!
How to farm Modules in The First Descendant
Most The First Descendant Modules can be acquired fairly easily, but the higher-quality ones (Ultimate, Transcendent) are more tedious to obtain. Here is the easiest process to farm Modules quickly.
Open Map > Swap to Access Info > Select Modules
Here, you can find all Modules and their drop locations. If a module drops from several locations, it is recommended to select drop locations with higher drop chances.
There isn’t really much more to this. Simply check the location and go farm. Normal and Rare quality Modules have 30-50% drop chances in most cases. Ultimate ones range around the 5% mark and Transcendent ones can be a tough cookie with around 2% drop chance.
We will list the best farming location of modules in the next step of the guide.
Smooth Grapple Hook for your Dia Build
Using the standard Grapple Hook in The First Descendant can be a pain, and it feels kinda frustrating at times. Don’t worry, there is a way better alternative that will make it a joy to use the grappling hook!
It is called the Mid-Air Maneuvering Sub Module. I use this on all my The First Descendant Builds because it improves grappling by so much.
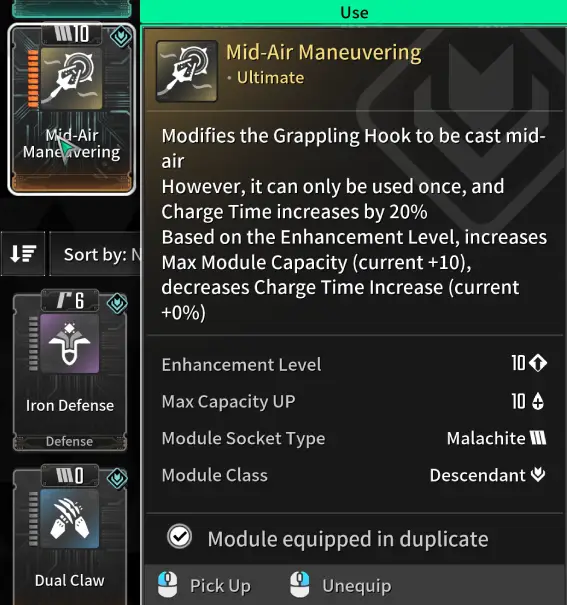
With this Module, you can attach your Grapple Hook to anything, even air! That means you can simply aim towards the sky and Hook up your grapple hook there for guaranteed fast movement!
Here is a guide on how to get the Mid-Air Maneuvering Sub Module in The First Descendant. It won’t take a lot of effort, but it will improve your build and overall gameplay in The First Descendant.
Dia’s Story in The First Descendant

X
Dia’s Exclusive Equipment –
Related Content
- The First Descendant Builds Database
- The First Descendant Bunny Build
- The First Descendant Ines Build
The post The First Descendant: Dia Build & Best Loadout appeared first on AlcastHQ.


