
BG3 Shadowheart Death Domain Build – The Lady of Loss

Welcome to the best Shadowheart Death Domain Build for BG3. This build is perfect for players who want to make a necromancy-themed party or an “evil playthrough” with Shadowheart in the group, or explore the dark path of Shadowheart’s storyline.
The Lady of Loss Build focuses on the Death Domain Cleric to summon undead and deal huge spikes of Necrotic Damage. We also augment it with a small amount of multiclassing – the Circle of Spores Druid in particular helps by increasing your Necrotic Damage.
We also have a regular Death Domain Build that is not centred on Shadowheart and doesn’t use any multiclassing. This build is up to date with the latest version of BG3 (Patch 8). You can find out how this build measures up to other Multiclass Builds on our BG3 Multiclass Builds Tier List.
Table of Contents:
- Shadowheart Death Cleric Build – First Steps
- Shadowheart Death Cleric Build Overview
- Character Creation – Level 1
- Shadowheart Death Cleric Levelling Guide (2-12)
- Shadowheart Death Cleric Best Equipment
- Shadowheart Death Cleric Extra Info
- Shadowheart Death Cleric Build FAQ
BG3 Shadowheart Death Cleric Build Strengths & Weaknesses:
SHADOWHEART DEATH CLERIC PROS
SHADOWHEART DEATH CLERIC CONS
BG3 Shadowheart Death Cleric Build Overview
BG3 Multiclass Explainer:
- How it works: New classes can be added as you level up. They are added on a level-by-level basis.
- Example: If you are a level 6 Cleric and decide to add 1 Druid level, you will only get the features of Druid level 1.
- Example 2: If you want the features of a level 6 Cleric and Druid, you need to be max level and add 6 levels of each class.
Pro Tip: It’s usually best to choose subclasses that work together easily. For example, the Cleric and Druid go well together because they both use Wisdom as their spellcasting attribute.
This means we have to be sure that the payoff of adding new classes to your build is worth it, because every level of a secondary class reduces the highest level we can reach with our primary class.
In this Shadowheart Multiclass Build, we’ll be combining the following classes:
- The Death Domain Cleric forms the core of the build; we’ll take 9 levels from this subclass.
- It gives you access to a wide range of spells, including damage, support and healing spells.
- Later on, you can summon undead minions to help you in combat. You get bonuses that increase your
 Necrotic Damage done.
- The Circle of Spores Druid supports the Death Domain Cleric by increasing the amount of damage you can do with Necrotic Damage.
- You can also use the
 Shillelagh Cantrip, boosting melee damage done with staves.
 - We’ll take two levels of the Druid, just enough to unlock the subclass.
- We’ll take just one level of the Fighter.
- This unlocks a Fighting Style, which slightly boosts either your attacking or defensive abilities.
- This is optional; you can instead add an extra Cleric or Druid level if you prefer.
Here is a quick overview of which class we pick when:
Shadowheart Death Cleric Levelling Progress Overview
- Level 1: Cleric 1 (Death Domain)
- Level 2: Cleric 2
- Level 3: Cleric 3
- Level 4: Cleric 4
- Level 5: Cleric 5
- Level 6: Druid 1
- Level 7: Druid 2 (Circle of Spores)
- Level 8: Cleric 6
- Level 9: Cleric 7
- Level 10: Cleric 8
- Level 11: Cleric 9
- Level 12: Fighter 1 OR Cleric 10 OR Druid 3
BG3 Shadowheart Death Cleric Build – First Steps

In this section, we will cover how to recruit Shadowheart and the essential steps to respec her into our powerful Death Domain setup. If you’re an experienced player, feel free to skip ahead to the next part.
How to Recruit Shadowheart in Baldur’s Gate 3
Shadowheart is likely the first companion you will encounter after the Nautiloid. While she is easy to find, rescuing her early provides a significant boost to your initial “approval” rating with her.
Step 1: The Nautiloid (Prologue)
- In the final room before the helm, you’ll find Shadowheart trapped in a pod.
- Go to the small side-room to the east.
- Loot the Eldritch Rune from the Dead Thrall.
- Insert the Rune into the console next to her pod to free her.
- Detailed Guide: How to recruit Shadowheart in BG3.
Step 2: The Ravaged Beach
- The Beach: Shadowheart lies unconscious on the sand directly in front of your starting position.
- The Dank Crypt: If not found on the beach, she is at the north end at the side-entrance to the Dank Crypt, banging on the stone doors.
- The Druid Grove: If you missed her twice, she will be sitting near the training area in the Emerald Grove.
Pro Tip: Rescuing her on the Nautiloid grants an immediate +10 Approval, making it easier to unlock her romance and story beats early.
How to Respec Shadowheart in BG3
Shadowheart starts with a poorly optimised ability distribution and with the wrong subclass, so we need to respec here ASAP. Follow these steps to do that:
Step 1: Unlock Withers (The Dank Crypt)
You need the NPC Withers to change classes. Find him early in Act 1:
- Withers Location: Inside the Dank Crypt.
- Access: Enter via the Chapel Entrance or the hole in the floor near the bandits.
- The Secret Room: Find the Skull Lever to open the secret door to gain access to the Dank Crypt. Defeat the skeletons.
- The Sarcophagus: Interact with the large coffin to wake Withers. He will now appear in your camp.
Step 2: The Respec Process
Once Withers is at your camp, follow these steps:
- Switch Character: Ensure you are controlling Shadowheart (not your main character).
- Talk to Withers: Select “Can you help me change my class?”
- Cost: 100 Gold.
- Class: Cleric
- Subclass: Death Domain
When to Respec? As soon as you have the gold spare. You don’t have to rush it, but as soon as you have done the respec, you’ll be able to easily follow along with the build guide below.
BG3 Shadowheart Death Cleric Character Creation (Level 1)

In this section, we will guide you through the best starting choices for creating your BG3 Shadowheart Death Cleric Multiclass Build.
Starting Class (Cleric)
We’ll start by choosing the Cleric class. The Druid and Fighter elements of the build will be added later.
The Cleric starts the game with the following features, which we’ll build on over the course of this guide:
Core Cleric Features
- Item Proficiency – Simple Weapons, Maces, Mourningstars, Light & Medium Armour, Shields
- Cleric Spellcasting – You start with two first-level spell slots. You can learn cantrips and spells from the Cleric spell list. You’ll unlock more as you level up.
- Subclass Choice – You must choose your Cleric subclass.
We’ll explain what to choose for these options below.
Race: High Half-Elf
Shadowheart is a High Half-Elf. This race isn’t actually that great, and there are better picks for Cleric Builds generally, but it’s not possible to change Shadowheart’s race without modding the game, so we’ll make the best of it.
High Half-Elf “Wizard” Cantrip (Pick One)
One positive of High Half-Elf is the ability to choose an extra Cantrip from the Wizard list. Since these use Intelligence, avoid damage spells (like Fire Bolt) as they will miss too often.
Instead, pick a Utility spell:
 Mage Hand: Manipulate objects and levers from a distance.
 Blade Ward: You take half damage from physical attacks for the next turn. Useful if you can’t make any good attacking or supportive plays on the current turn.
 Friends: Helps to pass dialogue checks.
More useful Racial Passives
 Darkvision: Removes attack penalties in dark environments, vital for landing
  Inflict Wounds and other attacks.
 Fey Ancestry: You have
  Advantage on
  Saving Throws against
  Charm and immunity to magical
  Sleep.
 Civil Militia: Grants proficiency with Spears, Pikes, Halberds, and Glaives, as well as Light Armour and Shields.
What is Advantage? When you have Advantage, you roll two dice and take the highest result. This significantly increases your success rate for critical saves and attacks.
Background & Skills
Shadowheart is locked into the Acolyte Background, which gives the following Skill Proficiencies:
Acolyte Background
 Insight
A Wisdom skill that allows you to read people and situations, sometimes unlocking extra info or rare dialogue options.
 Religion
An Intelligence skill that can give you more lore information about various locations, or unlock additional dialogue options.
You can manually choose two other Skills in addition to those granted by your Background. These choices are restricted to the Cleric Skill list.
You should get the  Medicine skill because it matches our build (we’ll be focusing on Wisdom). You can then choose any other skill from the remaining options.
If you’re a Human, you’ll get one extra unrestricted Skill Choice, which you should put in any remaining Charisma Skill.
Ability Points
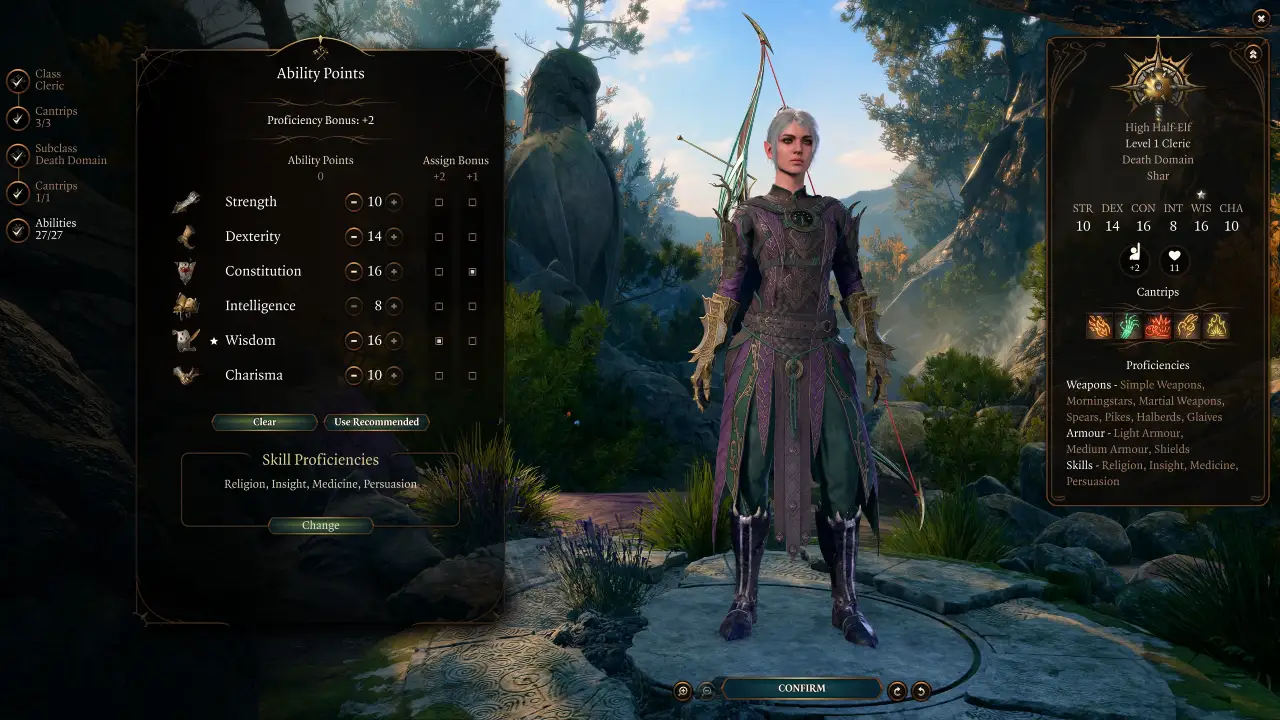
Wisdom will be our most important ability for the Shadowheart Death Cleric Build, because it’s used to determine the accuracy and damage of your spells (and later on, it will also boost melee attacks).
This is closely followed by Dexterity, which increases your Armour Class and a variety of Saving Throws.
The final important ability is Constitution, which increases our Hitpoints and improves our Concentration Checks.
 Strength – 10 Points
- Boosts melee attacks.
- Low priority for this build.
 Dexterity – 14 Points
- Affects your Initiative (how early you move in the turn compared to other characters).
- We’ll be using Medium Armour, so increasing Dexterity higher than 14 gives no further benefit to your Armour Class.
 Constitution – 16 Points
- Increases Max HP.
- Helps you to maintain Concentration Spells when you take damage.
- Provides some resistance to a wide range of debilitating debuffs.
 Intelligence – 8 Points
- Not relevant for our build.
 Wisdom – 16 Points
- Improves your spell accuracy/success chance.
- When you unlock the Shillelagh Cantrip later in the build, you can use Wisdom instead of Strength for melee Attack Rolls.
 Charisma – 10 Points
- Helps with dialogue checks, but low importance for this build.
| Ability | Points | Why it matters |
|---|---|---|
| Strength |
10 | Boosts melee attacks, jump distance and carry weight. Low priority for this build. |
| Dexterity |
14 | Boosts Initiative and Armour Class. We’ll use Medium Armour, so there’s no AC benefit above 14 Dexterity. |
| Constitution |
16 | Important: Increases HP and helps with Concentration checks for spells. |
| Intelligence |
8 | Not relevant for our build. |
| Wisdom |
16 | Increases success chance of spells. When you unlock Shillelagh, you can also roll melee attacks with Wisdom. |
| Charisma |
10 | Boosts Cantrips, Spells and dialogue checks. Low importance for this build. |
Important Tips:
- The “Even Number” Rule: In Baldur’s Gate 3, only even numbers (12, 14, 16) increase your ability modifier. This means an 11 is functionally the same as a 10, so we aim for even numbers to maximise efficiency.
- Concentration is Key: Many important Cleric spells (like
 Hold Person) require Concentration. A high Constitution helps ensure you don’t lose your spell just because you took a hit.
Cantrips
In the Class menu, choose three Cantrips to start with. We recommend getting the following Cantrips:

- Gives a 1d4 bonus to most non-combat dice rolls.
- Can be cast on yourself or allies and activated from within the dice roll screen.

- Deals 1d8 Necrotic Damage at long range, unless the enemy rolls a successful Wisdom Save.
- The damage is increased to 1d12 against enemies who are below full health.

- Target a corpse and cause it to explode, dealing 1d10
 Piercing Damage to nearby enemies who fail the Dexterity Saving Throw.
 - A decent situational AoE option.
Spells
You’ll need to choose four Spells to prepare, from a list of 10 known Spells. We recommend choosing the following Spells:

- A strong ranged projectile that deals up to 24
 Radiant Damage and gives the next person to attack the target Advantage.

- Useful for healing yourself or your allies.
- It’s better than
 Cure Wounds, despite the latter spell’s slightly higher healing cap, because it can be cast over a distance and only consumes a
  Bonus Action.
- Target up to three Allies, giving them a buff on
 Attack Rolls and Saving Throws.
 - Note that this is a Concentration Spell, so casting it will break any other Concentration effect you have active.
- Use this when fighting tougher early-game enemies like the Gnolls on Risen Road – it’s going to help a lot while you’re stuck with weak early-game weapons.
- Deals up to 30 Necrotic damage to an enemy. It can be upcast for more damage later in the game.
- With the Death Domain subclass boosting Necrotic Damage, we’ll be focusing on this spell quite a lot.
If you don’t know what we mean by terms like Advantage, Concentration or Saving Throw, or want to find out how systems like Stealth work, you will find our BG3 Hidden Mechanics Guide very useful.
Subclass – Death Domain
You must choose your Cleric subclass immediately upon performing Shadowheart’s respec. For this build, we are using Death Domain, which focuses on dealing Necrotic Damage to enemies.
The Death Domain subclass starts with the following features:
Death Domain Features
 Martial Weapons Proficiency
 Reaper – Necromancy Cantrips that target one creature can now instead target two.
- Death Domain Cantrip – Choose one of three Necromancy Cantrips to unlock. I recommend choosing
 Bone Chill because it gives the Cleric a reliable Cantrip that uses an Attack Roll, something this class normally lacks.
 - Death Domain Spells – You unlock two spells – they are always prepared:
 False Life – Give yourself some Temporary HP. This is a very weak spell, but regardless, it comes with the Death Domain subclass.
 Ray of Sickness – Deals a decent chunk of
  Poison Damage and can
  Poison the enemy, temporarily making them much weaker.
- More features will be unlocked as you level up.
BG3 Shadowheart Death Cleric Build Levelling Guide (2-12)
Now, we are going to look at how to level up your Shadowheart Death Cleric Build for Baldur’s Gate 3.
Early-Game Levelling (2-4)
In this section, we’ll cover the first four levels.
Level 2

For the first few levels, we’ll be sticking with the Cleric class. At level 2, you’ll unlock the following features:
Death Domain Cleric Features

- Attempt to
 Turn all Undead who can see you, causing them to flee.

- When you hit a creature with a melee attack (including melee spell Attack Rolls like Inflict Wounds), you can spend a Channel Divinity charge to deal Necrotic Damage.
- The amount of damage is calculated by the formula 5 + 2*(Cleric Level). So, to begin with, this will deal 9 damage, increasing by 2 at every level.
- Remember to double-check your Reaction settings so that you are asked when you want to activate Touch of Death.
Cleric Spell
You can choose another Cleric spell to learn. We recommend:

- Attempt to force the target to carry out a command on their turn. Some useful options include telling them to stay put and do nothing, drop their weapon, or fall to the ground.
- While this only lasts for 1 turn, it doesn’t require Concentration, so it can be safely used in conjunction with any spell in the game.
Level 3
At Cleric Level 3, you unlock these new features:
Death Domain Spells
You unlock two new Death Domain spells, which are automatically learned and always prepared.

- Attempt to
 Blind the target.
 - If successful, the target has a much lower attack accuracy and is more likely to be hit by your attacks.
- The target becomes
 Feeble for up to 10 turns.
 - Their Strength-based attacks deal half damage.
- This spell works best against melee heavy-hitters.
New Cleric Spell
In addition, you can choose another Cleric spell to prepare. You now have access to second-level spells. We recommend:

- Increase your Maximum HP and that of all nearby allies (party members and summons) by 5. Lasts until the next Long Rest.
- Later on, you should upcast the spell to get another 5 HP per spell slot level.
- I recommend casting this spell after every Long Rest.
Level 4
At Level 4, you get one more spell and a Feat.

New Cleric Spell
Choose one more Cleric spell to prepare:
- Freezes the target in place for up to 10 turns (requires Concentration).
- While active, the target cannot move or attack. Melee attacks against them are guaranteed Critical Hits.
I also want to draw your attention to the  Prayer of Healing spell. This can give your whole party a big heal outside of combat, but since it cannot be used in combat, you should only slot it when you need to use it, then switch back to another spell.
New Feat
You can choose a Feat to make your Shadowheart Death Cleric better in combat.
For now, we are going to use Ability Improvement:
- Gives you two additional Ability Points.
- Put them both into Wisdom, improving your spellcasting.
Later on, we will replace this Feat. But for the time being, it’s going to give you lots of extra damage and momentum.
Mid-Game Levelling (5-8)
In this section, we’ll cover the mid-game. During these levels, the Shadowheart Death Cleric Build will become much more powerful, accessing a wider array of spells and features.
Level 5
At Level 5, we get quite a few new features and can access third-level spells.
Cleric Features

- An upgrade to the Turn Undead feature we obtained at Level 2.
- Undead creatures Turned by you will now take 4d6 Radiant Damage.
New Cleric Spell
You now have access to Third-Level spells, and can choose one to unlock. Our recommendation is:
- Surround yourself with spirits who follow you around.
- The spirits attack any enemies who move close to you, dealing Radiant or Necrotic damage.
Death Domain Spells
The Death Domain gives you two more spells that are automatically Prepared at all times.

- Target a corpse to raise a Skeleton or a Zombie.
- Later on, you will be able to upcast this spell to raise more powerful undead, or packs of undead.

- Deal 3d6 Necrotic Damage as a melee Attack Roll, and restore half of the damage done to yourself as HP.
- If you maintain Concentration, you can recast the effect every turn without spending another Spell Slot.
- This is another spell that can activate the Death Domain Cleric’s Touch of Death feature.
Level 6

We’ll now add a Druid level to the Shadowheart Death Domain Build. Check the image above if you don’t know how to add a new class to your build.
Druid Cantrips
You can choose two Druid Cantrips to unlock. It’s essential to choose Shillelagh, but the second Cantrip is unimportant.
- Your staff is imbued with magical attacks, dealing 1d8 damage when you hit an enemy with a melee attack.
- While this effect is active, you will make melee Attack Rolls with Wisdom instead of Strength, making your attacks more accurate.
Druid Spells
If you followed the guide accurately so far, you should be able to select five Druid spells to learn. Just like Cleric spells, they are cast with Wisdom, so they fit into the build perfectly.
The following are the most useful options for the Shadowheart Death Cleric Build:

- Triple the target’s jumping distance.
- Very good for getting to places that are hard to reach, or outmanoeuvring enemies.
- It doesn’t cost a Spell Slot if cast outside of combat.

- All targets in the area who fail the Saving Throw are illuminated.
- Attack Rolls against affected targets have Advantage, and any hidden or invisible targets are revealed.
- This can also debuff your allies, so be careful.

- Increase the target’s Movement Speed until the next Long Rest.
- This does not require Concentration and doesn’t cost a Spell Slot outside of combat. You can cast it on several characters consecutively.
- Therefore, I recommend putting it on everyone in your party (and any long-lasting summons) after every Long Rest.

- Allows you to communicate with animals until the next Long Rest.
- Doesn’t cost a Spell Slot if cast outside combat.

- Deals
 Thunder Damage in a cone-shaped AoE.
 - Any targets who fail a Strength Saving Throw are pushed back.
- Can knock targets off high ledges for massive falling damage.
Level 7

We’ll add one more Druid level here, enough to unlock the Circle of Spores subclass, which grants a bonus to Necrotic Damage.
Druid Features

- You can spend Wild Shape charges to assume the form of a Badger, Cat, Spider or Wolf.
- Each animal has different stats and features.
- When you “die” in animal form, you return to your normal form with the HP you had before transforming.
Druid Subclass – Circle of the Spores
We highly recommend the Circle of the Spores subclass because it is the only option that boosts this build’s playstyle (focusing on Necrotic Damage). It gives you the following features:

- Spend your
 Reaction to deal Necrotic Damage to a target within 6 metres.
 - The target will attempt a Constitution Saving Throw to block the damage.
- This yields fairly consistent additional damage. But it means you won’t be able to perform Opportunist Attack or any other reactions this turn.
- Gain some Temporary HP.
- While the THP persists, your melee weapon attacks deal 1d6 additional Necrotic Damage, and your Halo of Spores damage is doubled.
- Each activation costs a Wild Shape charge. It’s best to activate this before combat so you don’t waste a turn.
Level 8

We’ll now return to adding Cleric levels to the Shadowheart Death Cleric Build.
The sixth Cleric level grants:
New Death Cleric Feature:

- You ignore Resistance to Necrotic Damage.
You can also unlock a new spell. We recommend:
New Cleric Spell
- Create a glyph that explodes when stepped on.
- The glyph can deal a chosen type of elemental damage or put a group of enemies into a magical Sleep.
Late-Game Levelling (9-12)
As we move into the final few levels for the Shadowheart Death Cleric Build, you’ll continue to gain more powerful spells and features.
Level 9
We will add another Cleric level, unlocking several new spells.
New Death Domain Spells:

- Deal 8d8 Necrotic Damage.
- Targets who perform a successful Constitution Saving Throw will still take half of the damage.

- Wards the target against death.
- When they are reduced to 0HP, they heal by 1HP instead of being
 Downed.
 - Quite niche, but has some use on Honour mode, in which case it can save you from a party wipe (but often your ally just dies immediately after the ward is used up).
You can then choose another Cleric spell to learn:

Level 10
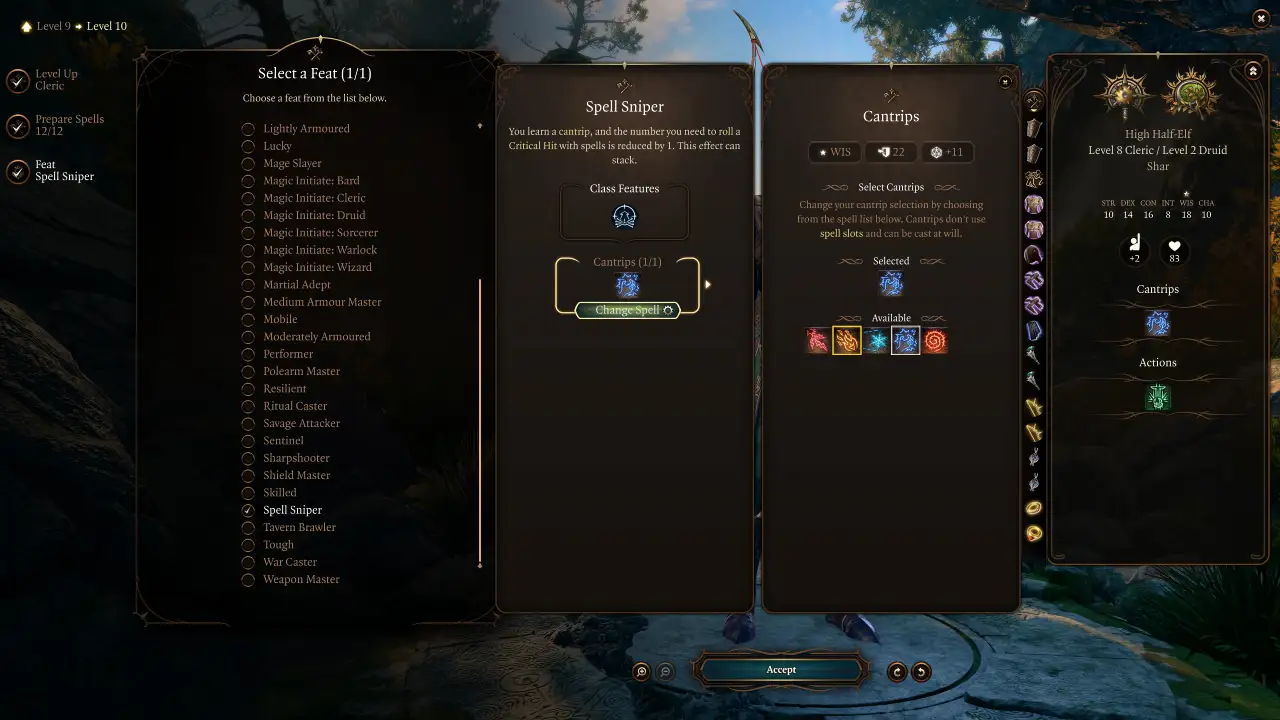
We’ll add another Cleric level here, taking the total to Cleric 8, Druid 2.
First, let’s choose a new spell:
New Cleric Spell

- Snap an ally out of a stun, and prevent them from being
 Paralysed or
  Restrained.
 - This can be a lifesaver, but the downside is that you have to stand next to the target to cast it.
Choose a Feat – You can choose one more Feat for your Shadowheart Death Cleric. You have two options here:
- Get another helping of Ability Improvement and put both points into Wisdom. This will slightly boost your spell success rate and melee attacks (when using Shillelagh).
- Get Spell Sniper, which makes Attack Roll spells like Inflict Wounds more likely to crit.
- Both of these options are roughly equal in power. Personally, I chose Spell Sniper because I find it more fun to build into critical hits.
Level 11
We’ll now add the ninth Cleric level to the build, unlocking fifth-level spells.
Death Domain Spells

- Summon a very large cloud that deals 5d8 Poison Damage per turn to those within.
- Creatures can roll a Constitution Save to halve the damage.
- If you maintain Concentration, you can reposition the cloud on subsequent turns.
- If you lose Concentration, the cloud disappears immediately!

- A complicated spell that can permanently afflict a creature with one of six diseases.
- The Mindfire variant is particularly interesting because the victim becomes Confused and attacks its allies.
- The creature will roll up to six Saving Throws. Accumulating three failures will apply the selected disease, while three successes results in recovery.
- Casting this in combat is very impractical; it’s normally used by more adventurous players to mess with NPCs before combat starts.
- Afflicting a creature with the spell doesn’t trigger hostility, but trying to cast it and missing the initial Attack Roll can lead to combat.
New Cleric Spell

- Summon a very large cloud of insects that deals 4d10 Piercing Damage per turn to those within.
- The cloud counts as difficult terrain, slowing down those within.
- Targets can roll a Constitution Save to halve the damage.
- Maintaining the cloud requires Concentration.
Level 12

For the final level, we will add one level from the Fighter class to the build.
Fighter Class Starting Features

- Spend a Bonus Action to heal yourself.
- Once per Short Rest.
Fighting Style
- Specialise in a Fighting Style, gaining a small bonus depending on your choice.
- Any of these three options are useful:
 Duelling – Gives +2 damage to your melee weapon, as long as it is one-handed and there is no weapon in your other hand (a shield is fine).
 Defence – Gives you a +1 bonus to Armour Class when you are wearing armour.
 Protection – With a shield equipped, you can spend your Reaction to impose
  Disadvantage on an Attack Roll made against an ally within 1.5 metres of you. This can be used to protect your party members or your undead summons.
ALTERNATIVE: You can instead add a tenth Cleric level or a third Druid level.
BG3 Shadowheart Death Cleric Build Equipment

Now, let us take a look at some of the equipment choices you can make for your BG3 Shadowheart Death Cleric Build.
Don’t worry if you miss out on some of the items. Just enjoy your playthrough and try to view this as a wishlist rather than a precise blueprint. The names of the most essential, build-defining items are written in Bold Italic.
Some of the items are quite expensive – you may be interested in our BG3 Infinite Gold Guide to help you afford them all.
Early Game Equipment
This is the early-game gear setup that you can use for the Shadowheart Death Cleric Build. You don’t need to get all the items, but the build will perform better if you find most or all of them. You can find these items in Act 1 or early Act 2. Essential items are written in Bold Italic.
| Slot | Icon | Item | Effects | Location |
|---|---|---|---|---|
| Head |  |
Holy Lance Helm |
|
In a painted chest on the top level of Rosymorn Monastery |
| Cloak |  |
Cloak of Protection |
|
Purchased from Quartermaster Talli in Last Light Inn |
| Chest |  |
Adamantine Scale Mail |
|
Crafted at the Adamantine Forge. Requires Mithral Ore and the Scale Mail Mould |
| Gloves |  |
Swordmaster Gloves |
|
Sold by Dammon at Last Last Light Inn |
| Boots |  |
Boots of Speed |
|
Given by Thulla in the Myconid Colony as thanks for curing her from poison. |
| Necklace |  |
Amulet of Restoration |
|
Sold by Derryth Bonecloak in the Underdark, near the Myconid Colony. |
| Ring 1 |  |
Ring of Protection |
|
Complete Mol’s quest to steal the sacred idol in the Druid Grove. |
| Ring 2 |  |
The Whispering Promise |
|
Sold by either Volo or Grat the Trader. |
| Melee Weapon |  |
Staff of Arcane Blessing |
|
Leaning against a table in the basement of the Arcane Tower, in the Underdark. |
| Shield |  |
Safeguard Shield |
|
Sold by Dammon in the Druid Grove |
| Ranged Weapon |  |
Bow of Awareness |
|
Sold by Roah Moonglow in Shattered Sanctum |
Head: Holy Lance Helm
- Enemies who miss you with an Attack Roll must succeed on a DEX Save or take 1d4 Radiant Damage.
- +1 to Constitution Saving Throws (helps you to maintain spell concentration)
- In a painted chest on the top level of Rosymorn Monastery
Cloak: Cloak of Protection
- +1 to
 Armour Class and Saving Throws
 - Purchased from Quartermaster Talli in Last Light Inn
Chest:  Adamantine Splint Armour
- Enemies cannot land Critical Hits on you
- Reduces all incoming damage by 2
- Melee attackers are sent
 Reeling, reducing their Attack Rolls by 1
 - Must be crafted at the Adamantine Forge.
Hands: Swordmaster Gloves
- +1 bonus to Attack Rolls
- Gives Proficiency with all types of swords
- Sold by Dammon at Last Last Light Inn
Feet: Boots of Speed
- Grants
 Click Heels, allowing you to boost your Movement Speed.
 - Works well with the
 Spirit Guardians spell.
 - Given by Thulla in the Myconid Colony as thanks for curing her from poison.
Necklace: Amulet of Restoration
- Can cast Healing Word and Mass Healing Word for free, once each per Long Rest.
- Excellent combo with Whispering Promise and Staff of Arcane Blessing.
- Sold by Derryth Bonecloak in the Underdark, near the Myconid Colony.
Ring 1: Ring of Protection
- +1 to Armour Class and Saving Throws
- Can use Crusher’s Ring instead if you don’t want to do the required quest.
- Complete Mol’s quest to steal the sacred idol in the Druid Grove.
Ring 2: The Whispering Promise
- When you heal a creature, they are
 Blessed for 2 turns, giving them a 1d4 bonus to Attack Rolls and Saving Throws.
 - Sold by either Volo or Grat the Trader.
Melee Weapon: Staff of Arcane Blessing
- When you Bless a creature, they also gain Mystra’s Blessing for 10 turns, granting an additional 1d4 bonus to Spell Attack Rolls.
- Use on any Attack Roll spellcaster (including yourself) to boost spells and cantrips like Inflict Wounds,
 Fire Bolt or
  Eldritch Blast.
 - Leaning against a table in the basement of the Arcane Tower, in the Underdark.
Shield: Safeguard Shield
- +2 to Armour Class
- +1 to all Saving Throws
- Sold by Dammon in the Druid Grove
Ranged Weapon: Bow of Awareness
- +1 bonus to Initiative Rolls, allowing you to move earlier in the turn.
- Sold by Roah Moonglow in Shattered Sanctum
The most important item combo here is the combination of Amulet of Restoration, The Whispering Promise and Staff of Arcane Blessing. This allows you to deal out significant buffs to attacks, spells and saving throws for your whole party, and it is especially strong for anyone using spell attack rolls (such as Inflict Wounds).
Also notable is the inclusion of defensive items like Holy Lance Helm, Cloak of Protection, Ring of Protection and Safeguard Shield, all of which make it easier for you to succeed Concentration Saving Throws, which is very important for Clerics like Shadowheart who have a lot of powerful Concentration Spells.
Endgame Equipment
The endgame gear for the Shadowheart Death Cleric can be obtained either in late Act 2 or Act 3 of Baldur’s Gate 3. If you manage to complete all the items below, you will be an unstoppable force of power. Essential items are written in Bold Italic.
| Slot | Icon | Item | Effects | Location |
|---|---|---|---|---|
| Head |  |
Hood of the Weave |
|
Sold by Mystic Carrion in Philgrave’s Mansion |
| Cloak |  |
Cloak of Displacement |
|
Sold at Danthelon’s Dancing Axe in Wyrm’s Crossing. |
| Chest |  |
Armour of the Sporekeeper |
|
Sold by Mystic Carrion in Philgrave’s Mansion |
| Gloves |  |
Blackguard Gauntlets |
|
Loot from That Which Watches in the Murder Tribunal |
| Boots |  |
Helldusk Boots |
|
In a locked Gilded Chest on the top floor of Wyrm’s Rock Fortress |
| Necklace |  |
Amulet of the Devout |
|
In the offering chest in Stormshore Tabernacle. |
| Ring 1 |  |
Ring of Feywild Sparks |
|
Looted from Auntie Ethel in Act III |
| Ring 2 |  |
Callous Glow Ring |
|
In the vault room near Balthazar, Gauntlet of Shar. The lock is very high DC, but the Knock spell can open it. |
| Main Weapon |  |
Staff of Cherished Necromancy |
|
Carried by Mystic Carrion in Philgrave’s Mansion. |
| Shield |  |
Viconia’s Walking Fortress |
|
Looted from Viconia DeVir in the Cloister of Sombre Embrace |
| Second Weapon |  |
The Dead Shot |
|
Sold by Fytz the Firecracker in Stormshore Armoury |
Head: Hood of the Weave
- +2 bonus to your Spell Save DC and Spell Attack Rolls
- Sold by Mystic Carrion in Philgrave’s Mansion
Cloak: Cloak of Displacement
- Attack Rolls against you have Disadvantage, unless you have taken damage on the current turn.
- Sold at Danthelon’s Dancing Axe in Wyrm’s Crossing.
Chest: Armour of the Sporekeeper
- You gain +1 to Spell Save DC. All your Necrotic Damage dealt is increased by 1.
- When imbued with
 Symbiotic Entity, you can spread Bibberbang Spores (poison targets), Timmask Spores (confuse targets), or Haste Spores (grant the
  Hastened buff).
 - Sold by Mystic Carrion in Philgrave’s Mansion
Hands: Blackguard Gauntlets
- +1 to Strength Saving Throws
- +1 to Attack Rolls
- Cast Inflict Wounds at Fourth Level once per Long Rest (doesn’t use a Spell Slot)
- Loot from That Which Watches in the Murder Tribunal
Feet: Helldusk Boots
- You are immune to Difficult Terrain
- You cannot be forcibly moved by enemy spells or actions
- You can use
 Hellcrawler to teleport and deal
  Fire Damage
 - Found in Gortash’s personal chest at the top of Wyrm’s Rock Fortress
Necklace: Amulet of the Devout
- +2 to Spell Save DC
- +1 Channel Divinity Charge
- In the offering chest in Stormshore Tabernacle.
Ring 1: Ring of Feywild Sparks
- Applies a +1 bonus to Spell Save DC (the tooltip doesn’t mention it)
- Looted from Auntie Ethel in Act III
Ring 2: Callous Glow Ring
- You deal 2 extra damage against illuminated creatures.
- The buff applies to almost every separate damage source you deal, so you usually get much more than 2 damage in total.
- Have one of your party members cast the
 Light cantrip (or something similar) to ensure it is activated in dark areas.
 - In the vault room near Balthazar, Gauntlet of Shar. The lock is very high DC, but the Knock spell can open it.
Melee Weapon: Staff of Cherished Necromancy
- Creatures have Disadvantage on Saving Throws against your Necromancy spells.
- Killing a hostile creature with a spell gives you
 Life Essence, allowing you to cast your next Necromancy Spell without spending a Spell Slot.
 - This effect can be used an unlimited number of times! However, a spell cast with Life Essence cannot grant another stack of Life Essence.
- Carried by Mystic Carrion in Philgrave’s Mansion.
Shield: Viconia’s Walking Fortress
- +3 Armour Class
- When a foe hits you, you can use your Reaction to bash them, dealing 2d4
 Force Damage and knocking them
  Prone
Prone - Advantage on Saving Throws against Spells. Spell Attack Rolls against you have Disadvantage
- Looted from Viconia DeVir in the Cloister of Sombre Embrace
Ranged Weapon: The Dead Shot
- Reduces the Attack Roll needed to Crit by 1
- The bonus applies to all Attack Rolls, not just those made with the bow.
- Shadowheart doesn’t have Proficiency with Longbows, so if you actually want to use the bow instead of just having it to buff critical chance, swap this out.
- Sold by Fytz the Firecracker in Stormshore Armoury
Here is a summary of how these items work together to boost this Shadowheart Death Cleric Build for Baldur’s Gate 3:
Attacking Items:
- Hood of the Weave – Boosts your accuracy with spells, and makes it harder for enemies to win Saving Throws against them.
- Blackguard Gauntlets – Boosts your accuracy with Attack Rolls, including spell Attack Rolls.
- Amulet of the Devout – Makes it significantly harder for enemies to win their Saving Throws against your spells.
- Callous Glow Ring – Can rack up huge amounts of bonus damage when you attack illuminated enemies.
- The Dead Shot – Increases your Critical Hit chance.
Defensive Items:
- Cloak of Displacement – Makes you much harder to hit with Attack Rolls.
- Helldusk Boots – Stops you from being forcefully moved and allows you to succeed a failed Saving Throw once per turn.
- Viconia’s Walking Fortress – The strongest shield in the game – +3 to Armour Class and lets you retailiate against attackers.
Mobility & Utility:
- Armour of the Sporekeeper – Gives you a small damage boost and lets you emit spores to buff allies and confuse enemies.
- Staff of Cherished Necromancy – Can be viewed as the “engine” of the build, making it very hard for enemies to succeed Saving Throws against your Necromancy spells, and allowing you to cast a Necromancy Spell for free after killing an enemy with any other spell.
Shadowheart Death Cleric Build Extra Info
Here is some extra information that will help you to get the most out of this Shadowheart Death Cleric Build in Baldur’s Gate 3.
Best Potions and Elixirs for the Shadowheart Death Cleric Build
All of these potions are great choices for the Shadowheart Death Cleric, and I recommend stockpiling a few of each when you can:
 Potion of Speed – Gives you Haste for 3 turns, granting an extra
  Action on each turn. This is ideal for hitting enemies fast and hard at the start of combat. Beware that when the effect ends, you’ll become
  Lethargic and be forced to skip a turn.
- To craft: Combine Ashes of Hyena Ear with any Salt.
 Elixir of Bloodlust – When you kill an enemy, you get an additional Action.
- To craft: Combine Ashes of Worg Fang with any Salt.
 Elixir of Viciousness – Reduces the number required for a Critical Hit by 1. The Bloodlust Elixir is stronger, but this is a good backup choice.
- To craft: Combine Vitriol of Shadowroot Sac with any Ashes.
Mirror of Loss Choice (Optional)
If you access the Mirror of Loss during your playthrough, you can get two additional ability points to allocate.
It’s best to put the points into Wisdom to further improve your spellcasting and staff attacks (with Shillelagh).
To learn more about the Mirror of Loss and how to use it to make your party stronger, see our Mirror of Loss Guide.
How to Play this Shadowheart Death Cleric Build
This build is focused on making the Inflict Wounds spell as accurate and deadly as possible. This is a melee spell that deals a big chunk of Necrotic Damage to the target, and because it uses an Attack Roll, it can also crit for even more damage.
The issue with this is you’ll burn through your spell slots too quickly if you cast a spell every turn, so sometimes you’ll need to use Cantrips like Bone Chill instead. When you add the Druid class to the build, you can also use the Shillelagh cantrip to make melee staff attacks with Wisdom instead of Strength, making them much more accurate.
Later on, when you can obtain the Staff of Cherished Necromancy, you can get Inflict Wounds casts for free after killing a creature with one of your spells.
Remember that you can also upcast Inflict Wounds, along with most other spells, to increase their damage or make their effects stronger.
While the focus of this build is dealing single-target damage with Inflict Wounds, you also have good AoE damage potential with spells like Spirit Guardians and  Glyph of Warding, and you can support your team in many other ways, such as healing allies, buffing them with Bless or stunning enemies with Hold Person.
Shadowheart Death Cleric Build Illithid Powers (optional)
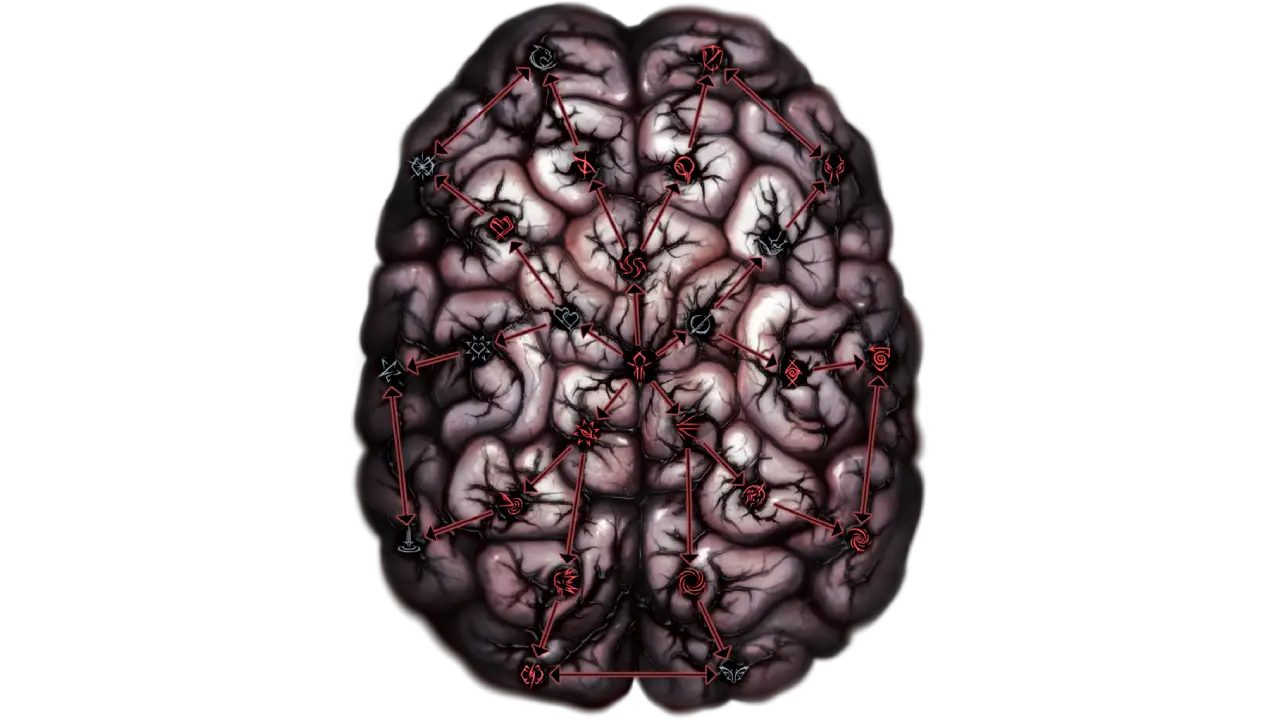
Illithid Powers are unlocked later in BG3 when you learn more about Mind Flayers and Tadpoles. By eating Jars of Mind Flayer Parasites you gain one point. This is another optional skill tree that you can get access to if you want. Here are some of the best Illithid Powers for the BG3 Shadowheart Death Cleric Build:

- Allows you to deal extra damage to a target when you are Concentrating on a spell, potentially also healing if the target is Concentrating too.

- When you reduce a creature’s hit points below a certain threshold, this power instantly kills it and deals 1-4 Psychic Damage to nearby enemies.
- This is particularly effective when engaging groups of weaker foes, enabling you to thin their numbers rapidly.

- This can be used to reach hard-to-get-to places or change positions in combat.

- This power creates an area-based effect that pulls in and slows targets.
- It’s particularly useful for crowd control, allowing you to cluster enemies together for area-of-effect attacks or to isolate them from vulnerable allies.
Pro Tip: Try getting the Haste buff from a Potion of Speed or the Haste spell (lets you perform 2 Actions on one turn), then casting Black Hole and then Hunger of Hadar to cause a world of pain for a group of enemies.

- This is a top-tier reaction from the Illithid Powers skill tree in BG3.
- This allows you to deal psychic damage when a nearby enemy casts a spell.
- This is especially useful if the target is casting a Concentration Spell.
- The damage from Psionic Backlash can immediately break their Concentration, ending the spell’s effects.
Shadowheart Death Cleric Build FAQs
Here are some frequently asked questions related to the BG3 Shadowheart Death Cleric Build. Most of these questions have already been answered in the guide itself.
- Is Multiclassing Worth It?
- What roles can the Shadowheart Death Cleric fill in my party?
- What abilities are most important for the Shadowheart Death Cleric?
- Which subclasses should I use?
FAQ: Is Multiclassing Worth It?
Multiclassing in BG3, done correctly, is significantly stronger than using a single class for your build.
Combining several classes that complement each other is essential for proper use of multiclassing. For example, we mixed the Cleric and Druid classes, which works well because they both cast spells with Wisdom. Furthermore, the Circle of Spores Druid boosts Necrotic Damage, which is the main focus of the Death Domain Cleric subclass.
FAQ: What roles can the Shadowheart Death Cleric fill in my party?
The Shadowheart Death Cleric is an all-rounder who leans towards melee damage.
With this setup, Shadowheart has very good single-target damage potential with the Inflict Wounds spell, but can also heal and support her team or hinder enemies with debuffs and stuns when needed.
FAQ: What Abilities are most important for the Shadowheart Death Cleric?
- Wisdom is the most important ability for the Shadowheart Death Cleric. It boosts the damage and accuracy of your spells (and also your melee weapon attacks once you unlock the Shillelagh cantrip).
- Constitution is another very important ability. It improves your HP and helps you to maintain Concentration when you take damage.
- Dexterity is the third most important ability for the build. It improves your Armour Class, allows you to move earlier in the turn order and helps with some Saving Throws.
FAQ: Which Cleric and Druid subclasses should I use?
- For the Cleric, we are using the Death Domain, which unlocks additional necromancy-themed cantrips and spells and allows you to deal more necrotic damage.
- For the Druid, we’re using Circle of the Spores, which also boosts your necrotic damage output, making for an excellent combo.
Related Guides for Baldur’s Gate 3






The post BG3 Shadowheart Death Domain Build – The Lady of Loss appeared first on AlcastHQ.